Displaying Mysql Tables in PHP

Once you have a Mysql database setup with a table and some data in that table you are ready to display the data through PHP. This is very easy to do not only efficiently but also with a clean design in mind.

So let’s say this is your MySQL table:

Categories
Id, Title, Description, Timestamp

Once you have a Mysql database setup with a table and some data in that table you are ready to display the data through PHP. This is very easy to do not only efficiently but also with a clean design in mind.

Here is a basic Mysql command to grab all the data in our table “categories”:

[codesyntax lang=”php”]
<?php

$query = “SELECT * FROM categories ORDER BY id DESC”;
$sql = mysql_query($query) or die(mysql_error());
$count = mysql_num_rows($sql);

?>
[/codesyntax]

This will grab all the data out of the table “categories” in descending order by the ID. Now let’s say we want to display this in a table with headers and organization. Here is an easy example of how to do this:

[codesyntax lang=”php”]
<?php

if($count > 0){
// rows were returned by the query
// set up the table opener and headers
echo ‘<table width=”100%” align=”center” border=”0″ cellpadding=”2″ cellspacing=”0″ class=”data_table”>’;
echo ‘<tr>’;
// headers
echo ‘<th align=”left”>Title</th>’;
echo ‘<th align=”left”>Description</th>’;
echo ‘<th align=”left”>Posted Date</th>’;
echo ‘</tr>’;
for($i=0;$i<=$count;$i++){
while($row = mysql_fetch_array($sql)){
// go through all the returned rows and print the fields
echo ‘<tr>’;
if($i%2==0){
// apply row styles
echo ‘<td align=”left” class=”td_alt2″>’.$row[‘title’].'</td>’;
echo ‘<td align=”left” class=”td_alt2″>’.substr($row[‘description’],0,200).”;
// shorten to 200 characters
if(strlen($row[‘description’]) > 200){
echo ‘…’;
}
echo ‘</td>’;
echo ‘<td align=”left” class=”td_alt2″>’.date(“m/d/Y”,$row[‘timestamp’]).'</td>’;
} else {
echo ‘<td align=”left” class=”td_alt1″>’.$row[‘title’].'</td>’;
echo ‘<td align=”left” class=”td_alt1″>’.substr($row[‘description’],0,200).”;
// shorten to 200 characters
if(strlen($row[‘description’]) > 200){
echo ‘…’;
}
echo ‘</td>’;
echo ‘<td align=”left” class=”td_alt1″>’.date(“m/d/Y”,$row[‘timestamp’]).'</td>’;
}
echo ‘</tr>’;
}
}
echo ‘</table>’;
} else {
echo ‘No entries found, please try again.’;
}

?>[/codesyntax]

This will output something like so:

Title Description Posted Date
Data 1 Title Data 1 Description Data 1 Date
Data 2 Title Data 2 Description Data 2 Date
Data 3 Title Data 3 Description Data 3 Date
Data 4 Title Data 4 Description Data 4 Date
Data 5 Title Data 5 Description Data 5 Date
Filed under: MySQL, PHP, Web ProgrammingTagged with: , , , , , ,

Digital Point Forums

If you are a web developer, designer, programmer, or just a user of the web then you should probably be a member of the Digital Point Forums. Here you will find web masters by the thousands who post and discuss topics all related to online function. Whether you run your own website, are looking to, or are just curious about the way the internet works – this is a great forum to be a part of.

The forums cover a range of categories such as:

  • Search Engines
  • Online Marketing
  • Running a Business
  • Web Design & Development
  • Helpful Products & Tools
Digital Point Forums Index

I personally use Digital Point for learning more on online marketing techniques, link exchange and link building, programming ideas, and primarily – buying and selling services.

Click here to contact me on Digital Point for your web development needs!

On Digital Point users’ reputations go by their “Feedback Score” which is the positive or negative value each user has which comes from their business on the forums. When a user receives negative feedback – i.e. the user did not meet expectations or did not complete their work – then their feedback score is lowered, and vice versus the feedback is increased when positive feedback is received. This method allows users to know those who are reliable and professional in their work.

You can search forums for sales by looking for the [WTS] – “Want to Sell” tag applied the thread titles in forums like services, domains, etc. or if you want to sell a service/product of your own you can look for threads including the [WTB] – “Want to Buy” tag. There is also [WTT] or “Want to Trade” which you can look for to trade goods for services or whatever it may be.

Overall, Digital Point is another great resource to have for any web master or interested user.

Filed under: Web ProgrammingTagged with: , , , , , , ,

How to Make an Animated Loading GIF

When you have a form to submit some kind of data to your website it is very helpful to have a loading image that is displayed once the user submits the form.

This let’s the user know that the form was submitted and the upload is in progress, rather than just relying on looking up at the address bar and seeing the refresh button spinning. This also helps prevent people from clicking the submit button again, causing problems with the upload, ending in the user being frustrated and leaving.

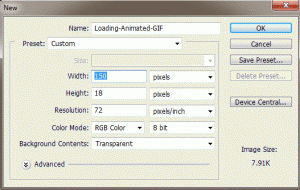
First, let’s open Adobe Photoshop and open a new document dimensions 150px by 18px. (See Figure 1).

Figure 1

Then let’s select the Rectangular Marquee Tool in the tools panel, and at the top under Style select “Fixed Size” and enter the dimensions – Width: 14px Height: 14px. Then make a New Layer, and then click on the palette and position the square marquee to the left and centered (as seen in Figure 2). You may need to zoom in in order to position it exactly 2 pixels away from the edges so it is centered.

Figure 2

Then fill this selected square with your desired themed color, I chose a blue color (#044686), using the Paint Bucket Tool. (Also seen in Figure 2).

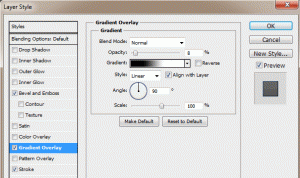
I like to apply a nice gradient to the square, as well as a little bevel and a clean border. First open the Layer Blending Options – do this by right clicking on the layer you placed the square on, and selecting “Blending Options…” or simply by double clicking the layer – and then go to Gradient Overlay. Then apply a slight gradient, I just keep it on Normal blending mode, and just lower the opacity to like 8%. (See Figure 3).

Figure 3

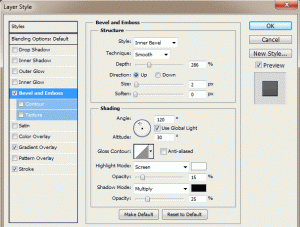
Then go to the Bevel and Emboss in the Layer Blending Options, and apply a slight bevel. This is accomplished by raising the Depth of the bevel and lowering the Opacity. I like the bevel to be small so I keep the size at 2px. Then I lower the opacity of the white to 15% and the black to 25%. (See Figure 4).

Figure 4

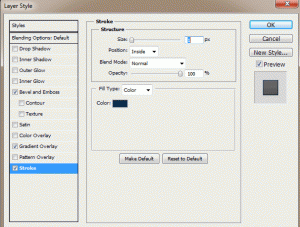
Now your square should have a nice gradient and bevel. To make it stand out from the background even more, add a nice clean border. Keep it at 1px width and either black or a darkened version of the color you used for the square. For example, my square is blue so I just used a dark blue (#0a2b4b). Do this by going to the Stroke menu in the Layer Blending Options. Enter the following for the properties: Size: 1px, Position: Inside, Opacity: 100%, and then choose your color. (See Figure 5).

Figure 5

Now your square has a Gradient, Bevel, and a nice Border. Now you can duplicate your square layer – select the layer and press (Ctrl+J) to make copies. After you make a copy, drag the squares you make to the right and keep them an equal distance from each other.  If you use the dimensions I did, you should be able to fit 8 squares in your document. (See Figure 6).

* I recommend using the guides in Photoshop to be sure they are an equal distance from one another. If rulers are not enabled, go to View > Rulers. Then drag guidelines from the left (vertical ruler) onto the document and use equal increments.

Figure 6

Once you have all your squares the way you want them and set equal distances from each other, you are ready to make the animation. Go the the top menu bar, and under Window select Animation. This will bring the animation menu below your document. To start you only want the first square visible, so hide all the other squares’ layers by clicking the Eyes to the left of each layer in the layers menu.

Your animation menu may come up in Timeline mode – this is shown as the title of the animation menu at the bottom. If it is called “Animation (Timeline)” then you are in timeline mode and you need to switch to frames mode. This is done by clicking the very small image in the bottom right corner of the animation menu which looks like a gray rectangle with 3 white squares in it. This will change the title to “Animation (Frames)“. Now, all you should see on your document is the first square, all the way to the left because we hid the others.

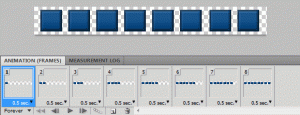
First, set the Delay to 0.5 seconds, this is done by clicking on the “10 sec.” with the down arrow. Now click the New Frame button (which looks identical to the new layer button but is located in the animation menu, obviously, not the layers menu). This will add a second frame to the animation. What you want to do is add a new frame, and then un-hide the next square in the sequence. So it’s basically: make a new frame and un-hide next square – over and over until you reach the last square in the document. When you are done, you should have 8 frames and 8 squares in the last frame. Lastly, set the looping to “Forever” by clicking where it says “Once” with a down arrow. (See Figure 7).

Figure 7

You can preview your animated loading image by zooming back out to 100% on the document, and going to Frame 1 and hit play. It’s still on a transparent background so it doesn’t look as nice as it will on your webpage, but just an idea. Here is our animated loading image:

Animated Loading GIF Image


Here is another, smoother sliding upload bar animated GIF I made:


Now that we have our animated loading GIF image, we need to incorporate this to our website with a form. Let’s say this is our form in HTML:

[codesyntax lang=”html4strict” title=”HTML Form”]
<form method=”post” action=”” enctype=”multipart/form-data”>
<table width=”650″ align=”center” border=”0″ cellpadding=”2″ cellspacing=”0″>
<tr>
<td align=”left” width=”100″><strong>Title:</strong></td>
<td align=”left”><input type=”text” name=”title” size=”25″ maxlength=”60″ /></td>
</tr>
<tr>
<td align=”left”><strong>Image:</strong></td>
<td align=”left”><input type=”file” name=”image” size=”25″ /></td>
</tr>
<tr>
<td align=”left” colspan=”2″><input type=”submit” value=”Submit” name=”submit” onclick=”showUploadDiv()” /></td>
</tr>
</table>
</form>
[/codesyntax]

So right now, this form just submits as normal without any loading image. To change this, we use the “onclick” attribute to the submit button, so that once the submit button is clicked (the form is submitted) we will display the loading image with whatever text we want to go along with it. So first let’s make some CSS styles for the uploading div and the image itself, then some Javascript entries, to the <head> portion of the webpage.

Insert the following in the <head></head> section:

[codesyntax lang=”css” title=”CSS Styles and IDs”]
<style type=”text/css”>
#uploading {
background: #eee;
padding: 3px;
border: 1px dashed #ccc;
width: 300px;
text-align:center;
}
#loading_image {
width:100%;
height:18px;
border:0;
padding: 2px 0;
background: #eee url(./Loading-Animated-GIF.gif) no-repeat top center;
text-align: center;
}
</style>
[/codesyntax]

[codesyntax lang=”javascript” title=”Show Upload Image JavaScript Function”]
<script type=”text/javascript”>
function showUploadDiv(){
var uploadDiv = document.getElementById(‘uploading’);
if(uploadDiv.style.display == ‘none’){
// the div isnt being displayed yet, so lets change the display then write the content
uploadDiv.style.display = ‘block’;
uploadDiv.innerHTML = ‘Please wait while your image is being uploaded…<br/><div id=”loading_image”></div>’;
}
}
</script>
[/codesyntax]

Now, right after our form we need to include a <div> which holds the uploading animated GIF and some text. So let’s put this right after the form:

[codesyntax lang=”html4strict” title=”Uploading DIV”]
<div id=”uploading” style=”display:none”>
</div>
[/codesyntax]

Be sure to change the image source to your images location and file name so it loads properly. Otherwise you will see the alternative text. Now, we have one last change to make. We need to add the onclick function to the form’s submit button. So let’s go back to the form and change the submit button to the following:

[codesyntax lang=”html4strict” title=”Form Submit Button”]
<input type=”submit” value=”Submit” name=”submit” onclick=”showUploadDiv()” />
[/codesyntax]

Now when we click the submit button we will see a nice message letting us know our image is being uploaded and an image representing the upload progress.

Click here to check out the demo!

Enjoy!

Filed under: Tutorials, Web ProgrammingTagged with: , , , , , , , , , , , ,

Battlefield 3 Update 27th of March for PlayStation 3. Xbox 360 and PC will come soon.

The team at EA has been working on fixing a lot of issues with Battlefield 3 for all systems as well as striving to meet the public’s demands. March 27th the latest patch for Battlefield 3 was released for Playstation 3 and soon to come the patches for PC and Xbox 360. The patch includes many corrections to unbalanced aspects to the game and pretty much solutions to glitches.

EA’s representative


This patch includes many gameplay tweaks and balances; several suggested by you. The full list of changes and updates is as follows. This update will also bring the “Rent a Server” functionality to Xbox 360 and Playstation 3. For more updated information on this functionality, check back next week.

FIXES FOR PC SERVER OPERATION
– Having the same map occur multiple times in the maplist now works properly
– If adding a new map to the servers maplist after a clear and then running “mapList.runNextRound” the server will ignore any remaining rounds on the map that it still run since before the clear and move to the new first map in the list. The server will now have reset the current rounds per map and run the map in the list for the number of rounds stated when adding the map.
– Maplist can contain up to 1000 entries now
– mapList.list will return at most 100 entries. To get the entire list, perform mapList.list repeatedly with increasing offsets (like banList.list)

GENERAL GAMEPLAY FIXES
-Players should no longer take fall damage from short falls.
-Players now get up from Prone slightly faster, allowing better odds of getting away from a grenade or threat when prone.
-Fixed some situations that would unintentionally make a player unrevivable.
-Reduced the black screen fade in time on spawn. The fade is still necessary for properly streaming in loading content at spawn, but it has been substantially reduced.
-Increased the spawn protection time from 1sec to 2sec. The protection will still be immediately canceled as soon as the player moves or shoots.
-Spawn protection will no longer be canceled by the player looking around.
-Increased the speed at which a player regains accuracy when aiming after moving for a more responsive experience. Firing before fully zoomed will still result inaccurate fire.
-Increased the inaccuracy and recoil added when a player is fully suppressed.
-Shotgun Buck and Flechette rounds now have a less suppressive effect at medium to long range.
-Tweaked the damage levels of Buck and Flechette rounds to balance them with other weapons.
-Improved the suppression of the .44 magnum, .357 magnum, and the 5.8x42mm DAP88 rounds from the Type88 sniper.
-Attempting to Crouch (like Prone) will now properly interrupt Sprint.
-Increased the effectiveness of Suppression Resist Specialization.
-Parachutes now respond to turn and throttle inputs more quickly.
-Switching from primary weapons to sidearms and back now takes less time.
-Increased the effectiveness of explosive resistance.
-Tweaked bipod deploy settings so players can no longer deploy a bipod in places higher than chin level.
-The bipod should now be more reliable when deploying on top of sloped objects like cars and rocks.
-Fixed several issues with vaulting objects, especially for thin railings.
-The Knife now only takes two swipes to kill when attacking from a position where a takedown is not possible.
-CRAM weapons on Carriers now count towards stationary weapon awards.

VEHICLE FIXES
-The A10 properly gives Jet score again.

-Unguided tank rounds and RPGs will now instantly destroy Jets, Attack Helicopters, and Scout Helicopters.
-Increased the damage the MBT’s primary weapon does to the front and side armor of other main battle tanks. Primarily this means 1 less shot to the front, and very good hits to the side can result in a 1 hit to disable.
-Slightly reduced the repair speed of the repair tool.
-Increased the damage done by TOW weapons to armored vehicles.
-Increased the rate of fire and minimum damage of the Coax HMG.
-Increased the damage mounted gunner .50cal HMGs do at long range.
-Increased the power of the repair tool when killing soldiers or destroying vehicles slightly.
-Fixed a problem when locking on to two nearby targets, the locking should no longer jump rapidly between multiple targets. This applies to all locking weapons and Laser Designators.
-Increased the damage of the Javelin and Air to Ground missiles against laser designated targets.
-Javelin missiles fired without Laser targeting now do more damage to the side and rear of MBTs.
-Slightly reduced the locking time of all weapons vs Laser Designated targets.
-Laser Guided missiles can now be distracted by Flares.
-Increased the locking distance for AGM Missiles for Jets when locking on laser designated targets.
-Reduced the locking time for the AGM Missiles for Jets to make them more viable against ground targets.
-Reduced the locking time for AA Missiles for Jets to make them more viable against air targets.
-Flares will no longer break the lock of a vehicle that is locked on, it will only distract the missiles.
-Flares now more reliably distract missiles, especially for Helicopters.
-Flares for Jets and Choppers now reload at 11 seconds again, except for the gunner, which remains unchanged at 20sec.
-AA Missiles are more difficult to dodge in Jets, this was unintended behavior that created an imbalance against skilled pilots.
-AA Missiles should no longer kill the pilot instead of the vehicle.
-AA Missiles should no longer detonate before hitting their target or a Flare/ECM chaff cloud.
-Reduced the damage AA missiles do to jets to 45%.
-Fixed the SU-35 firing Air to Air missiles at a lower rate of fire than other vehicles.
-The IGLA and Stinger now lock on much more quickly and disable an attack aircraft in 1 hit, but have significantly reduced range. This should allow Stingers to mount an effective close range point defense, without dominating an entire airspace.
-Increased the speed of the Helicopter AA missiles lock on to reduce the tedious nature of Helicopter dogfights and improve the Helicopter’s defensive abilities vs Jets.
-Slightly reduced the damage of Jet cannons against Aircraft. Damage is now only slightly higher than it was originally at launch.
-Increased RPG and SMAW damage against aircraft.
-Guided Rockets will now only track ground targets, as originally intended.
-Reduced the direct damage done by Attack Helicopter gunners vs Armor.
-Helicopter guns should now suppress correctly.
-Improved the accuracy of the Attack Helicopter’s Rocket Pods, both guided and unguided.
-Slightly increased the damage of Attack Helicopter’s Rocket Pods vs Infantry and other Helicopters.
-Additional fixes have been made to the TV missile to prevent it from blowing up the lauching vehicle.
-The Mi28 has received upgrades to its climbing and yawing abilities.
-Fixed an issue where guided rockets from the Mi28 did not follow the crosshair properly.
-Improved the accuracy of the Mi28 gun to match the AH1 gun.
-Increased the direct hit damage of the APFSDS rounds for the IFVs.
-Decreased the locking time of the IFV Guided Missile to make it more viable as an unlock.
-Miniguns and Helicopter Gunners now more quickly destroy parked cars.
-Increased the power of explosions from cars and other explosive static objects.
-Dying from the explosion of a car or other explosive static object should now correctly credit the player who caused the explosion.
-Adjusted the F35′s Center of Mass and Hover Engine for more stable, level flight in all flight modes.
-Updated the F35 weapon systems to be consistent with the other Jets.
-The F35 will now only attempt to enter Hover at low altitudes, though it will maintain the hover until forward flight is resumed, even if it reaches high altitude.
-The F35 and SU35 now properly have Ejection seats to prevent players from being killed when exiting the vehicle.
-Changed the Kornets to TOW launchers on Wake Island and moved the spawn position of the AAV to a more level position.
-Fixed several bugs with air vehicles colliding with objects at high speeds and taking no damage.
-Players will no longer receive suicides or team kills if they crash their vehicle (dying is punishment enough).
-The MAV will no longer destroy vehicles that run into it, instead it should be destroyed.
-Jet and Helicopter collisions should now properly result in the death of both vehicles.
-You can now spot with the EOD bot.
-Increased the base accuracy for AA guns and added a decrease in accuracy over the course of a burst.
-Reduced the damage AA guns (both mobile and stationary) do to infantry.
-The carrier based CRAM stations are now properly tracked as stationary weapons.
-CRAM and Pantsir stationary AA weapons now have Air Radar equipped by default.
-Improved the sound feedback for damage to help players better understand the amount of damage their vehicle is taking.
-The A10′s extinguisher should now function properly.
-Disabled vehicles now have an increased reverse speed to help escape to cover after being disabled.
-The T90′s crosshair now more accurately represents the trajectory of the main gun.
-Toggle and Hold zoom settings now also apply to soldier controlled turrets on jeeps, transport helicopters, boats, and IFVs port guns.
-The AAV now has zoom and a 3P camera when using the turret.
-Tweaked the AAV’s turret controls to be more useful when the vehicle is moving.
-The Z11w now properly functions with Below Radar.
-Below Radar will now also prevent the lock on of Stinger and IGLA missiles.
-Added Horns to all Jeeps.
-Tanks can no longer drive into the water and cross the Wake Island lagoon completely submerged.

WEAPONS
Several weapons have had recoil or accuracy adjusted in orer to balance these weapons in effectiveness and also increase the feeling of individuality in each gun

-Added Extended Mags to the ASVAL. The Extended Mags can be unlocked at 200 kills with the AS VAL.
-Reduced the recoil of the SKS rifle and increased its maximum damage at close range.
-Fixed aimed firing max accuracy on the Pecheneg to be consistent with other LMGs.
-Semiautomatic and automatic shotguns firing FRAG rounds now do slightly less splash damage.
-The M26 MASS frag and slug rounds are now the more effective pump action versions.
-The M26 MASS and M320 now benefit from the Laser Sight when mounted with an Underslung Rail.
-Fixed the bolt action timer on the L96 that would cause an animation glitch.
-9x39mm rounds no longer benefit from the Sniper headshot bonus.
-Increased the damage of the 9x39mm rounds at long range.
-Fixed the AKS74u damage at max range, it was incorrectly higher than other carbines.
-Increased the damage of the .357 and .44 magnum rounds at max range.
-All semiautomatic and bolt weapons, including all shotgun slugs, now have their maximum damage out to 15m.
-Semiautomatic weapons will no longer “jam” if the player presses fire faster than the weapon is capable of shooting. Some semi-automatic weapons have had their rates of fire adjusted to fit this change.
-Bolt action sniper rounds now have a chance to kill at close range if the player is hit in the upper chest.
-Semiautomatic sniper rifles, Assault Rifles, LMGs, and shotgun slugs now have more consistent damage over long range. At maximum range shots to the legs will not require more hits to kill.
-The spread for Flechette rounds has been reduced slightly on all shotguns.
-The spread for Buckshot has been reduced on the M1014, DAO-12, and S12k. These weapons have an accuracy advantage over the USAS12 but are not as accurate as the 870.
-Zooming shotguns with Buckshot and Flechette loads will now result in a slightly tighter cone for the pellets.
-Reduced the delay time between quick knife attempts slightly. Attacks with the knife drawn are still significantly faster.
-Fixed the Rate of Fire when the USAS and MK3A1 are equipped with FRAG rounds. All other shotguns correctly had a reduced rate of fire with frags, except the USAS and MK3A1.
-Fixed an Accuracy bug when the MK3A1 shotgun is equipped with FRAG or Slug rounds.
-Shotguns equipped with slugs will no longer automatically begin reloading if the weapon is zoomed when the clip is empty. This allows players to see where the slug lands before reloading.
-Fixed 12g FRAG rounds not breaking glass at long range.
-Players can now earn the shotgun Ribbon using the M26 MASS.
-The underslung grenade launchers for Russian rifles now properly report GP30 in the kill log.
-Fixed the AEK971 40mm shotgun round listing itself as FRAG in the kill log.
-Fixed the 40mm smoke grenade so it no longer passes through soldiers and unbroken objects before it detonates.
-M27 IAR: No change. The M27 is a heavier version of the M416, giving it good all-around performance though it has worse performance on the move.

-RPK-74M: Reduced the initial recoil and vertical recoil. The RPK-74M is a more stable firing platform than the comparable M27, though it lacks the M27′s higher rate of fire.
-M249: Added an initial recoil. The M249 is the fastest firing belt fed LMG, giving it superior suppressive and damage abilities. The initial recoil makes it a bit harder to run and gun, while making little overall impact on performance.
-Type-88: Slightly increased the initial recoil, reduced muzzle drift. The Type88 fires the slowest of the medium caliber LMGs, though what it lacks in rate of fire it makes up for in controllability.
-PKP: Reduced recoil but added a slight initial recoil, increased damage at max range. The Pecheneg has a heavy vertical recoil with a hard hitting round and little drift, this makes it excellent at sustained fire.
-M60: Reduced the initial recoil, increased damage at all ranges. The M60 has a very low rate of fire that makes it the most controllable with the powerful 7.62x51mm round.
-M240B: Added an initial recoil, increased damage at all ranges. The fastest firing medium MG, the M240 has a substantial muzzle kick and drift that makes all that power difficult to control.
-QBB-95: Reduced the total recoil but increased muzzle drift and initial recoil. The QBB-95 should now kick harder but settle into full auto fire better, combined with the bullpup hip fire bonus this makes the QBB-95 a highly mobile LMG.
-MG36: Added an initial recoil. The MG36 fires at a fast 750rpm and makes a nice middle ground between the controllability of a clip LMG and the sustained firepower of a belt fed LMG.
-870: No change. The 870 is a popular and highly effective weapon.
-DAO-12: Reduced the total pellets fired from 12 to 9. The DAO-12 has a high magazine capacity with a slow reload that makes it a solid all around shotgun.
M1014: Increased the rate of fire from 200 max to 210 max. Reduced the total pellets fired from 12 to 9. The M1014 was underperforming compared to the USAS12 and 870, it should now be more viable in CQB thanks to a higher rate of fire.
-S12k: Increased extended mag from 8 rounds to 10 rounds. Reduced the total pellets fired from 12 to 9. The S12k larger extended magazine but slower rate of fire should make it stand out against the M1014, while the DAO-12 has a higher capacity over all, but a slowe reload.
-MK3A1: Increased magazine capacity to 8 and 12 for normal and extended mag respectively. Reduced the total pellets fired from 12 to 9. The MK3A1 has a lower ROF than the USAS12, giving it slightly more ammo makes this an edge vs the USAS.
USAS-12: Increased the initial recoil. Reduced the total pellets fired from 12 to 9. The USAS 12 has a higher ROF than other shotguns, this recoil change better balances that advantage and the pellets balance its damage output.
-M4A1: No Change. Well-rounded carbine, with good rate of fire and controllable recoil.
-M4: Increased vertical recoil, reduced horizontal recoil. The Burst only M4 should now feel different to its automatic sibling, the reduced horizontal recoil emphasizes the greater control you have in burst fire.
-AKS-74U: Reduced initial recoil and vertical recoil. The AKS-74u’s low rate of fire is paired with great controllability. The overall increase in sustained fire control should help this carbine stand out, while the first kick gives it character.
-SG553: Reduced initial recoil and vertical recoil. The SG553 is a lower rate of fire carbine with greater controllability than the G36C. The change to initial recoil should better highlight this difference.
-A91: No Change. The A91′s high rate of fire and bullpup from the hip accuracy is offset by a poor controllability on full auto.
-G36C: Reduced initial recoil. The G36C is a well-rounded carbine, with a medium rate of fire and a medium recoil. The 2 round burst mode gives this weapon an edge at mid-range.
-SCAR-H: Increased damage at maximum range and increased max range. The SCAR-H fires a heavier round than all other carbines, giving it better stopping power at range at the cost of a low fire rate that penalizes it in CQB.
-G53: Reduced recoil and drift, recoil settle times now similar to other carbines. The HK53 is a short carbine with a lot of initial kick but a stable recoil pattern and a medium rate of fire. The changes give it more character compared to the G36.
-QBZ-95B: Reduced muzzle sway, recoil settle times now similar to other carbines. A bullpup like the A91, the QBZ-95B is steady on the move with a lower rate of fire for controllable shots at longer range. The built in foregrip is now properly reflected in the weapon’s stats.
-AK-74M: Reduced initial recoil and vertical recoil. The AK-74M sacrifices rate of fire for controllable automatic fire, the initial recoil was negatively affecting the feeling of controllability.
-M16A3: No Change. The M16 (both A3 and A4) provide a well-rounded stable firing platform with a high rate of fire that is relatively controllable.
-M16A4: Increased vertical recoil, reduced horizontal recoil. The Burst only M16A4 should now feel different to its automatic sibling, the reduced horizontal recoil emphasizes the greater control you have in burst fire.
-M416: No change. The M416 is the middle ground AR, blending a medium recoil and rate of fire.
AEK-971: Increased initial recoil, reduced aimed accuracy slightly. The AEK has a very high rate of fire, and also a large muzzle drift that makes control difficult. The low initial recoil allowed a player to kill before the weapon’s weaknesses kicked in while the reduced accuracy highlights its close range role.
-F2000: Reduced vertical recoil, increased zoomed accuracy slightly. As a bullpup, the F2000 has a bonus to accuracy on the move and from the hip while its high rate of fire sacrifices controllability for saturation. The previous changes were an overreaction, this is a corrective update.
-AN94: Reduced vertical recoil. The AN94′s 2 round burst mode is incredibly accurate, but it suffers from a low rate of fire on fully automatic. The recoil in full auto has been reduced somewhat to offset this penalty and make the AN94 more attractive.
-G3A3: Increased damage at all ranges, reduced vertical recoil. The G3A3′s heavy recoil and heavy round are offset by a low rate of fire and a small magazine. The G3A3 was clearly outclassed at all ranges.
-KH2002: No Change. The KH2002 is locked to burst fire, with a high rate of fire and a large muzzle drift the weapon favors accurate mid-range fire.
-L85A2: Increased accuracy, reduced muzzle drift. The L85 differs from other bullpup style ARs by having a low rate of fire, the accuracy and controllability were too low to offset the rate of fire.
-FAMAS: The FAMAS combines an extreme rate of fire with extreme recoil making it very difficult to use at anything other than close quarters combat. Due to update restrictions, the FAMAS had different stats on all 3 platforms. The FAMAS is now uniform on all platforms and now has the correct 25 round magazine.
-PP2000: Reduced the initial recoil. The PP2000 has a lower ROF than other PDWs and needed the controllability to be balanced.
-UMP45: Reduced accuracy loss during full auto. The UMP45 hits hard and has a controllable recoil at the cost of a heavy initial recoil kick.
-MP7: No Change. The MP7 has a very low recoil and a high muzzle drift that favors longer bursts than the P90.
-AS VAL: Increased vertical recoil, reduced first shot recoil, reduced accuracy on the move. The AS VAL fires a long range, highly accurate, high damage projectile that favors short bursts or single fire when stationary. While still quite good from the hip, the AS VAL will suffer if fired while moving and aimed.
-PDW-R: Reduced the initial recoil. The PDW-R has high recoil and favors burst fire, the added initial recoil was making it less effective in small bursts.
-P90: Reduced the initial recoil. The P90 favors a run and gun play style using long bursts to control muzzle drift, the initial recoil was making bursting ineffective.
-PP-19: Slightly reduced the initial recoil when firing, increased base damage. The PP-19′s high initial recoil was over penalizing the burst fire needed to be effective on the low damage, high capacity weapon.

SCOPES
-Fixed the 7x scope not zooming to the full 7x on all weapons.
-Corrected the M39′s laser sight so it points at the point of impact and aligns with scopes when zoomed.
-Fixed a misaligned scope crosshair on the G3A3 using the Rifle Scope 6x.
-Fixed the PKA and PKA-S scopes on the M416 having swapped zoom levels.
-The L96 Straight Pull bolt now functions properly.
-The L96 ironsights have been adjusted for a clearer aiming picture and correct use of the integral front sight.
-The L96 now properly shows scope glint when using the 8x, and 12x scopes.
-Tweaked IRNV to be more consistent across all levels.
-Fixed a rendering issue with IRNV view when taking damage.
-Tweaked the IRNV zoom times and scope visible areas to be the same across all weapons (some were faster than others).
-Fixed the QBU-88 sniper and the L96 IRNV scopes to use the proper sniper reticule

BIPOD
-The Accuracy increase and Recoil reduction of the Bipod has been significantly improved for Assault Rifles and Carbines.
-The Bipod now provides similar Accuracy and Recoil benefits no matter if the weapon is fired while aiming or without aiming for all weapons. Previously only LMGs were worked this way. This especially improves the speed at which snipers can make follow up shots, and also allows effective unaimed suppressive fire with Assault Rifles and Carbines.
-Increased the Speed at which a bipod is deployed, allowing the user to obtain the bipod’s bonus sooner after the deploy has started and allowing the weapon to be aimed in a far shorter time. The speed has been increased 40-50%, depending on the weapon and animation.

HEAVY BARREL
-The Vertical Recoil penalty of the Heavy Barrel has been reduced. The value has been changed from a global percent increase to a weapon specific value.
-A small Hip Accuracy penalty has been added to the Heavy Barrel to represent the added weight of the accessory, as well as focus the attachment on accurate mid and long range fire. The exact penalty amount is a weapon specific value.
-Several weapons with low default bullet speed now have their bullet speed increased when the Heavy Barrel is equipped. This is in effect for the A91, G3A3, AKS-74u, G36C, M4A1, SCAR-H, SG553, G53, and QBZ-95B.
-The Heavy Barrel is now also paired with Match Rounds which increase the maximum range of the weapon. The minimum and maximum damage are unchanged, weapons with the Heavy Barrel will be more effective in mid range.
-The Aimed Accuracy bonus provided by the Heavy Barrel has been increased. This will increase the effectiveness of the Heavy Barrel for small bursts, as originally intended.

IRNV FIXES
-Tweaked IRNV to be more consistent across all levels.
-Fixed a rendering issue with IRNV view when taking damage.
-Tweaked the IRNV zoom times and scope visible areas to be the same across all weapons (some were faster than others).
-Fixed the QBU-88 sniper and the L96 IRNV scopes to use the proper sniper reticule.

FOREGRIP
-The Horizontal Sway reduction has been changed from a global percent reduction to a weapon specific value reduction. For most guns this means very little change, for guns which have a large horizontal recoil the change is more substation. The FAMAS, F2000, and AEK971 are most effected, the AK-74, M16, and M416 are nearly unchanged.
-A small long range Aimed Accuracy penalty has been added to the foregrip. Players who generally find themselves fighting at mid to long range may want to change their accessory, while players fighting in CQB will go largely unaffected. Combining the Foregrip with a Silencer or a Heavy Barrel will offset this penalty.

LASER SIGHT
-The Hip Accuracy bonus provided by the Laser Sight has been increased. Some PDWs have had their crouch and prone base stats adjusted to prevent hip firing being more accurate than aimed fire when using a laser sight.

-The bonus is now a weapon specific value instead of a global percentage, some guns receive larger or smaller bonuses, though all bonuses are better than they were previously.

SUPPRESSOR
-The Suppressor no longer reduces the maximum damage of a weapon when equipped. Instead the Suppressor reduces the minimum and maximum range of the weapon, making it ideal for CQB and Stealth. This change will make the Suppressor slightly more effective at long range, where the bullet drop and speed makes shots difficult already, and reduces the power of the suppressor at mid range slightly.

-The Suppressor’s recoil bonus remains unchanged at a global 10% decrease. This is less than the Flash Suppressor’s bonus for all weapons.
-The Hip Accuracy penalty of the Suppressor has been changed from a global percentage to a per weapon value. Generally this penalty is higher now, but not for all weapons. Specifically, the belt LMGs and bolt Snipers do not have any additional hip fire penalty, as their penalty is already at the maximum possible value.
-Reduced the Aimed Accuracy bonus of the Suppressor from 50% to 25%. A Suppressor and Foregrip combo will have similar accuracy to a weapon without any Accessories, at the penalty of worse Hip Fire Accuracy and Range and with the benefit of much improved Stealth and reduced Recoil.

FLASH SUPPRESSOR
-The Flash Suppressor no longer reduces accuracy for Automatic Fire.
-The Flash Suppressor now also works as a recoil compensator, reducing the Vertical Recoil by a weapon specific value. This bonus is larger than the bonus provided by the Suppressor.
-A small Hip Accuracy penalty has been added to the Flash Suppressor to represent the added weight of the accessory. The exact penalty amount is a weapon specific value.

GADGETS
-Reduced the spot times on C4 and Claymore projectiles from 30 to 15 sec.
-Tweaked the controls and physics for the EOD bot to improve its handling and aiming capabilities.
-The Radio Beacon, Mortar, MAV, EOD bot, T-UGS, and SOFLAM should now be much easier to deploy.
-The MAV will now be destroyed when running into a soldier or vehicle at high speed. It is still possible to strategically sacrifice your MAV on a soldier; it will be destroyed in the process.
-The MAV now properly shows up in the Kill Feed. Previously it simply displayed “KILLED.”
-The MAV can no longer be used as an elevator.
-Matched the motion sensor sweep frequency and range on the MAV to the TUGS.
-Players will no longer auto enter SOFLAM, MAV, and EOD bots after they are deployed.
-Players may now use their knife to destroy enemy equipment.
-C4 will no longer be detonable after a player respawns, if the player is revived within 5 seconds he can still detonate his C4.
-The player may now have a maximum number of mines which will persist after the player’s death. Deploying more than the maximum of 6 mines will remove a previous mine from the world.
-Claymores now live up to 5 seconds after a player dies, the player can have a max 2 claymores planted at the same time.
-Claymores can now detonate from vehicles and can be used to disable jeeps or kill the passengers in light jeeps. Claymores will not do any damage to heavy vehicles.
-Ammobags now stay until the user redeploys them like Medkits.
-Ammobags resupply bullets more quickly, but explosives resupply more slowly, especially 40mm grenades.
-Slightly reduced the effective blast radius of the RPG, SMAW, and 40mm grenade projectiles against infantry.
-Reduced the total number of RPG and SMAW missiles carried from 5 to 4. Players desiring more rockets will want to use the Explosive spec.
-Slightly increased the heal rate of the Medical Crate.
-The MAV now will also descend by pressing the Crouch Toggle key. (PC)
-The M224 Mortar can no longer be deployed in an area that is out of combat for another team like a home base or other protected spawn.
-Tweaked M224 exit points so the player faces in the direction of the mortar when he exits.
-Mines, Claymores, C4 and other deployable items will now only appear on the minimap when spotted by a teammate.

TEAM DEATHMATCH
-Fixed a bug where players would spawn close to the enemy team at the start of the round.
-Tehran Highway playable area has been doubled and is now the same as the Squad Deathmatch set up. Spawn points have been tweaked, and an extra spawn zone has been added north of the footbridge.
-Kharg Island has a new spawn zone layout, along with a bigger playable area and new cover objects. Spawn points have also been tweaked.
-Strike at Karkand spawns zones have been tweaked to improve player flow. Spawn points have been tweaked to improve safety upon spawning.
-Sharqi Peninsula spawn zones have been adjusted to optimize player movement. Spawn points have been tweaked so players spawn more safely.
-Seine Crossing spawn zone set up has been improved. There is a new spawn zone by the alleyway to the northwest with additional spawn points.
-Caspain Border spawn zones have been tweaked slightly.

SQUAD DEATHMATCH
-Fixed a bug where players would spawn close to the enemy team at the start of the round.
-Damavand Peak layout and spawn zones have been tightened to reduce the spread of players across the map
-Tehran Highway now features an extra spawn zone north of the footbridge, along with tweaked spawn points.
-Noshahr Canals spawn zones have been tweaked. Removed unsafe spawn points in the Northeast corner, and in the middle of the container area to the Southwest.

DISABLE ANTI-ALIASING ON PS3 TO REDUCE INPUT LAG
PlayStation 3 players may now turn off anti-alias in the options menu to reduce input lag.

IMPROVED COMMO-ROSE FOR PC

As has been rumored for some time, we are making some improvements to the commo-rose on PC. This is partially based on feedback from the community.

Please be aware that the commo-rose will change depending on your current position – vehicles and infantry each have separate call outs. Each function should trigger appropriate voice messages as well as icons on the mini map.

Each button should trigger appropriate voice messages as well as icons on the mini map.  Players should keep an eye on the mini map for these icons that will flash when a team mate is requesting aid via the commo-rose.


IMPROVEMENTS TO MINIMAP
we are also adjusting the level of detail to give a clearer picture for players when using the mini-map.
The three new mini map modes are:

Read the article here:

Game Update will drop on the 27th of March for PlayStation 3. Xbox 360 and PC will come soon.

Filed under: GamingTagged with: , , , , , , ,

The Truth About SOPA and PIPA

Stop SOPA and PIPA
Protect your online rights! Stop SOPA & PIPA!

So, you might have heard some word about these bills “SOPA” (Stop Online Piracy Act) and “PIPA” (Protect IP Act). These bills were established October 26th, 2011 with the introduction of SOPA from the House of Representatives congressman – Lamar S. Smith. Basically the reason for the creation of these acts is to put an end to online piracy and the spread of illegally downloaded software, games, music, you name it. These bills come from the constant demand for intellectual property protection from organizations such as Universal Media Group, RIAA, and the MPAA. While this may seem like a very necessary and helpful action, the true potential of these bills is in fact far from its proclaimed intent.

What does SOPA and PIPA mean to you?

Together, these bills will allow for full censorship of the world-wide-web, otherwise known as the internet. What does that mean? It means that whatever you post on your Facebook, Twitter, Youtube, or whatever it may be – is up for revision by the U.S. government. Sounds a little bit like the censorship of the internet taking place in the People’s Republic of China, doesn’t it? That’s because it ultimately IS.

Let’s say you post a video on Youtube, whatever the intent of the video may be, and you include a song in that video. If you do not personally own the rights to that song, that video will be removed. Think of all the videos on Youtube right now that fit that description… That is a LOT of content, just gone now. Or maybe you post an image on your Facebook, something you found funny or just liked. Once again, that being an image you do not personally own, will be removed. This affects a lot of content and innovation that we all love so much on the web.

Here’s what will happen if SOPA and PIPA become laws of the U.S. constitution:

  • Security threats – countless websites will be forced to modify their software opening security holes and increased vulnerability to their websites.
  • Free Speech Infringement – the government controls what you can and can’t publish to what was once the worlds greatest free information resource.
  • Innovation Out the Window – developers and publishers will have a very hard time establishing government-approved content and products.
  • Internet Police” – The federal government will be using ISPs, cable companies, web hosts, etc. as their task force to achieved a censored internet.

That is just the quick summary of what these bills could mean. Maybe the bill sponsors Lamar Smith and Patrick Leahy didn’t intend on infringing on free speech or basically destroying the internet we all know and love, but that is exactly what these bills threaten to do if passed.

The sad part is that there are other ways to run a business in these industries without violating U.S. law or taking part in online piracy. Services such as iTunes, Steam, Pandora, and Last-FM all offer services for digital goods like music, movies, and games, and they do it LEGALLY. All it takes is a little innovation to provide a better service like these organizations do. What does the federal government want to do? Take full control of the internet and online life.

What can you do?

I know it seems like there isn’t much you can do about this sort of thing, but you are the ones that CAN. Contact your local representatives office and give them a piece of your mind!

Find and contact your local representative:
https://writerep.house.gov/writerep/welcome.shtml

Join the fight against online censorship:
http://americancensorship.org/

Filed under: Articles, FeaturedTagged with: , , , , , , , ,

Building a Battlefield 3 PC

How to Build a Battlefield 3 PC
Build Your Battlefield 3 PC Cheap and Right!

Battlefield 3 will hit the shelves October 25th, 2011 for the PC, Xbox 360, and Playstation 3. If you are a PC gamer you know you are going to want a powerful machine to experience this much anticipated release. Battlefield 3 introduces the Frostbite 2.0 engine which is based on the 1.5 engine seen in Bad Company 2, so the system requirements will be similar.

Minimum System Requirements:

OS: Windows Vista or Windows 7
Processor: Core 2 Duo @ 2.0GHz
RAM: 2GB
Graphic card: DirectX 10 or 11 compatible Nvidia or AMD ATI card.
Graphics card memory: 512 MB
Hard drive: 15 GB for disc version or 10 GB for digital version

Recommended System Requirements:

OS: Windows 7 64-bit
Processor: Quad-core Intel or AMD CPU
RAM: 4GB
Graphics card: DirectX 11 Nvidia or AMD ATI card, GeForce GTX 460, Radeon Radeon HD 6850
Graphics card memory: 1 GB
Hard drive: 15 GB for disc version or 10 GB for digital version

My Battlefield 3 Gaming Machine

CPU / Processor:
AMD Phenom II X6 1090T Black Edition Thuban 3.2GHz
http://www.newegg.com/Product/Produc…82E16819103849

Motherboard:
GIGABYTE GA-990XA-UD3 AM3+ AMD 990X
http://www.newegg.com/Product/Produc…82E16813128510

Video Card:
SAPPHIRE 100315L Radeon HD 6850 1GB 256-bit GDDR5
http://www.newegg.com/Product/Produc…82E16814102908

with 8GB 1333 DDR3 memory and my current power supply / case which will fit the new components well.

Take the build found here in this article:
http://pc.mmgn.com/Articles/Building-A-PC-For-Battlefield-3

This build budget is $1000.

With the 3 components I have above I am at $445 with a promotional code (HARDOCPX817E) on the processor. This promotion ends TODAY – 8/23/11.

If I added on a Power Supply, HDD, CPU cooler, Case, DVD Drive, and memory:

OCZ ModXStream Pro 700W$59.99 (After rebate) + Free Shipping
Western Digital WD5000AAKS 500GB$49.99 + Free Shipping
ZALMAN CNPS10X Performa 120mm$40.24
– Free Shipping
Rosewill CHALLENGER Black Gaming ATX Mid Tower Computer Case – $49.99 + $9.99 Shipping
Sony Optiarc CD/DVD Burner Drive$19.99 + Free Shipping
G.SKILL Ripjaws Series 8GB (2 x 4GB)$49.99 + Free Shipping

Total: $749 (Plus Tax)
Saved: $250!

Now whether you are looking to put together a new computer all together or just upgrade some components, this may be helpful to you.

1. Establish your price range – Sounds simple, but careful – you may find yourself stretching your boundaries reaching for some luxurious hardware.

2. Look for the deals – Always look for specials online for websites like Newegg.com and TigerDirect.com.

Promotional codes and coupons can be found online  as well from places like RetailMeNot.com or Google. It pays to be patient as well for some upcoming deals for PC components. Check combo deals as well online for Motherboards/CPU’s or GPU/CPU’s.

3. Check compatibility –  It is very important when picking out computer parts to make sure they are compatible with everything else you are getting or with what you are keeping in your system.

With Processors (CPU’s) you want to make sure your motherboard and CPU are both either Intel or AMD. For example my processor is “AMD Phenom II X6 1090T Black Edition” and my motherboard is “GIGABYTE GA-990XA-UD3 AM3+ AMD 990X.” Both are AMD. You also want to make sure that the motherboard accepts the CPU socket type of your processor. My CPU socket type is “Socket AM3” and if you look under details on my motherboard it says “CPU Socket Type: AM3+.” Your power supply must also have the power inputs that match your motherboard’s CPU power input. My motherboard has a 8 pin spot for the CPU and my power supply has that input.

You also want to make sure your motherboard is compatible with both the video card and memory you have. Most motherboards have multiple “PCI Express 2.0 x16” inputs. You will need at least one for your video card and more than one if you plan on having other components that will use these inputs (sound card, 2nd video card, etc.) The video card must also have the same “Chipset Manufacturer” as the motherboard/CPU brand (Intel or AMD). You should also check if features that are available from your video card are possible through your motherboard, such as SLI and CrossfireX. If you are getting a video card for any games (Battlefield 3) make sure it is DirectX11 under 3D API DirectX.

Most memory online and in stores now is DDR3. If you are upgrading your motherboard you will need to make sure the memory you will have is a compatible speed and type.  If you look at “Memory Standard” under details for my motherboard it says “DDR3 2000(O.C.)/1866/1600/1333/1066.” So it is DDR3 and runs at those speeds – 2000 is “Over Clocked.” My memory is 8GB DDR3 1600MHz so it is compatible.

Here is my motherboard layout:

Enjoy building your new PC! Post your builds here or at BFGamerz!

Filed under: Featured, Gaming, TutorialsTagged with: , , , , , , , , , , , ,

Javascript & PHP Star Rating Script

I’ve searched around the interwebs for an ajax star rater and I came across a few different possibilities, all of which looked very good. The top result from google was Nick Stakenburg’s “Starbox” for “ajax star rater”. I also found Masuga Web Design’s Ajax Star Rater and a script from MySandbox to be popular results. However I couldn’t really seem to find a PHP / Mysql script that used Javascript for the rater effects. So I decided to make one based off of a script I found:

Reign Water Design’s 5 Star Rating System

This was a very nice easy to use Javascript 5 star rating script. All I had to do was make some tweaks to my preference and add on some PHP/Mysql code to submit the rating.

See the demo or download this script.

To view the PHP source code, images, and everything together you must download this script.

Javascript

Insert the following in the <head> tags of your page:
[codesyntax lang=”html4strict” title=”Javascript Source Code”]
<script type=”text/javascript”>
function insertParam(key, value)
{
key = escape(key); value = escape(value);

var kvp = document.location.search.substr(1).split(“&”);

var i=kvp.length; var x; while(i–)
{
x = kvp[i].split(“=”);

if (x[0]==key)
{
x[1] = value;
kvp[i] = x.join(“=”);
break;
}
}

if(i<0) {kvp[kvp.length] = [key,value].join(“=”);}

//this will reload the page, it’s likely better to store this until finished
document.location.search = kvp.join(“&”);
}
function alterDisplay(id){
var dropdown = document.getElementById(id);
if(dropdown.style.display == “none”){
dropdown.style.display = “”;
} else {
dropdown.style.display = “none”;
}
}
</script>
<script type=”text/javascript” language=”javascript” src=”./scripts/ratingsys.js”></script>
[/codesyntax]

CSS

You will need to include this in the <head> tags as well either in <style> tags or by <link>:
[codesyntax lang=”css” title=”CSS Styles”]
#rateMe #rate_overlay {
position:absolute;
display:block;
float:left;
margin:0;
padding:0;
height:30px;
width:auto;
background:#eee url(./images/star_overlay.gif) repeat-x;
z-index:2;
cursor:default;
}
#rateStatus{width:100px; height:20px;margin:4px 0 0 5px;font: 12px “Trebuchet MS”, Arial, Helvetica, sans-serif; font-weight: bold}
#rateMe{width:152px; height:50px; padding:1px; margin:0px; vertical-align:top; z-index:auto; border: 1px solid #ccc; }
#rateMe li{float:left;list-style:none;}
#rateMe li a:hover,
#rateMe .on{background:url(./images/star_on.gif) no-repeat;}
#rateMe a{float:left;background:url(./images/star_off.gif) no-repeat;width:30px; height:30px;cursor:pointer;}
#rateMe a:hover{background:url(./images/star_on.gif) no-repeat;}
#rateMe a.grey,#rateMe a.grey:hover{background:url(./images/star_off.gif) no-repeat; cursor:default;}
#rateVotes{display:block; margin-left:65px; font: 11px “Trebuchet MS”, Arial, Helvetica, sans-serif; color:#4a4a4a;}
#ratingSaved{display:none;}
.saved{color:red; }
.grey

.rate_on_button {

}
.rate_on_button a { float:left;padding:10px;margin:0 5px;border:2px solid #666; background-color:#fff; color: #000; font-size: 2em; text-align:center; display:block; color: #000; text-decoration: none; }
.rate_on_button a:hover { color: #fff; text-decoration: none; background-color: #333; }
[/codesyntax]

Basically I took the script that Water’s made and changed a few things to the css styles, added an overlay for the current rating, and wrote a php script to insert rates and determine the current rating, etc. I also added the Javascript functions insertParam() and alterDisplay(). You do not need to use this function insertParam() to create the url, you can simply set the <a> tags to something like this:

[codesyntax lang=”html4strict”]
<a href=”./index.php?r=1″ id=”_1″ title=”Terrible” onmouseover=”rating(this)” onmouseout=”off(this)”></a>
[/codesyntax]

The Javascript function alterDisplay() is used to hide and show the overlay <div> that holds the current rating (if there is one). So when you mouse over the rating bar holder it hides the overlay so you can rate.

The PHP script grabs the information from the Mysql table that you specify in the function. You will need to adjust the following values:

  • $var – The column to base your mysql selection off of. Grab all rows where this column equals $id.
  • $table – The table where the ratings are being held.
  • $star_width – Width of the stars, default is 30px.

You will need to be connected to a MYSQL database before calling the rating bar function.

Since the syntax of the function is the following:

[codesyntax lang=”php” title=”Rating Bar Syntax”]
function rating_bar($id);
[/codesyntax]

You will need to supply the identifier ($id) which tells the PHP script which row to grab from the Mysql table.

To display the current rating after it has been rated on – because Javascript alone is not enough – I added an overlay <div> which will hold the current rating. This is done by setting the css style of this overlay div to the following:

[codesyntax lang=”css” title=”Rate Overlay CSS Style”]
#rateMe #rate_overlay {
position:absolute;
display:block;
float:left;
margin:0;
padding:0;
height:30px;
width:auto;
background:#eee url(./images/star_overlay.gif) repeat-x;
z-index:2;
cursor:default;
}
[/codesyntax]

The position: aboslute and z-index: 2 style attributes make the div lay over top of the rateMe div which holds the rater and has a z-index: 1.

Test out this free script with the demo link at the top of the post or download it and use on your own website. Credit where due is always appreciated.

Any questions or problems please feel free to email me at brian@bgallz.org or post here.

Filed under: Featured, Javascript, PHP, Scripts, TutorialsTagged with: , , , , , , ,

Battlefield 2142 v1.51 Patch – Final Release!

Battlefield 2142 v1.51 Final Patch
Download the latest Battlefield 2142 patch!

After a beta release of the patch version 1.51 for Battlefield 2142, EA Games has released a final patch now available for download. The patch includes a number of bug fixes, an increase in account security, four brand new maps, and the unlock of the expansion pack “Northern Strike” for all players with the patch installed. You will need patch 1.50 installed before installing 1.51.

You can download the Battlefield 2142 v1.50 Full Patch (525.30 MB) full patch here:
http://bfgamerz.com/download/50/battlefield-2142-v151-final-patch

Patch Notes:

  • No Digital Rights Management on BF2142.exe file.
  • Northern Strike expansion free for all.
  • Four new maps: Strike at Karkand 2142 Operation Blue Pearl, Yellow Knife, and Molokai.
  • Account security updates.
  • Added fix for nVidia drivers to solve tinitus visual effect.
  • Hit detection bug fix: Changed so that latency compensation history takes correct stored positions from buffer.
  • Updated as_titan_wake.tweak to allow for two attack choppers instead of the one previously allowed.

Download the full update and much more at BFGamerz.com here:

Click here to download the Battlefield 2142. v1.51 Full Patch!

Filed under: Featured, GamingTagged with: , , , , ,

Check if Field Exists in Mysql Table

Sometimes it is useful to know if a field exists in a mysql table before running a query using that field name, especially when the field name is coming from some kind of user input.

So to do this we use the function mysql_list_fields to grab the fields out of a table and run through them with a for loop until we find the one we are looking for – using the function mysql_field_name, in which case we return true. If we don’t find it, the function returns false.

[code lang=”php”]

[/code]

And it’s that easy!

Filed under: MySQL, PHP, TutorialsTagged with: , , , ,

WHMCS Cron Jobs in cPanel

Here we will look at how to set up your WHMCS to run scheduled cron jobs through your cPanel. This allows you to let your clients automatically have their websites and hosting, etc. set up without actually manually doing it. It is an automation feature, which coming from your system’s cPanel, is availabile in WHMCS. Basically in cPanel you create a new job under Cron Jobs and set it to your cron.php in WHMCS to run the automation. These scheduled tasks are very useful for several web applications for businesses or even personal use.

So firstly, we need to create a new server in the Servers menu and a product in our Products and Services menu in WHMCS.

Assuming you have your WHMCS installed, go to the admin directory “whmcs/admin/” and login.

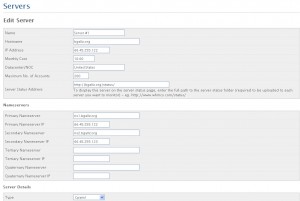
Under Setup go to Servers (if you don’t have a server already made) click Add New Server. You generally have one main server for the WHMCS you are using, but some larger companies and business/groups have multiple servers – VPS, Dedicated, etc. Here you need to fill in the information for your server. Below is an image of what mine looks like:

Server Settings

Depending on the software you are using you will need to select it in “Type” and input your connection username and password. You will then need to create at least one group for the server you just made. These groups are the different types of accounts that will be setup to run off of this server you select.

Then, under Setup go to Products/Services. If you don’t have any groups or products, click the add group/new product links to create a new group and a product inside that group. Set up whatever specific details you want for your new product. If it is hosting of some kind, or just a purchasable service, fill it out to its entirety.

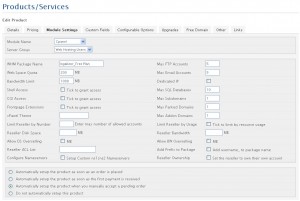
Under the Module Settings tab, you will find the fields and inputs for setting up the cPanel and Cron Job properties. Below is an image of what my Product Module Settings looks like:

Product Module Settings

I use cPanel so that is my Module Name. Then you just select the server group you just made for your server.

Web Host Manager Settings

In your cPanel at the very bottom of the index (homepage) there is a link for your Web Host Manager (WHM). This is the software that cPanel uses for maintaining all of the hosting accounts you have on your server. You must set up your nameservers here that are used in the server you setup in WHMCS. You do this by clicking the “Basic cPanel & WHM Setup” link. You must also add the packages here that are the same titles you used when setting up the products and services in the Module Settings tab under “WHM Package Name.” Your WHMCS will run Cron jobs based off of these values so make sure they are correct.

Finally, we must set the Cron Jobs Settings in cPanel.

On your cPanel index page, towards the bottom there is a link for Cron Jobs.

  1. Enter an email address for support on these accounts affected.
  2. Enter the time interval for this Cron Job to be ran.
  3. The Command is the address to your cron.php file in WHMCS.

My command line is something like so:

[code lang=”html”]php -q /home/mysite/public_html/whmcs/admin/cron.php[/code]

This tells cPanel where to get the cron.php script from so it can run the automated jobs for your WHMCS services. Be sure to go through all the settings for the Product/Service you setup. There are a lot of features you may want on or off depending on what the service is.

And that’s it! Enjoy setting up endless hosting accounts, hands free!

Filed under: Featured, TutorialsTagged with: , , , ,