Category: Web Programming

PHP Upload Multiple Files From URL

In a previous post I made I showed you how to upload a file from a URL using a PHP script. You can view this post here.

Now I will show you how to take this a step further and upload multiple files from multiple URLs or uploaded from the user’s computer.

Because we will have multiple files to upload we are going to want to make an array of these files that include all their attributes. Then we’ll process each file at a time and based on whether it is coming from a URL or the user’s hard drive, we will upload it accordingly.

Here is a preview of what our form will look like:
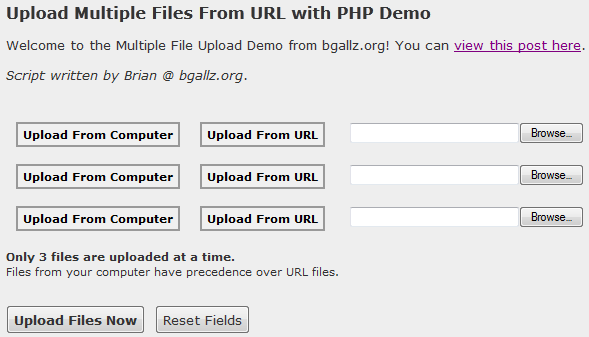
Here is our HTML for this form on index.php:

<form action="./index.php?do=upload" method="post" enctype="multipart/form-data" name="upload_files_form">
<div id="upload_files">
<div id="upload_file_1">
<div>
<button id="1_computer_button" name="upload_type_computer" type="button" onclick="hideElement('1_upload_url'); showElement('1_upload_computer')">Upload From Computer</button>
<button id="1_url_button" name="upload_type_url" type="button" onclick="hideElement('1_upload_computer'); showElement('1_upload_url')">Upload From URL</button>
</div>
<div>
<div id="1_upload_computer">
<input type="file" name="files_hdd[]" size="30" />
</div>
<div id="1_upload_url" style="display:none">
<input type="text" name="files_url[]" size="30" maxlength="100" value="http://" onfocus="if(this.value == 'http://') this.value = '';" id="1_input_url" />
</div>
</div>
</div>
<div id="upload_file_2">
<div>
<button id="2_computer_button" name="upload_type_computer" type="button" onclick="hideElement('2_upload_url'); showElement('2_upload_computer')">Upload From Computer</button>
<button id="2_url_button" name="upload_type_url" type="button" onclick="hideElement('2_upload_computer'); showElement('2_upload_url')">Upload From URL</button>
</div>
<div>
<div id="2_upload_computer">
<input type="file" name="files_hdd[]" size="30" />
</div>
<div id="2_upload_url" style="display:none">
<input type="text" name="files_url[]" size="30" maxlength="100" value="http://" onfocus="if(this.value == 'http://') this.value = '';" id="2_input_url" />
</div>
</div>
</div>
<div id="upload_file_3">
<div>
<button id="3_computer_button" name="upload_type_computer" type="button" onclick="hideElement('3_upload_url'); showElement('3_upload_computer')">Upload From Computer</button>
<button id="3_url_button" name="upload_type_url" type="button" onclick="hideElement('3_upload_computer'); showElement('3_upload_url')">Upload From URL</button>
</div>
<div>
<div id="3_upload_computer">
<input type="file" name="files_hdd[]" size="30" />
</div>
<div id="3_upload_url" style="display:none">
<input type="text" name="files_url[]" size="30" maxlength="100" value="http://" onfocus="if(this.value == 'http://') this.value = '';" id="3_input_url" />
</div>
</div>
</div>
</div>
<input type="submit" name="submit" value="Upload Files Now" onclick="showUploadDiv()" />  <input type="reset" name="reset" value="Reset Fields" />
<p> </p>
<div id="uploading" style="display:none">
</div>
</form>

This form contains three file inputs, either uploaded from the user’s computer, or given by a URL to a file. There are two buttons for each input which enable and disable the HDD or URL upload options. Now, I haven’t made the script to completely disable the URL input once a file has been selected from the user’s computer, so when the form is submitted it will check for uploaded files first over files being gathered from a URL. So you will want to include that on your main page so users know you can only upload three files at a time here, not six.

The form includes the animated loading gif feature which I posted here:
https://bgallz.dev/1140/how-to-make-animated-loading-gif/

You’ll notice on the submit button it activates the Javascript function “showUploadDiv().” This function changes the display style setting on the uploading div and then fills it with some text and the animated loading image.

I also have used some jQuery for the buttons to be used effectively:

<script src="jquery-1.7.2.min.js" type="text/javascript"></script>
<script type="text/javascript">
$(document).ready(function(){
var clickedClass = "selected";
var buttons = "#upload_files button";
$(buttons).click(function() {
$(this).addClass(clickedClass).siblings().removeClass(clickedClass);
});
});
</script>

What this jQuery says is to add the class “selected” – from clickedClass – to the current button that is being clicked, and remove that class name from all other buttons within the current parent’s sibilings. Sounds a little complicated, but it’s very simple. The buttons are loaded from “#upload_files button” – so thats all the button elements within the div ID “upload_files.”

Now finally for the PHP of the script. On index.php we include the following in the header:

$valid_exts = array(
"gif","png","jpeg","jpg",
"image/gif","image/jpeg","image/png","image/jpg"
); // array of valid file extensions
$max_file_size = 32; // file size in kb
$upload_dir = "files/"; // directory to upload to with trailing slash

$upload_result = "";

if(isset($_GET['do']) && $_GET['do'] == "upload"){
$upload_result = run_upload_form();
}

So when the form is submitted – which is sent to “index.php?do=upload” – we run the function run_upload_form() and set the $upload_result to its returned value.

The key variables defined at the beginning of the script are there for you to modify as you need them. Of course you can modify the function itself to output different values as you need them to be. Currently the script checks against the following before uploading:

  • Valid extension type (image files by default)
  • File size limit (32KB by default)
  • Upload directory exists and is writable
  • URL validation for remote file size and type

To view the rest of the PHP as well as the Javascript and CSS styles you must download the script.

Download the script free here.

Use the demo here.

Multiple File Upload with HTML5

A new feature of HTML 5 is the ability to use a multiple file upload field. This is extremely simple with HTML 5. You basically create an input tag with type = file and the multiple attribute applied.

Here is an example:

<form action="upload.php" method="post" enctype="multipart/form-data">
Upload Files: <input type="file" name="upload_files[]" multiple="multiple" />
<input type="submit" value="Submit" name="submit" />
</form>

This will create the following:

This may look like a regular file upload input from standard HTML however when you click the “Browse…” button to look for files on your computer, you can select multiple files by Shift+Clicking on the desired files grouped together, or alternatively Ctrl+Clicking to select individual scattered files. This only works for files coming from your computer of course, so to upload multiple files from URL, you will need a script like the one above.

Here is a screenshot of the browse window. You can select multiple files as you can see they are highlighted, and listed in order in the “File name:” input.

Browse for multiple files using HTML 5

For this multiple file upload, the PHP is much simpler. We simply run the upload like we would for the first example, only we don’t have to worry about URL files or checking an array of files. The HTML already loads the files into an array for us when PHP checks the $_FILES[‘upload_files’].

Here is how it looks…

<?php
// upload multiple files from HTML5 multiple files input

if(isset($_POST['submit']))
{
$valid_exts = array("image/gif","image/jpeg","image/png","image/jpg"); // image files
$max_size = 20480; // max size in kb (2kb default)
$directory = "./files/"; // upload directory

$upload_files = $_FILES['upload_files'];
$files_uploaded = array(); // successful uploads

if(is_array($upload_files))
{

foreach($upload_files as $file)
{

if(in_array($file["type"],$valid_exts))
{

if($file["size"] <= $max_size)
{

// file is valid type and size, let's upload
if(move_uploaded_file($file["tmp_name"],$directory . $file["name"]))
{

$files_uploaded[] = '<a href="'.$directory.$file["name"].'" target="_blank">'.$file["name"].'</a>';

}

} else { return "File size too large. Max file size is: ". ($max_size / 1024) . " KB."; }

} else { return "Only image file types may be uploaded."; }

}

return "". count($files_uploaded) ." files out of ". count($upload_files) ." total have successfully been uploaded. Here are the uploaded files: <br/><br/>" . print_r($files_uploaded) . "";

} else { return "Please a file or multiple files to upload."; }

}
?>

Enjoy!

Filed under: CSS, Featured, Javascript, PHP, Scripts, Web ProgrammingTagged with: , , , , , , , , , , , , ,

Displaying Mysql Tables in PHP

Once you have a Mysql database setup with a table and some data in that table you are ready to display the data through PHP. This is very easy to do not only efficiently but also with a clean design in mind.

So let’s say this is your MySQL table:

Categories
Id, Title, Description, Timestamp

Once you have a Mysql database setup with a table and some data in that table you are ready to display the data through PHP. This is very easy to do not only efficiently but also with a clean design in mind.

Here is a basic Mysql command to grab all the data in our table “categories”:

[codesyntax lang=”php”]
<?php

$query = “SELECT * FROM categories ORDER BY id DESC”;
$sql = mysql_query($query) or die(mysql_error());
$count = mysql_num_rows($sql);

?>
[/codesyntax]

This will grab all the data out of the table “categories” in descending order by the ID. Now let’s say we want to display this in a table with headers and organization. Here is an easy example of how to do this:

[codesyntax lang=”php”]
<?php

if($count > 0){
// rows were returned by the query
// set up the table opener and headers
echo ‘<table width=”100%” align=”center” border=”0″ cellpadding=”2″ cellspacing=”0″ class=”data_table”>’;
echo ‘<tr>’;
// headers
echo ‘<th align=”left”>Title</th>’;
echo ‘<th align=”left”>Description</th>’;
echo ‘<th align=”left”>Posted Date</th>’;
echo ‘</tr>’;
for($i=0;$i<=$count;$i++){
while($row = mysql_fetch_array($sql)){
// go through all the returned rows and print the fields
echo ‘<tr>’;
if($i%2==0){
// apply row styles
echo ‘<td align=”left” class=”td_alt2″>’.$row[‘title’].'</td>’;
echo ‘<td align=”left” class=”td_alt2″>’.substr($row[‘description’],0,200).”;
// shorten to 200 characters
if(strlen($row[‘description’]) > 200){
echo ‘…’;
}
echo ‘</td>’;
echo ‘<td align=”left” class=”td_alt2″>’.date(“m/d/Y”,$row[‘timestamp’]).'</td>’;
} else {
echo ‘<td align=”left” class=”td_alt1″>’.$row[‘title’].'</td>’;
echo ‘<td align=”left” class=”td_alt1″>’.substr($row[‘description’],0,200).”;
// shorten to 200 characters
if(strlen($row[‘description’]) > 200){
echo ‘…’;
}
echo ‘</td>’;
echo ‘<td align=”left” class=”td_alt1″>’.date(“m/d/Y”,$row[‘timestamp’]).'</td>’;
}
echo ‘</tr>’;
}
}
echo ‘</table>’;
} else {
echo ‘No entries found, please try again.’;
}

?>[/codesyntax]

This will output something like so:

Title Description Posted Date
Data 1 Title Data 1 Description Data 1 Date
Data 2 Title Data 2 Description Data 2 Date
Data 3 Title Data 3 Description Data 3 Date
Data 4 Title Data 4 Description Data 4 Date
Data 5 Title Data 5 Description Data 5 Date
Filed under: MySQL, PHP, Web ProgrammingTagged with: , , , , , ,

Digital Point Forums

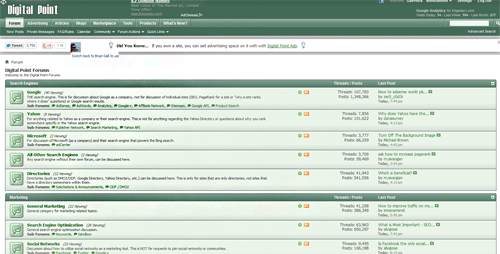
If you are a web developer, designer, programmer, or just a user of the web then you should probably be a member of the Digital Point Forums. Here you will find web masters by the thousands who post and discuss topics all related to online function. Whether you run your own website, are looking to, or are just curious about the way the internet works – this is a great forum to be a part of.

The forums cover a range of categories such as:

  • Search Engines
  • Online Marketing
  • Running a Business
  • Web Design & Development
  • Helpful Products & Tools

Digital Point Forums Index

I personally use Digital Point for learning more on online marketing techniques, link exchange and link building, programming ideas, and primarily – buying and selling services.

Click here to contact me on Digital Point for your web development needs!

On Digital Point users’ reputations go by their “Feedback Score” which is the positive or negative value each user has which comes from their business on the forums. When a user receives negative feedback – i.e. the user did not meet expectations or did not complete their work – then their feedback score is lowered, and vice versus the feedback is increased when positive feedback is received. This method allows users to know those who are reliable and professional in their work.

You can search forums for sales by looking for the [WTS] – “Want to Sell” tag applied the thread titles in forums like services, domains, etc. or if you want to sell a service/product of your own you can look for threads including the [WTB] – “Want to Buy” tag. There is also [WTT] or “Want to Trade” which you can look for to trade goods for services or whatever it may be.

Overall, Digital Point is another great resource to have for any web master or interested user.

Filed under: Web ProgrammingTagged with: , , , , , , ,

How to Make an Animated Loading GIF

When you have a form to submit some kind of data to your website it is very helpful to have a loading image that is displayed once the user submits the form.

This let’s the user know that the form was submitted and the upload is in progress, rather than just relying on looking up at the address bar and seeing the refresh button spinning. This also helps prevent people from clicking the submit button again, causing problems with the upload, ending in the user being frustrated and leaving.

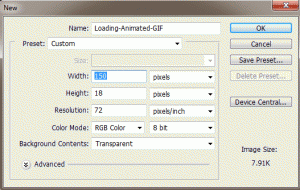
First, let’s open Adobe Photoshop and open a new document dimensions 150px by 18px. (See Figure 1).

Figure 1

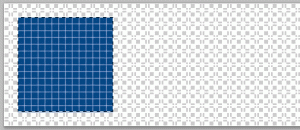
Then let’s select the Rectangular Marquee Tool in the tools panel, and at the top under Style select “Fixed Size” and enter the dimensions – Width: 14px Height: 14px. Then make a New Layer, and then click on the palette and position the square marquee to the left and centered (as seen in Figure 2). You may need to zoom in in order to position it exactly 2 pixels away from the edges so it is centered.

Figure 2

Then fill this selected square with your desired themed color, I chose a blue color (#044686), using the Paint Bucket Tool. (Also seen in Figure 2).

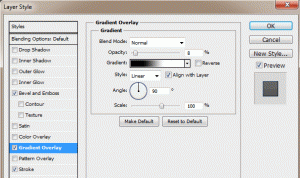
I like to apply a nice gradient to the square, as well as a little bevel and a clean border. First open the Layer Blending Options – do this by right clicking on the layer you placed the square on, and selecting “Blending Options…” or simply by double clicking the layer – and then go to Gradient Overlay. Then apply a slight gradient, I just keep it on Normal blending mode, and just lower the opacity to like 8%. (See Figure 3).

Figure 3

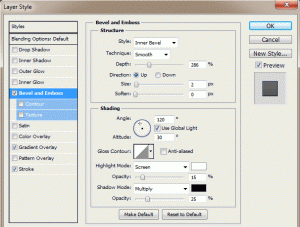
Then go to the Bevel and Emboss in the Layer Blending Options, and apply a slight bevel. This is accomplished by raising the Depth of the bevel and lowering the Opacity. I like the bevel to be small so I keep the size at 2px. Then I lower the opacity of the white to 15% and the black to 25%. (See Figure 4).

Figure 4

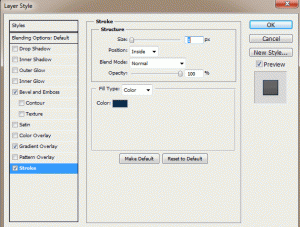
Now your square should have a nice gradient and bevel. To make it stand out from the background even more, add a nice clean border. Keep it at 1px width and either black or a darkened version of the color you used for the square. For example, my square is blue so I just used a dark blue (#0a2b4b). Do this by going to the Stroke menu in the Layer Blending Options. Enter the following for the properties: Size: 1px, Position: Inside, Opacity: 100%, and then choose your color. (See Figure 5).

Figure 5

Now your square has a Gradient, Bevel, and a nice Border. Now you can duplicate your square layer – select the layer and press (Ctrl+J) to make copies. After you make a copy, drag the squares you make to the right and keep them an equal distance from each other.  If you use the dimensions I did, you should be able to fit 8 squares in your document. (See Figure 6).

* I recommend using the guides in Photoshop to be sure they are an equal distance from one another. If rulers are not enabled, go to View > Rulers. Then drag guidelines from the left (vertical ruler) onto the document and use equal increments.

Figure 6

Once you have all your squares the way you want them and set equal distances from each other, you are ready to make the animation. Go the the top menu bar, and under Window select Animation. This will bring the animation menu below your document. To start you only want the first square visible, so hide all the other squares’ layers by clicking the Eyes to the left of each layer in the layers menu.

Your animation menu may come up in Timeline mode – this is shown as the title of the animation menu at the bottom. If it is called “Animation (Timeline)” then you are in timeline mode and you need to switch to frames mode. This is done by clicking the very small image in the bottom right corner of the animation menu which looks like a gray rectangle with 3 white squares in it. This will change the title to “Animation (Frames)“. Now, all you should see on your document is the first square, all the way to the left because we hid the others.

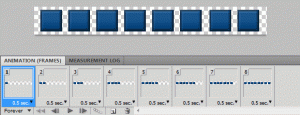
First, set the Delay to 0.5 seconds, this is done by clicking on the “10 sec.” with the down arrow. Now click the New Frame button (which looks identical to the new layer button but is located in the animation menu, obviously, not the layers menu). This will add a second frame to the animation. What you want to do is add a new frame, and then un-hide the next square in the sequence. So it’s basically: make a new frame and un-hide next square – over and over until you reach the last square in the document. When you are done, you should have 8 frames and 8 squares in the last frame. Lastly, set the looping to “Forever” by clicking where it says “Once” with a down arrow. (See Figure 7).

Figure 7

You can preview your animated loading image by zooming back out to 100% on the document, and going to Frame 1 and hit play. It’s still on a transparent background so it doesn’t look as nice as it will on your webpage, but just an idea. Here is our animated loading image:

Animated Loading GIF Image


Here is another, smoother sliding upload bar animated GIF I made:


Now that we have our animated loading GIF image, we need to incorporate this to our website with a form. Let’s say this is our form in HTML:

[codesyntax lang=”html4strict” title=”HTML Form”]
<form method=”post” action=”” enctype=”multipart/form-data”>
<table width=”650″ align=”center” border=”0″ cellpadding=”2″ cellspacing=”0″>
<tr>
<td align=”left” width=”100″><strong>Title:</strong></td>
<td align=”left”><input type=”text” name=”title” size=”25″ maxlength=”60″ /></td>
</tr>
<tr>
<td align=”left”><strong>Image:</strong></td>
<td align=”left”><input type=”file” name=”image” size=”25″ /></td>
</tr>
<tr>
<td align=”left” colspan=”2″><input type=”submit” value=”Submit” name=”submit” onclick=”showUploadDiv()” /></td>
</tr>
</table>
</form>
[/codesyntax]

So right now, this form just submits as normal without any loading image. To change this, we use the “onclick” attribute to the submit button, so that once the submit button is clicked (the form is submitted) we will display the loading image with whatever text we want to go along with it. So first let’s make some CSS styles for the uploading div and the image itself, then some Javascript entries, to the <head> portion of the webpage.

Insert the following in the <head></head> section:

[codesyntax lang=”css” title=”CSS Styles and IDs”]
<style type=”text/css”>
#uploading {
background: #eee;
padding: 3px;
border: 1px dashed #ccc;
width: 300px;
text-align:center;
}
#loading_image {
width:100%;
height:18px;
border:0;
padding: 2px 0;
background: #eee url(./Loading-Animated-GIF.gif) no-repeat top center;
text-align: center;
}
</style>
[/codesyntax]

[codesyntax lang=”javascript” title=”Show Upload Image JavaScript Function”]
<script type=”text/javascript”>
function showUploadDiv(){
var uploadDiv = document.getElementById(‘uploading’);
if(uploadDiv.style.display == ‘none’){
// the div isnt being displayed yet, so lets change the display then write the content
uploadDiv.style.display = ‘block’;
uploadDiv.innerHTML = ‘Please wait while your image is being uploaded…<br/><div id=”loading_image”></div>’;
}
}
</script>
[/codesyntax]

Now, right after our form we need to include a <div> which holds the uploading animated GIF and some text. So let’s put this right after the form:

[codesyntax lang=”html4strict” title=”Uploading DIV”]
<div id=”uploading” style=”display:none”>
</div>
[/codesyntax]

Be sure to change the image source to your images location and file name so it loads properly. Otherwise you will see the alternative text. Now, we have one last change to make. We need to add the onclick function to the form’s submit button. So let’s go back to the form and change the submit button to the following:

[codesyntax lang=”html4strict” title=”Form Submit Button”]
<input type=”submit” value=”Submit” name=”submit” onclick=”showUploadDiv()” />
[/codesyntax]

Now when we click the submit button we will see a nice message letting us know our image is being uploaded and an image representing the upload progress.

Click here to check out the demo!

Enjoy!

Filed under: Tutorials, Web ProgrammingTagged with: , , , , , , , , , , , ,

Javascript & PHP Star Rating Script

I’ve searched around the interwebs for an ajax star rater and I came across a few different possibilities, all of which looked very good. The top result from google was Nick Stakenburg’s “Starbox” for “ajax star rater”. I also found Masuga Web Design’s Ajax Star Rater and a script from MySandbox to be popular results. However I couldn’t really seem to find a PHP / Mysql script that used Javascript for the rater effects. So I decided to make one based off of a script I found:

Reign Water Design’s 5 Star Rating System

This was a very nice easy to use Javascript 5 star rating script. All I had to do was make some tweaks to my preference and add on some PHP/Mysql code to submit the rating.

See the demo or download this script.

To view the PHP source code, images, and everything together you must download this script.

Javascript

Insert the following in the <head> tags of your page:
[codesyntax lang=”html4strict” title=”Javascript Source Code”]
<script type=”text/javascript”>
function insertParam(key, value)
{
key = escape(key); value = escape(value);

var kvp = document.location.search.substr(1).split(“&”);

var i=kvp.length; var x; while(i–)
{
x = kvp[i].split(“=”);

if (x[0]==key)
{
x[1] = value;
kvp[i] = x.join(“=”);
break;
}
}

if(i<0) {kvp[kvp.length] = [key,value].join(“=”);}

//this will reload the page, it’s likely better to store this until finished
document.location.search = kvp.join(“&”);
}
function alterDisplay(id){
var dropdown = document.getElementById(id);
if(dropdown.style.display == “none”){
dropdown.style.display = “”;
} else {
dropdown.style.display = “none”;
}
}
</script>
<script type=”text/javascript” language=”javascript” src=”./scripts/ratingsys.js”></script>
[/codesyntax]

CSS

You will need to include this in the <head> tags as well either in <style> tags or by <link>:
[codesyntax lang=”css” title=”CSS Styles”]
#rateMe #rate_overlay {
position:absolute;
display:block;
float:left;
margin:0;
padding:0;
height:30px;
width:auto;
background:#eee url(./images/star_overlay.gif) repeat-x;
z-index:2;
cursor:default;
}
#rateStatus{width:100px; height:20px;margin:4px 0 0 5px;font: 12px “Trebuchet MS”, Arial, Helvetica, sans-serif; font-weight: bold}
#rateMe{width:152px; height:50px; padding:1px; margin:0px; vertical-align:top; z-index:auto; border: 1px solid #ccc; }
#rateMe li{float:left;list-style:none;}
#rateMe li a:hover,
#rateMe .on{background:url(./images/star_on.gif) no-repeat;}
#rateMe a{float:left;background:url(./images/star_off.gif) no-repeat;width:30px; height:30px;cursor:pointer;}
#rateMe a:hover{background:url(./images/star_on.gif) no-repeat;}
#rateMe a.grey,#rateMe a.grey:hover{background:url(./images/star_off.gif) no-repeat; cursor:default;}
#rateVotes{display:block; margin-left:65px; font: 11px “Trebuchet MS”, Arial, Helvetica, sans-serif; color:#4a4a4a;}
#ratingSaved{display:none;}
.saved{color:red; }
.grey

.rate_on_button {

}
.rate_on_button a { float:left;padding:10px;margin:0 5px;border:2px solid #666; background-color:#fff; color: #000; font-size: 2em; text-align:center; display:block; color: #000; text-decoration: none; }
.rate_on_button a:hover { color: #fff; text-decoration: none; background-color: #333; }
[/codesyntax]

Basically I took the script that Water’s made and changed a few things to the css styles, added an overlay for the current rating, and wrote a php script to insert rates and determine the current rating, etc. I also added the Javascript functions insertParam() and alterDisplay(). You do not need to use this function insertParam() to create the url, you can simply set the <a> tags to something like this:

[codesyntax lang=”html4strict”]
<a href=”./index.php?r=1″ id=”_1″ title=”Terrible” onmouseover=”rating(this)” onmouseout=”off(this)”></a>
[/codesyntax]

The Javascript function alterDisplay() is used to hide and show the overlay <div> that holds the current rating (if there is one). So when you mouse over the rating bar holder it hides the overlay so you can rate.

The PHP script grabs the information from the Mysql table that you specify in the function. You will need to adjust the following values:

  • $var – The column to base your mysql selection off of. Grab all rows where this column equals $id.
  • $table – The table where the ratings are being held.
  • $star_width – Width of the stars, default is 30px.

You will need to be connected to a MYSQL database before calling the rating bar function.

Since the syntax of the function is the following:

[codesyntax lang=”php” title=”Rating Bar Syntax”]
function rating_bar($id);
[/codesyntax]

You will need to supply the identifier ($id) which tells the PHP script which row to grab from the Mysql table.

To display the current rating after it has been rated on – because Javascript alone is not enough – I added an overlay <div> which will hold the current rating. This is done by setting the css style of this overlay div to the following:

[codesyntax lang=”css” title=”Rate Overlay CSS Style”]
#rateMe #rate_overlay {
position:absolute;
display:block;
float:left;
margin:0;
padding:0;
height:30px;
width:auto;
background:#eee url(./images/star_overlay.gif) repeat-x;
z-index:2;
cursor:default;
}
[/codesyntax]

The position: aboslute and z-index: 2 style attributes make the div lay over top of the rateMe div which holds the rater and has a z-index: 1.

Test out this free script with the demo link at the top of the post or download it and use on your own website. Credit where due is always appreciated.

Any questions or problems please feel free to email me at brian@bgallz.org or post here.

Filed under: Featured, Javascript, PHP, Scripts, TutorialsTagged with: , , , , , , ,

Check if Field Exists in Mysql Table

Sometimes it is useful to know if a field exists in a mysql table before running a query using that field name, especially when the field name is coming from some kind of user input.

So to do this we use the function mysql_list_fields to grab the fields out of a table and run through them with a for loop until we find the one we are looking for – using the function mysql_field_name, in which case we return true. If we don’t find it, the function returns false.

[code lang=”php”]

[/code]

And it’s that easy!

Filed under: MySQL, PHP, TutorialsTagged with: , , , ,

Avoid Duplicate Content Pages

Many people do not think about the possibility of duplicate content pages on their website, when this is very common and easily avoidable. All it takes is a little HTML in the head tags of the page.

What is a duplicate content page?

Duplicate content is content that is showing up on the Internet by multiple URLs. Another words, a page like aboutus.php might be coming with the same content as aboutus.php?do=send.

This causes some problems with search engines as far as determining which page the engine should use for query matches, page ranking, use of meta tags between the two versions, and just which one to include for their indices.

How do you avoid duplicate content?

Let’s say these are your pages that are coming with the same content:

Original source:
post.php?id=1
.

Duplicate content pages:
post.php?id=1&lang=en
post.php?id=1&do=login

On post.php we can include a <link> tag that will reference to the original source so Search Engines gather the original correct information from the server, rather than trying to decide between the serveral duplicate pages.

Place in the <head> tags of post.php:

[code lang=”php”]
echo ‘‘;
[/code]

This will take the $id and put it into the URL as just post.php?id=$id. So any other URL parameters, such as lang=en, or do=login, will not be read as a duplicate page, but tell search engines to use the content of just post.php?id=$id.

If you do not need to use PHP and you just want the page to load a set content of just post.php then you would use the tag like so:

[code lang=”html”] [/code]

When using this method, you want to be sure that you are consistent throughout your website with your canonical URLs. If your canonical url is like: “http://www.bgallz.org/” then you want to use “www” in all of your URL references and tags for the domain.

Now, if you have pages that you do NOT want included in any search engine queries or crawled by search engine bots, then you want to use a META tag with “noindex, nofollow”.

To block a page from search engine indexes places the following in the <head> tags:

[code lang="html"]

[/code]

Walla!
Filed under: HTML, TutorialsTagged with: , ,

HTML Div Float Property

Div Float LayoutUsing the HTML tag – <div> and the float style property, you can make designs for your websites. Well, you can make layouts for where design could be. This is a good structural tool in laying out where content will be on your web pages, images, blurbs, etc.

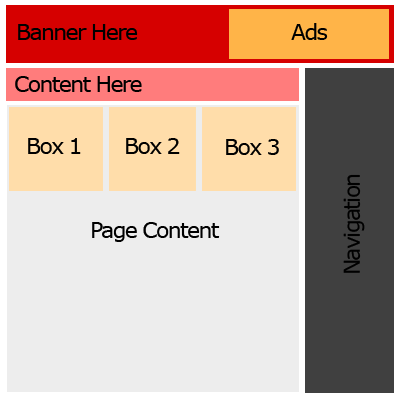
Let’s say we want a page to look like this:

First I’m going to set up the CSS styles we will set our <div>’s to in the HTML to give this page the right look as far as padding, margins, borders, etc. Once we have all the styles defined we will call them to the DIV tags in our HTML like so: <div class=”CLASSNAME“>. Using the right float’s in the right order will place our DIVs in the right places to make this layout.

This will go in our <head> tags of the HTML page:

[code lang=”css”]
html, body, center {
padding: 0px;
margin: 0px;
height: 100%;
}
.header {
padding: 8px;
vertical-align: middle;
height: 80px;
background: #d60000;
}
.banner {
float: left;
border: 0;
vertical-align: middle;
width: 500px;
height: 60px;
}
.ads {
padding: 10px 0px;
float: right;
width: 300px;
height: 60px;
vertical-align: middle;
background: #ffb448;
}
.wrapper { /* Main page holder. */
padding: 10px;
width: 875px;
background: #fff;
height: 100%;
}
.page {
padding: 10px 0px;
width: 630px;
float: left;
height: 100%;
}
.top {
padding: 5px;
height: 40px;
background: #ff7c7c;
margin:0;
}
#boxes {
padding: 5px 0px;
}
.box {
width: 197px;
height: 197px;
padding: 3px;
margin: 3px;
background: #ffddaa;
float: right;
}
.rightside {
float: right;
text-align: center;
height: 100%;
padding: 10px 0px;
}
.nav {
padding: 5px;
background: #ccc;
width: 200px;
height: 100%;
min-height: 600px;
}
.content {
margin: 20px 0px;
width: 600px;
text-align: left;
}
[/code]

Now we have to write the HTML to use these styles appropriately.

Here is our <body> HTML:

[code lang=”html”]


Ads Here
Content Here
Box 3
Box 2
Box 1

Content Here, lots and lots of content here! Content Here, lots and lots of content here! Content Here, lots and lots of content here! Content Here, lots and lots of content here! Content Here, lots and lots of content here! Content Here, lots and lots of content here! Content Here, lots and lots of content here! Content Here, lots and lots of content here!Content Here, lots and lots of content here!

Content Here, lots and lots of content here!Content Here, lots and lots of content here!Content Here, lots and lots of content here!Content Here, lots and lots of content here!Content Here, lots and lots of content here!

[/code]

Take a look at the HTML in action here!

If you notice in the HTML the box’s are placed in descending order inside the “boxes” div ID. Since the box class is set to to the right:

[code lang=”css”]
.box {
float: right;
}
[/code]

We put the boxes in descending order so that the HTML will read down the page and float the first one to the right, then the next, then the last. So it floats BOX3, then BOX2, then BOX1.

Using the float style property of DIV tags is really useful in making layouts because it does not require any real guidelines to follow as far as where it is on the page. This sounds a little wordy but basically with a combination of float, and position style attributes you can make your DIV’s go where ever you want.

Filed under: HTML, Tutorials, Web Programming, XHTMLTagged with: , , , , , , ,

PHP fopen() Function

The fopen() function will open any valid file or url.

If the function fails it will return false along with an error generated. You can hide the error message by adding an “@” in front of the function name.

Syntax

[code lang=”php”]
fopen(filename, mode, include_path, context);
[/code]

Parameters

filename (String | Required)

This specifies the URL or file to open. Example: “./files/myfile.zip“.

mode (String | Required)

The type of access you are requesting for the file.

These are the valid access modes:

  • r” (Read only. Starts at the beginning of the file)
  • r+” (Read/Write. Starts at the beginning of the file)
  • w” (Write only. Opens and clears the contents of file; or creates a new file if it doesn’t exist)
  • w+” (Read/Write. Opens and clears the contents of file; or creates a new file if it doesn’t exist)
  • a” (Write only. Opens and writes to the end of the file or creates a new file if it doesn’t exist)
  • a+” (Read/Write. Preserves file content by writing to the end of the file)
  • x” (Write only. Creates a new file. Returns FALSE and an error if file already exists)
  • x+” (Read/Write. Creates a new file. Returns FALSE and an error if file already exists)

include_path (Boolean | Optional)

This can be set to 1 or TRUE if you want to search for the requested file in the include path, also.

context (String | Optional)

Defines the context of the file stream. This is a set of options that change the behavior of the stream.

Originally posted at w3schools.com:

Note: When writing to a text file, be sure to use the correct line-ending character! Unix systems use \n, Windows systems use \r\n, and Macintosh systems use \r as the line ending character. Windows offers a translation flag (‘t’) which will translate \n to \r\n when working with the file. You can also use ‘b’ to force binary mode. To use these flags, specify either ‘b’ or ‘t’ as the last character of the mode parameter.

Here I showed you how to upload a file from a URL using this function.

Example:

[code lang=”php”]
$filename = “./images/myimage.jpg”;

$file = fopen($filename,”r”);

if($file){
echo “We have the file.”;
} else {
echo “File not found.”;
}
[/code]

Filed under: PHP, Web ProgrammingTagged with: , ,

PHP Pagination with Mysql

So you have a Mysql table you want to pull data from, but you don’t want to flood the page with everything in the table right! So you need some pagination to seperate all the content in the table into easy to open pages.

So let’s say this is your mysql query:

[code lang=”php”]
$sql = mysql_query(“SELECT * FROM table1”) or die(mysql_error());
[/code]

So this will grab everything from table1.

If we have a lot of rows in this table this is going to return all of them, so we need to make a pagination for all the rows returned. This requires modifying the query and adding some variables. I like to have the PER_PAGE,OFFSET, and PAGE_NUM variables defined so you can use them globally in every class and function, however you may not want the same values throughout so declare them as you wish.

Here is the header PHP for definitions:

[code lang=”php”]
// === START Pagination definitions === //
$pgNperPage=15;
$pgNpageNum=1;
if(isset($_GET[“p”])){
$pgNpageNum=(int)$_GET[“p”];
}
$pgNoffset = ($pgNpageNum – 1) * $pgNperPage;
// definitions
define(“SITE_URL”,”http://mysite.com/”,true);
define(“PER_PAGE”,$pgNperPage,true);
define(“OFFSET”,$pgNoffset,true);
define(“PAGE_NUM”,$pgNpageNum,true);
// === END Pagination definitions === //
[/code]

So we have to modify the query we use in $sql to include a limit with the offset and per page values used. I have made a pagination function which will do everything for me. We’ll pass the query along with some parameters through this function to output the new query and the pagination HTML.

Here is the function syntax:

[code lang=”php”]
pagination($query,$pageNum,$perpage,$sortable,$cat=””,$sort=””,$headers=””,$pageL=””);
[/code]

Function Paremeters:

  • $query – The original query to use for the Mysql. i.e. “SELECT * FROM table1”. (No ORDER BY or LIMIT).
  • $pageNum – Current page number.
  • $perpage – Per page integer value.
  • $sortable – Array of sortable fields in mysql table to order the results by.
  • $cat – What is being paginated. i.e. (Users, videos, comments, etc.) [Optional]
  • $sort – Field in Mysql table to sort it by. Default in the function definition is “timestamp” – usually used for date. [Optional]
  • $headers – Additional URL headers besides the sort and page number. i.e. “&g=bf-2142” (Start with & not ?) [Optional]
  • $pageL – Pagination letter. Useful if you have multiple paginations on one page. i.e. “cp”. (Default is p.) [Optional]

Here is the pagination function definition:

[code lang=”php”]
function pagination($query,$pageNum,$perpage,$sortable,$cat=””,$sort=””,$headers=””,$pageL=””){
$pagination = array();
$paginationDetails = “”;
$adjacents = 3;
if(!$perpage){
$perpage = 15; // default
}
if($cat){
$cat = ” “.$cat.””;
}
$pageNum = (int)$pageNum;
if(!$pageNum){
$pageNum=1;
}
if(!$pageL){
$pageL=”p”;
}
$pgNoffset = ($pageNum – 1) * $perpage;

if(isset($_GET[‘dsc’]) && $_GET[‘dsc’] != “”){
$dsc = “DESC”;
$urldsc = “&dsc=1”;
} else {
$dsc = “”;
$urldsc = “”;
}
if(is_array($sortable)){
if(in_array($sort,$sortable)){
$sort = trim($sort);
} else {
$sort = “”;
}
}
if($sort){
$order_by = “ORDER BY “.$sort.” “.$dsc.””;
} else {
$order_by = “”;
}
$limit = “LIMIT “.$pgNoffset.”,”.$perpage.””;
$queryNew = $query.’ ‘.$order_by.’ ‘.$limit;
$pagination[] = $queryNew;
if(strpos($_SERVER[“REQUEST_URI”],”?”)){
$pos = strpos($_SERVER[“REQUEST_URI”],”?”);
} else {
$pos = strlen($_SERVER[“REQUEST_URI”]);
}
$pageURL = substr($_SERVER[“REQUEST_URI”],0,$pos);

$pageURL .= “?sort=”.$sort.””;
$pageURL .= “&dsc=”.$dsc.””;
$pageURL .= $headers;

$sql = mysql_query($queryNew) or die(mysql_error());
$count = mysql_num_rows($sql);
if($count > 0){
$totalQuery = mysql_query($query) or die(mysql_error());
$totalCount = mysql_num_rows($totalQuery);
$total = ceil($totalCount / $perpage);
$pm1 = $total – 1;
$paginationDetails .= ‘

Displaying ‘.$count.’ of ‘.$totalCount.$cat.’.

‘;
if($pageNum > 1){
// previous button
$paginationDetails .= ‘

‘;
}
// conditionals for breaking up the pages
if($total < 7 + ($adjacents*2)){ // not enought to break up for($page=1;$page<=$total;$page++){ if($page == $pageNum){ $paginationDetails .= '

‘;
} else {
$paginationDetails .= ‘

‘;
}
}
}
else if($total > 5 + ($adjacents*2)){
// enought to hide some
if($pageNum < 1 + ($adjacents*2)){ // hide later pages for($page=1;$page<5+($adjacents*2);$page++){ if($page == $pageNum){ $paginationDetails .= '

‘;
} else {
$paginationDetails .= ‘

‘;
}
}
$paginationDetails .= ‘

‘;
$paginationDetails .= ‘

‘;
$paginationDetails .= ‘

‘;
}
else if($total – ($adjacents*2) > $pageNum && $pageNum > ($adjacents * 2)){
// in middle, hide little front and back
$paginationDetails .= ‘

‘;
$paginationDetails .= ‘

‘;
$paginationDetails .= ‘

‘;
for($page=($pageNum – $adjacents);$page<=($pageNum + $adjacents);$page++){ if($page == $pageNum){ $paginationDetails .= '

‘;
} else {
$paginationDetails .= ‘

‘;
}
}
$paginationDetails .= ‘

‘;
$paginationDetails .= ‘

‘;
$paginationDetails .= ‘

‘;
}
else {
// close to end, hide early pages
$paginationDetails .= ‘

‘;
$paginationDetails .= ‘

‘;
$paginationDetails .= ‘

‘;
for($page=$total – (3 +($adjacents*2));$page<=$total;$page++){ if($page == $pageNum){ $paginationDetails .= '

‘;
} else {
$paginationDetails .= ‘

‘;
}
}
}
}

if($pageNum < $total){ $paginationDetails .= '

‘;
}
$paginationDetails .= ‘

Page ‘.$pageNum.’ of ‘.$total.’ ‹ Prev ‘.$page.’ ‘.$page.’ ‘.$page.’ ‘.$page.’ ‘.$pm1.’ ‘.$total.’ 1 2 ‘.$page.’ ‘.$page.’ ‘.$pm1.’ ‘.$total.’ 1 2 ‘.$page.’ ‘.$page.’ Next ›

‘;
$pagination[] = $paginationDetails;
}
return $pagination;
}
[/code]

Now we just need to include the HTML and CSS classes for the pagination so viewers can navigate through the pages returned from this query.

Pagination CSS:

[code lang=”css”]
.pagination,.pagination div {
background-color: #eee;
font: 11px tahoma;
border: 1px solid #ccc;
text-align: left;
}
.a_td {
color: #343434;
background-color: #fff;
font-size: 11px;
font-family: tahoma;
}
.a_page {
color: #343434;
background-color: #fff;
font-size: 11px;
font-family: tahoma;
padding:0px;
}
.a_page:hover {
background-color: #eee;
}
.a_page a {
display:block;
padding:2px;
color: #333;
text-decoration: none;
}
.page_selected {
background-color: #333;
color: #fff;
font-weight: bold;
font-size: 11px;
font-family: tahoma;
}
.page_selected a {
color: #000;
}
[/code]

Now we have the function included on our page along with the necessary CSS styles. Now we can call the function and echo the contents of the returned array. The function pagination returns an array like so: pagination = [newMysqlQuery, paginationHTML].

So let’s say this was our function for downloads:

[code lang=”php”]
function downloads($g){
$g=mysql_real_escape_string($g); // Game
$validSorts = array(“title”,”catType”,”dl_count”,”timestamp”); // Sorts
if(isset($_GET[‘sort’]) && in_array($_GET[‘sort’],$validSorts)){
$sort = mysql_real_escape_string($_GET[‘sort’]);
} else {
$sort = ‘timestamp’; // default sort used.
}
if(isset($_GET[‘dsc’])){
$desc = “DESC”;
} else {
$desc = “”;
}
if(isset($_GET[‘p’])){
$page = (int)$_GET[‘p’];
} else {
$page = 1;
}
$query = “SELECT * FROM downloads WHERE gameCat = ‘$g'”;
$pagination = pagination($query,$page,15,$validSorts,”downloads”,$sort,”&g=”.$g.””); // Call the function.
$sql = mysql_query($pagination[0]) or die(mysql_error()); // $pagination[0] = new query.
$count = mysql_num_rows($sql);
}
[/code]

Now we have called the pagination function with some variables for displaying our downloads. Along with printing the pagination HTML you could display the rows with the new Mysql query that the function returns.

See how to display Mysql Rows here!

For this example we will simply echo the pagination HTML:

[code lang=”php”]
echo $pagination[1];
[/code]

Check this function out LIVE here:

http://bfgamerz.com/members.php

Filed under: MySQL, PHP, Tutorials, Web ProgrammingTagged with: , , , ,