As of today, December 5th 2012, Instagram has dropped support for Twitter “cards.” This means that Instagram images will no longer be displayed properly on Twitter. This doesn’t eliminate the ability to post Instagram images to Twitter but makes visible the now weak compatibility between the two companies. Why has this happened?
Well, the feud between Instagram and Twitter all began when CEO of Instagram Kevin Systrom approached Facebook for an appraisal on the company after very recently receiving a valuation from Twitter which was said to be in the hundreds of millions of dollars. This offer from Twitter was given in April of 2012 after Instagram had reached tremendous growth since its initial launch in October of 2010. It was Jack Dorsey, a founder of Twitter, keen photographer and an original investor to Instagram, who made the offer. Dorsey’s intent was to have Instagram highly compatible with Twitter and the two companies work together.
Once Systrom went to Facebook looking for a better assessment to his company, the relationship between Instagram and Twitter quickly retrogressed. Facebook acquired Instagram for $715 million in cash and stock just 48 hours after the two companies met.
It was July 2012 when Twitter blocked Instagram from accessing data on friend connections on Twitter. This disabled automatic connections with Twitter friends through Instagram upon using the Instagram app. Twitter never publicly revealed the reason for their change in policy with Instagram, but it was quite obvious that Twitter felt betrayed. The previous ally is now a part of Twitter’s biggest competitor and the tensions continue to grow.
By September of that same year, Instagram had more mobile users than Twitter – a 7.3 million to 6.9 million victory and real slap in the face for Twitter. In October Instagram established a branch that would re-open Twitter access to its users. They were able to use their own user database to allow users to share Instagram images on Twitter.
This brings us to today’s latest quarrel between the two social media companies where Instagram dropped support for Twitter “cards” – which makes Instagram images easily viewable on Twitter. Despite the back and forth feud between the companies, CEO Systrom’s latest statement on the matter is “we have a really good relationship with Twitter.” On top of that, he has also announced that the dropping of Twitter cards was “deliberate and intended to drive users to the new web client for Instagram.” – Christopher Mims’ “Instagram to Twitter: We are never ever getting back together”
So Systrom, is this just a love-hate game we are playing or are things officially over with Twitter?
Exactly 20 years ago from yesterday the first SMS (text message) was sent. The progress this area of technology has made is incredible. It’s a shame that so many tech giants want SMS to come to an end.
Facebook launched their latest attack against SMS this morning – Tuesday, December 4th 2012 – as the company made its messenger app available to Android users in five different countries. This does not require a Facebook account either! You can simply download the Messenger app and sign in with your phone number and you are ready to start messaging your contacts… who use this application.
Since the beginning of SMS (short messaging services) its uses have been controlled by cellular carriers like Verizon Wireless, AT&T, T-Mobile, etc. – until now. This is not the first attempt by a tech company to grab hold of this market, but none the less, a very important release for Android users. As social media companies have updated to the mobile world, a piece of the text messaging pie has since been in their cross-hairs. One can’t help but wonder how long it will be before Facebook develops their very own mobile devices… or have they already started?
This Facebook Messenger App is available for both Android and iOS phones.
This release brings about the possibility for international expansion. There’s no telling how far companies like Facebook will stretch their arms for a strong hold on the SMS market. Starting today the product update will initially reach five countries – India, Australia, Indonesia, Venezuela, and South Africa – all areas showing very expensive SMS rates. This gives Facebook a greater chance at securing the SMS market in these areas, whether they have an account or not. It’s no surprise the update is beginning with Android powered phones as it is the fastest spreading smartphone platform in the world and available on a wide price range of phones.
There isn’t any word on the update for iOS users as of yet. It is more than likely that Apple will not be very fond of Facebook stealing users from using their SMS and switching to the app driven messenger.
Current competitor levels are certainly considerable, with mobile messaging platforms such as WhatsApp – one that Facebook has personally expressed interest in. However there is no development in the movement on securing this as their own. Owners of Whatsapp Brian Acton and Jan Koum have made clear their intent to remain as an independent company.
For now, SMS is still in the lead with mobile messaging, but who knows how long it shall remain. It’s been a solid 20 years SMS, but your days may be numbered.
In response to Mexico’s $2.7 billion US dollars judgement, Yahoo states they “will vigorously pursue all appeals.” The non-final judgement made by a Mexico City court ruling is for a breach of contract with a former partner – Ideas Interactivas and a company Worldwide Directories. Josh Constine explains the intent of the book-form directory:
The idea was to augment its online local business search with printed book. Yahoo hoped that the two-pronged strategy would let it compete with Google. The books would include maps, business and landmark listings, and a catalogue of offers and discounts. There would be flexible, low-cost advertising options in Yahoo! Páginas Útiles, which was slated for an initial circulation of 800,000 free copies followed by a second print run of 1.7 million units according to a April 2003 article from Mexican website Noticias Dot.com.
Yahoo says the case is “without merit.”
The ruling comes at a time when Yahoo! and its owners are looking to find a new direction for their business and its focus. Just another obstacle for CEO Marissa Mayer who just recently shut down services in Korea. The company has not been generating much traffic through Korean browsers as many users have turned to Google Inc.’s search engine and leading social media service providers such as Facebook Inc. and Twitter Inc.
The $2.7 billion ruling against Yahoo is pretty troubling considering Yahoo’s total revenue for last quarter was just $1.2 billion, and only $226 million the quarter prior. If Marissa Mayer’s appeals are unsuccessful this could prove to be a serious disaster for the CEO’s new direction. The case could take months or even years to be settled and the penalty their facing doesn’t hang well on the wall until then. As these charges will surely hurt their reputation, the intent of the former partners’ actions seems far more painful.
Josh’s article also explains the absurdity of the judgement in a relative matter:
The scope of the contracts between the companies are not yet clear. If the deals were for Mexico alone the penalty would amount to $30 per resident. A 2005 study said there were 4.29 million businesses in Mexico, which would mean Yahoo would pay $630 each. That seems somewhat absurd, so the total Yahoo has to pay could definitely get reduced if it doesn’t beat the charges all together during appeals.
Word from Yahoo on the details of the courts initial ruling and the agreement made with Worldwide Directories and Ideas Interactivas is still being anticipated.
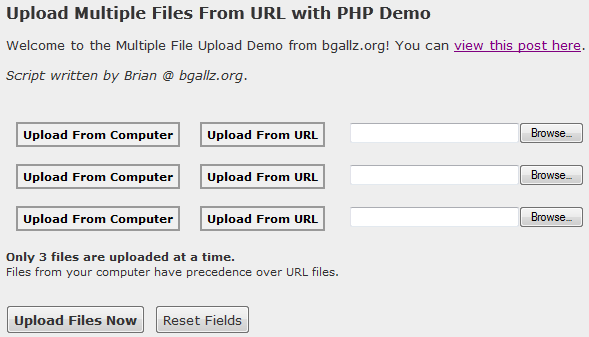
In a previous post I made I showed you how to upload a file from a URL using a PHP script. You can view this post here.
Now I will show you how to take this a step further and upload multiple files from multiple URLs or uploaded from the user’s computer.
Because we will have multiple files to upload we are going to want to make an array of these files that include all their attributes. Then we’ll process each file at a time and based on whether it is coming from a URL or the user’s hard drive, we will upload it accordingly.
Here is a preview of what our form will look like:
This form contains three file inputs, either uploaded from the user’s computer, or given by a URL to a file. There are two buttons for each input which enable and disable the HDD or URL upload options. Now, I haven’t made the script to completely disable the URL input once a file has been selected from the user’s computer, so when the form is submitted it will check for uploaded files first over files being gathered from a URL. So you will want to include that on your main page so users know you can only upload three files at a time here, not six.
You’ll notice on the submit button it activates the Javascript function “showUploadDiv().” This function changes the display style setting on the uploading div and then fills it with some text and the animated loading image.
I also have used some jQuery for the buttons to be used effectively:
What this jQuery says is to add the class “selected” – from clickedClass – to the current button that is being clicked, and remove that class name from all other buttons within the current parent’s sibilings. Sounds a little complicated, but it’s very simple. The buttons are loaded from “#upload_files button” – so thats all the button elements within the div ID “upload_files.”
Now finally for the PHP of the script. On index.php we include the following in the header:
$valid_exts = array(
"gif","png","jpeg","jpg",
"image/gif","image/jpeg","image/png","image/jpg"
); // array of valid file extensions
$max_file_size = 32; // file size in kb
$upload_dir = "files/"; // directory to upload to with trailing slash

$upload_result = "";

if(isset($_GET['do']) && $_GET['do'] == "upload"){
$upload_result = run_upload_form();
}
So when the form is submitted – which is sent to “index.php?do=upload” – we run the function run_upload_form() and set the $upload_result to its returned value.
The key variables defined at the beginning of the script are there for you to modify as you need them. Of course you can modify the function itself to output different values as you need them to be. Currently the script checks against the following before uploading:
Valid extension type (image files by default)
File size limit (32KB by default)
Upload directory exists and is writable
URL validation for remote file size and type
To view the rest of the PHP as well as the Javascript and CSS styles you must download the script.
A new feature of HTML 5 is the ability to use a multiple file upload field. This is extremely simple with HTML 5. You basically create an input tag with type = file and the multiple attribute applied.
This may look like a regular file upload input from standard HTML however when you click the “Browse…” button to look for files on your computer, you can select multiple files by Shift+Clicking on the desired files grouped together, or alternatively Ctrl+Clicking to select individual scattered files. This only works for files coming from your computer of course, so to upload multiple files from URL, you will need a script like the one above.
Here is a screenshot of the browse window. You can select multiple files as you can see they are highlighted, and listed in order in the “File name:” input.
Browse for multiple files using HTML 5
For this multiple file upload, the PHP is much simpler. We simply run the upload like we would for the first example, only we don’t have to worry about URL files or checking an array of files. The HTML already loads the files into an array for us when PHP checks the $_FILES[‘upload_files’].
Here is how it looks…
<?php
// upload multiple files from HTML5 multiple files input

if(isset($_POST['submit']))
{
$valid_exts = array("image/gif","image/jpeg","image/png","image/jpg"); // image files
$max_size = 20480; // max size in kb (2kb default)
$directory = "./files/"; // upload directory

$upload_files = $_FILES['upload_files'];
$files_uploaded = array(); // successful uploads

if(is_array($upload_files))
{

foreach($upload_files as $file)
{

if(in_array($file["type"],$valid_exts))
{

if($file["size"] <= $max_size)
{

// file is valid type and size, let's upload
if(move_uploaded_file($file["tmp_name"],$directory . $file["name"]))
{

$files_uploaded[] = '<a href="'.$directory.$file["name"].'" target="_blank">'.$file["name"].'</a>';

}

} else { return "File size too large. Max file size is: ". ($max_size / 1024) . " KB."; }

} else { return "Only image file types may be uploaded."; }

}

return "". count($files_uploaded) ." files out of ". count($upload_files) ." total have successfully been uploaded. Here are the uploaded files: <br/><br/>" . print_r($files_uploaded) . "";

} else { return "Please a file or multiple files to upload."; }

}
?>
So you just bought a hard drive and want to start filling that sucker with some files or whatever you want to put on it… Whether you don’t know how to install it into your computer’s case or just on the BIOS you have come to the right place. Here I am going to show you step by step how to install the new piece of hardware into your case as well as how to be sure it is populated properly on your PC.
Hard Drive (Hardware) Installation
Step 1) Open your computer’s case.
Your case should support at least 2 hard drives if not more. The hard drive bays are located (usually) below the bays for the CD/DVD drives. Most modern cases have locking mechanisms for the drives as you can see in Figure 1 next the the numbers for each bay.
Figure 2 (7-Pin SATA Cable)
Now if this is your first hard drive you are installing you are going to want to choose a bay that works well with your power supply connection’s cord length. So don’t choose the bottom bay with a cord that runs to hard drives as well as CD/DVD drives because you probably will have trouble reaching them up at the top of your case. The amount of space and cord length which you are given is always important to consider when installing ANY new hardware in your system.
In Figure 1 below you can see I labeled the following important items:
a) SATA Cables – Also called “Serial ATA” cables as seen in Figure 2, these connect from your motherboard to CD/DVD/Bluray Drives and SATA hard drive disks.
b) CD/DVD Drives – Usually located on top of the hard drive bays and are larger in size.
c) Hard Drive Bays – This is where you are installing your new hard drive. You will most likely need to remove a locking mechanism from the bay before you can insert a new drive. Be sure to pick an easily accessible bay with adequate cord length to the mother board and PSU.
Figure 3 (4-Pin Molex to SATA)
d) Molex Cables – These are usually white or clear 4-pin connectors that have 4 male outputs to connect to devices, see Figure 3. Most modern power supplies will have these molex connectors attached with adapters to connect to SATA devices like the hard drive. See Figure 3 for the connector to your new hard drive.
Not all hard drives come with SATA cables to connect to the motherboard. Make sure you have one before hand or that it comes with one!
Figure 1 (Computer Hardware Layout)
Step 2) Place hard drive in case.
Once you know where you are installing the hard drive slide it into the bay and be sure to use the locks on the side of the bays that come with the case. This will keep the hard drive from sliding back and forth.
Plug in the SATA cable shown in the Figure 2 in to your motherboard and then into the back end of the hard drive. Then plug in the power cable to your hard drive and be sure it is connected properly to the power supply.
Tuck away any loose cables to be sure they are as far away from any fans as possible.
Once you have your hard drive installed in the case it should resemble something like Figure 5.
Figure 5 (Hard Drive in Case)
Step 3) Install the device’s drivers.
Great! You have the hard part over with. Now that the drive is securely installed in the case we can close the case back up, power on, and start uploading.
When you boot up your computer after the hard drive is installed you should automatically get a notification from Windows detecting a new device. This will install the device’s drivers onto Windows. If Windows doesn’t tell you it has found a new device, go to:
Right click on “Disk drives” and go to “Scan for hardware changes.” This should find your newly connected hard drive and run driver install/update.
If this fails to detect the hard drive, you may need to recheck your installation in the case. Make sure all cables are plugged in securely, or try another SATA port on the motherboard.
Step 4) Add drive to Disk Management.
Last thing before you can start utilizing your hard drive. Before the hard drive is recognized as a partition part of your computer’s disk management you must do the following:
Start > Right-click Computer > Manage
On the left go to Storage > Disk Management and in the main window you should see your new drive in the list of volumes. Right click on the drive and go to “Format…” From here it will format the drive for your operating system and you can name it, etc. It will then populate the drive’s details, and whalla!
So, you might have heard some word about these bills “SOPA” (Stop Online Piracy Act) and “PIPA” (Protect IP Act). These bills were established October 26th, 2011 with the introduction of SOPA from the House of Representatives congressman – Lamar S. Smith. Basically the reason for the creation of these acts is to put an end to online piracy and the spread of illegally downloaded software, games, music, you name it. These bills come from the constant demand for intellectual property protection from organizations such as Universal Media Group, RIAA, and the MPAA. While this may seem like a very necessary and helpful action, the true potential of these bills is in fact far from its proclaimed intent.
What does SOPA and PIPA mean to you?
Together, these bills will allow for full censorship of the world-wide-web, otherwise known as the internet. What does that mean? It means that whatever you post on your Facebook, Twitter, Youtube, or whatever it may be – is up for revision by the U.S. government. Sounds a little bit like the censorship of the internet taking place in the People’s Republic of China, doesn’t it? That’s because it ultimately IS.
Let’s say you post a video on Youtube, whatever the intent of the video may be, and you include a song in that video. If you do not personally own the rights to that song, that video will be removed. Think of all the videos on Youtube right now that fit that description… That is a LOT of content, just gone now. Or maybe you post an image on your Facebook, something you found funny or just liked. Once again, that being an image you do not personally own, will be removed. This affects a lot of content and innovation that we all love so much on the web.
Here’s what will happen if SOPA and PIPA become laws of the U.S. constitution:
Security threats – countless websites will be forced to modify their software opening security holes and increased vulnerability to their websites.
Free Speech Infringement – the government controls what you can and can’t publish to what was once the worlds greatest free information resource.
Innovation Out the Window – developers and publishers will have a very hard time establishing government-approved content and products.
“Internet Police” – The federal government will be using ISPs, cable companies, web hosts, etc. as their task force to achieved a censored internet.
That is just the quick summary of what these bills could mean. Maybe the bill sponsors Lamar Smith and Patrick Leahy didn’t intend on infringing on free speech or basically destroying the internet we all know and love, but that is exactly what these bills threaten to do if passed.
The sad part is that there are other ways to run a business in these industries without violating U.S. law or taking part in online piracy. Services such as iTunes, Steam, Pandora, and Last-FM all offer services for digital goods like music, movies, and games, and they do it LEGALLY. All it takes is a little innovation to provide a better service like these organizations do. What does the federal government want to do? Take full control of the internet and online life.
What can you do?
I know it seems like there isn’t much you can do about this sort of thing, but you are the ones that CAN. Contact your local representatives office and give them a piece of your mind!
Battlefield 3 will hit the shelves October 25th, 2011 for the PC, Xbox 360, and Playstation 3. If you are a PC gamer you know you are going to want a powerful machine to experience this much anticipated release. Battlefield 3 introduces the Frostbite 2.0 engine which is based on the 1.5 engine seen in Bad Company 2, so the system requirements will be similar.
Minimum System Requirements:
OS: Windows Vista or Windows 7 Processor: Core 2 Duo @ 2.0GHz RAM: 2GB Graphic card: DirectX 10 or 11 compatible Nvidia or AMD ATI card. Graphics card memory: 512 MB Hard drive: 15 GB for disc version or 10 GB for digital version
Recommended System Requirements:
OS: Windows 7 64-bit Processor: Quad-core Intel or AMD CPU RAM: 4GB Graphics card: DirectX 11 Nvidia or AMD ATI card, GeForce GTX 460, Radeon Radeon HD 6850 Graphics card memory: 1 GB Hard drive: 15 GB for disc version or 10 GB for digital version
Now whether you are looking to put together a new computer all together or just upgrade some components, this may be helpful to you.
1. Establish your price range – Sounds simple, but careful – you may find yourself stretching your boundaries reaching for some luxurious hardware.
2. Look for the deals – Always look for specials online for websites like Newegg.com and TigerDirect.com.
Promotional codes and coupons can be found online as well from places like RetailMeNot.com or Google. It pays to be patient as well for some upcoming deals for PC components. Check combo deals as well online for Motherboards/CPU’s or GPU/CPU’s.
3. Check compatibility – It is very important when picking out computer parts to make sure they are compatible with everything else you are getting or with what you are keeping in your system.
With Processors (CPU’s) you want to make sure your motherboard and CPU are both either Intel or AMD. For example my processor is “AMD Phenom II X6 1090T Black Edition” and my motherboard is “GIGABYTE GA-990XA-UD3 AM3+ AMD 990X.” Both are AMD. You also want to make sure that the motherboard accepts the CPU socket type of your processor. My CPU socket type is “Socket AM3” and if you look under details on my motherboard it says “CPU Socket Type: AM3+.” Your power supply must also have the power inputs that match your motherboard’s CPU power input. My motherboard has a 8 pin spot for the CPU and my power supply has that input.
You also want to make sure your motherboard is compatible with both the video card and memory you have. Most motherboards have multiple “PCI Express 2.0 x16” inputs. You will need at least one for your video card and more than one if you plan on having other components that will use these inputs (sound card, 2nd video card, etc.) The video card must also have the same “Chipset Manufacturer” as the motherboard/CPU brand (Intel or AMD). You should also check if features that are available from your video card are possible through your motherboard, such as SLI and CrossfireX. If you are getting a video card for any games (Battlefield 3) make sure it is DirectX11 under 3D API DirectX.
Most memory online and in stores now is DDR3. If you are upgrading your motherboard you will need to make sure the memory you will have is a compatible speed and type. If you look at “Memory Standard” under details for my motherboard it says “DDR3 2000(O.C.)/1866/1600/1333/1066.” So it is DDR3 and runs at those speeds – 2000 is “Over Clocked.” My memory is 8GB DDR3 1600MHz so it is compatible.
Here is my motherboard layout:
Enjoy building your new PC! Post your builds here or at BFGamerz!
I’ve searched around the interwebs for an ajax star rater and I came across a few different possibilities, all of which looked very good. The top result from google was Nick Stakenburg’s “Starbox” for “ajax star rater”. I also found Masuga Web Design’s Ajax Star Rater and a script from MySandbox to be popular results. However I couldn’t really seem to find a PHP / Mysql script that used Javascript for the rater effects. So I decided to make one based off of a script I found:
This was a very nice easy to use Javascript 5 star rating script. All I had to do was make some tweaks to my preference and add on some PHP/Mysql code to submit the rating.
To view the PHP source code, images, and everything together you must download this script.
Javascript
Insert the following in the <head> tags of your page:
[codesyntax lang=”html4strict” title=”Javascript Source Code”]
<script type=”text/javascript”>
function insertParam(key, value)
{
key = escape(key); value = escape(value);
var kvp = document.location.search.substr(1).split(“&”);
var i=kvp.length; var x; while(i–)
{
x = kvp[i].split(“=”);
Basically I took the script that Water’s made and changed a few things to the css styles, added an overlay for the current rating, and wrote a php script to insert rates and determine the current rating, etc. I also added the Javascript functions insertParam() and alterDisplay(). You do not need to use this function insertParam() to create the url, you can simply set the <a> tags to something like this:
The Javascript function alterDisplay() is used to hide and show the overlay <div> that holds the current rating (if there is one). So when you mouse over the rating bar holder it hides the overlay so you can rate.
The PHP script grabs the information from the Mysql table that you specify in the function. You will need to adjust the following values:
$var – The column to base your mysql selection off of. Grab all rows where this column equals $id.
$table – The table where the ratings are being held.
$star_width – Width of the stars, default is 30px.
You will need to be connected to a MYSQL database before calling the rating bar function.
Since the syntax of the function is the following:
[codesyntax lang=”php” title=”Rating Bar Syntax”]
function rating_bar($id);
[/codesyntax]
You will need to supply the identifier ($id) which tells the PHP script which row to grab from the Mysql table.
To display the current rating after it has been rated on – because Javascript alone is not enough – I added an overlay <div> which will hold the current rating. This is done by setting the css style of this overlay div to the following:
The position: aboslute and z-index: 2 style attributes make the div lay over top of the rateMe div which holds the rater and has a z-index: 1.
Test out this free script with the demo link at the top of the post or download it and use on your own website. Credit where due is always appreciated.
Any questions or problems please feel free to email me at brian@bgallz.org or post here.
After a beta release of the patch version 1.51 for Battlefield 2142, EA Games has released a final patch now available for download. The patch includes a number of bug fixes, an increase in account security, four brand new maps, and the unlock of the expansion pack “Northern Strike” for all players with the patch installed. You will need patch 1.50 installed before installing 1.51.