Tag: windows 7

Installing Your New Internal Hard Drive

So you just bought a hard drive and want to start filling that sucker with some files or whatever you want to put on it… Whether you don’t know how to install it into your computer’s case or just on the BIOS you have come to the right place. Here I am going to show you step by step how to install the new piece of hardware into your case as well as how to be sure it is populated properly on your PC.

Hard Drive (Hardware) Installation

Step 1) Open your computer’s case.

Your case should support at least 2 hard drives if not more. The hard drive bays are located (usually) below the bays for the CD/DVD drives. Most modern cases have locking mechanisms for the drives as you can see in Figure 1 next the the numbers for each bay.
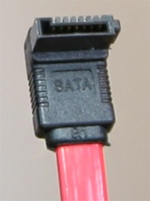
7-Pin SATA Cable
Figure 2 (7-Pin SATA Cable)

Now if this is your first hard drive you are installing you are going to want to choose a bay that works well with your power supply connection’s cord length. So don’t choose the bottom bay with a cord that runs to hard drives as well as CD/DVD drives because you probably will have trouble reaching them up at the top of your case. The amount of space and cord length which you are given is always important to consider when installing ANY new hardware in your system.

In Figure 1 below you can see I labeled the following important items:

a) SATA Cables – Also called “Serial ATA” cables as seen in Figure 2, these connect from your motherboard to CD/DVD/Bluray Drives and SATA hard drive disks.
b) CD/DVD Drives – Usually located on top of the hard drive bays and are larger in size.
c) Hard Drive Bays – This is where you are installing your new hard drive. You will most likely need to remove a locking mechanism from the bay before you can insert a new drive. Be sure to pick an easily accessible bay with adequate cord length to the mother board and PSU.
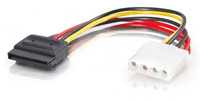
Figure 3 (4-Pin Molex to SATA)

d) Molex Cables – These are usually white or clear 4-pin connectors that have 4 male outputs to connect to devices, see Figure 3. Most modern power supplies will have these molex connectors attached with adapters to connect to SATA devices like the hard drive. See Figure 3 for the connector to your new hard drive.

Not all hard drives come with SATA cables to connect to the motherboard. Make sure you have one before hand or that it comes with one!
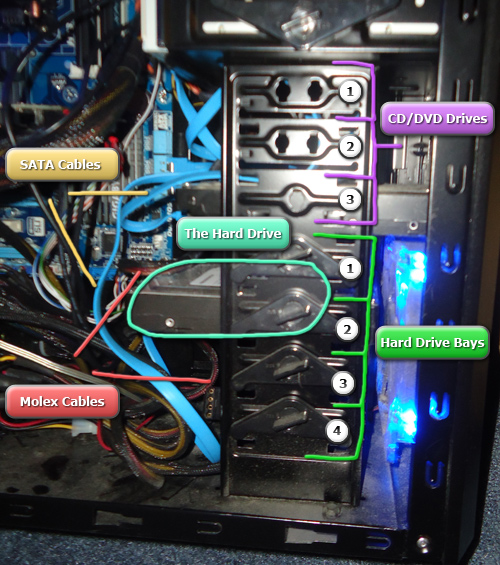
Computer Hardware Layout
Figure 1 (Computer Hardware Layout)

Step 2) Place hard drive in case.

Once you know where you are installing the hard drive slide it into the bay and be sure to use the locks on the side of the bays that come with the case. This will keep the hard drive from sliding back and forth.

Plug in the SATA cable shown in the Figure 2 in to your motherboard and then into the back end of the hard drive. Then plug in the power cable to your hard drive and be sure it is connected properly to the power supply.

Tuck away any loose cables to be sure they are as far away from any fans as possible.

Once you have your hard drive installed in the case it should resemble something like Figure 5.
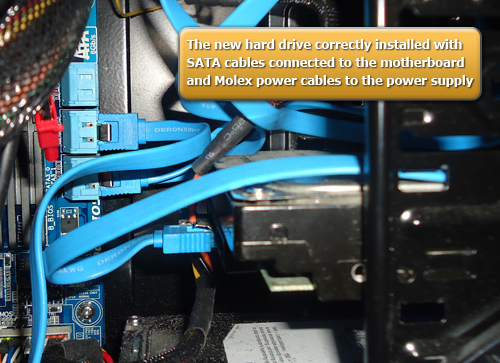
Figure 5 (Hard Drive in Case)

 Step 3) Install the device’s drivers.

Great! You have the hard part over with. Now that the drive is securely installed in the case we can close the case back up, power on, and start uploading.

When you boot up your computer after the hard drive is installed you should automatically get a notification from Windows detecting a new device. This will install the device’s drivers onto Windows. If Windows doesn’t tell you it has found a new device, go to:

Start > Right-click Computer > Properties > Click Device Manager

Right click on “Disk drives” and go to “Scan for hardware changes.” This should find your newly connected hard drive and run driver install/update.

If this fails to detect the hard drive, you may need to recheck your installation in the case. Make sure all cables are plugged in securely, or try another SATA port on the motherboard.

 Step 4) Add drive to Disk Management.

Last thing before you can start utilizing your hard drive. Before the hard drive is recognized as a partition part of your computer’s disk management you must do the following:

Start > Right-click Computer > Manage

On the left go to Storage > Disk Management and in the main window you should see your new drive in the list of volumes. Right click on the drive and go to “Format…” From here it will format the drive for your operating system and you can name it, etc. It will then populate the drive’s details, and whalla!

Enjoy using your new hard drive!

Filed under: Articles, Featured, TutorialsTagged with: , , , , , , , , , , ,

Building a Battlefield 3 PC

How to Build a Battlefield 3 PC
Build Your Battlefield 3 PC Cheap and Right!

Battlefield 3 will hit the shelves October 25th, 2011 for the PC, Xbox 360, and Playstation 3. If you are a PC gamer you know you are going to want a powerful machine to experience this much anticipated release. Battlefield 3 introduces the Frostbite 2.0 engine which is based on the 1.5 engine seen in Bad Company 2, so the system requirements will be similar.

Minimum System Requirements:

OS: Windows Vista or Windows 7
Processor: Core 2 Duo @ 2.0GHz
RAM: 2GB
Graphic card: DirectX 10 or 11 compatible Nvidia or AMD ATI card.
Graphics card memory: 512 MB
Hard drive: 15 GB for disc version or 10 GB for digital version

Recommended System Requirements:

OS: Windows 7 64-bit
Processor: Quad-core Intel or AMD CPU
RAM: 4GB
Graphics card: DirectX 11 Nvidia or AMD ATI card, GeForce GTX 460, Radeon Radeon HD 6850
Graphics card memory: 1 GB
Hard drive: 15 GB for disc version or 10 GB for digital version

My Battlefield 3 Gaming Machine

CPU / Processor:
AMD Phenom II X6 1090T Black Edition Thuban 3.2GHz
http://www.newegg.com/Product/Produc…82E16819103849

Motherboard:
GIGABYTE GA-990XA-UD3 AM3+ AMD 990X
http://www.newegg.com/Product/Produc…82E16813128510

Video Card:
SAPPHIRE 100315L Radeon HD 6850 1GB 256-bit GDDR5
http://www.newegg.com/Product/Produc…82E16814102908

with 8GB 1333 DDR3 memory and my current power supply / case which will fit the new components well.

Take the build found here in this article:
http://pc.mmgn.com/Articles/Building-A-PC-For-Battlefield-3

This build budget is $1000.

With the 3 components I have above I am at $445 with a promotional code (HARDOCPX817E) on the processor. This promotion ends TODAY – 8/23/11.

If I added on a Power Supply, HDD, CPU cooler, Case, DVD Drive, and memory:

OCZ ModXStream Pro 700W$59.99 (After rebate) + Free Shipping
Western Digital WD5000AAKS 500GB$49.99 + Free Shipping
ZALMAN CNPS10X Performa 120mm$40.24
– Free Shipping
Rosewill CHALLENGER Black Gaming ATX Mid Tower Computer Case – $49.99 + $9.99 Shipping
Sony Optiarc CD/DVD Burner Drive$19.99 + Free Shipping
G.SKILL Ripjaws Series 8GB (2 x 4GB)$49.99 + Free Shipping

Total: $749 (Plus Tax)
Saved: $250!

Now whether you are looking to put together a new computer all together or just upgrade some components, this may be helpful to you.

1. Establish your price range – Sounds simple, but careful – you may find yourself stretching your boundaries reaching for some luxurious hardware.

2. Look for the deals – Always look for specials online for websites like Newegg.com and TigerDirect.com.

Promotional codes and coupons can be found online  as well from places like RetailMeNot.com or Google. It pays to be patient as well for some upcoming deals for PC components. Check combo deals as well online for Motherboards/CPU’s or GPU/CPU’s.

3. Check compatibility –  It is very important when picking out computer parts to make sure they are compatible with everything else you are getting or with what you are keeping in your system.

With Processors (CPU’s) you want to make sure your motherboard and CPU are both either Intel or AMD. For example my processor is “AMD Phenom II X6 1090T Black Edition” and my motherboard is “GIGABYTE GA-990XA-UD3 AM3+ AMD 990X.” Both are AMD. You also want to make sure that the motherboard accepts the CPU socket type of your processor. My CPU socket type is “Socket AM3” and if you look under details on my motherboard it says “CPU Socket Type: AM3+.” Your power supply must also have the power inputs that match your motherboard’s CPU power input. My motherboard has a 8 pin spot for the CPU and my power supply has that input.

You also want to make sure your motherboard is compatible with both the video card and memory you have. Most motherboards have multiple “PCI Express 2.0 x16” inputs. You will need at least one for your video card and more than one if you plan on having other components that will use these inputs (sound card, 2nd video card, etc.) The video card must also have the same “Chipset Manufacturer” as the motherboard/CPU brand (Intel or AMD). You should also check if features that are available from your video card are possible through your motherboard, such as SLI and CrossfireX. If you are getting a video card for any games (Battlefield 3) make sure it is DirectX11 under 3D API DirectX.

Most memory online and in stores now is DDR3. If you are upgrading your motherboard you will need to make sure the memory you will have is a compatible speed and type.  If you look at “Memory Standard” under details for my motherboard it says “DDR3 2000(O.C.)/1866/1600/1333/1066.” So it is DDR3 and runs at those speeds – 2000 is “Over Clocked.” My memory is 8GB DDR3 1600MHz so it is compatible.

Here is my motherboard layout:

Enjoy building your new PC! Post your builds here or at BFGamerz!

Filed under: Featured, Gaming, TutorialsTagged with: , , , , , , , , , , , ,