Tag: image

How to Make an Animated Loading GIF

When you have a form to submit some kind of data to your website it is very helpful to have a loading image that is displayed once the user submits the form.

This let’s the user know that the form was submitted and the upload is in progress, rather than just relying on looking up at the address bar and seeing the refresh button spinning. This also helps prevent people from clicking the submit button again, causing problems with the upload, ending in the user being frustrated and leaving.

First, let’s open Adobe Photoshop and open a new document dimensions 150px by 18px. (See Figure 1).
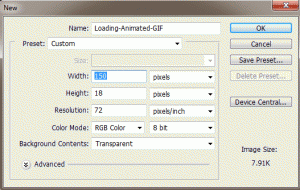
Figure 1

Then let’s select the Rectangular Marquee Tool in the tools panel, and at the top under Style select “Fixed Size” and enter the dimensions – Width: 14px Height: 14px. Then make a New Layer, and then click on the palette and position the square marquee to the left and centered (as seen in Figure 2). You may need to zoom in in order to position it exactly 2 pixels away from the edges so it is centered.
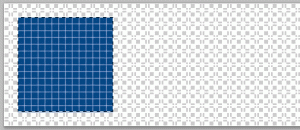
Figure 2

Then fill this selected square with your desired themed color, I chose a blue color (#044686), using the Paint Bucket Tool. (Also seen in Figure 2).

I like to apply a nice gradient to the square, as well as a little bevel and a clean border. First open the Layer Blending Options – do this by right clicking on the layer you placed the square on, and selecting “Blending Options…” or simply by double clicking the layer – and then go to Gradient Overlay. Then apply a slight gradient, I just keep it on Normal blending mode, and just lower the opacity to like 8%. (See Figure 3).
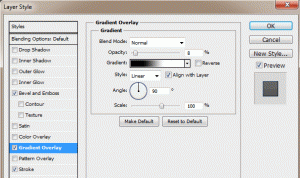
Figure 3

Then go to the Bevel and Emboss in the Layer Blending Options, and apply a slight bevel. This is accomplished by raising the Depth of the bevel and lowering the Opacity. I like the bevel to be small so I keep the size at 2px. Then I lower the opacity of the white to 15% and the black to 25%. (See Figure 4).
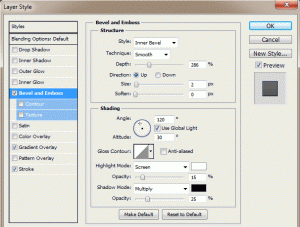
Figure 4

Now your square should have a nice gradient and bevel. To make it stand out from the background even more, add a nice clean border. Keep it at 1px width and either black or a darkened version of the color you used for the square. For example, my square is blue so I just used a dark blue (#0a2b4b). Do this by going to the Stroke menu in the Layer Blending Options. Enter the following for the properties: Size: 1px, Position: Inside, Opacity: 100%, and then choose your color. (See Figure 5).
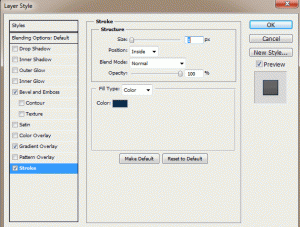
Figure 5

Now your square has a Gradient, Bevel, and a nice Border. Now you can duplicate your square layer – select the layer and press (Ctrl+J) to make copies. After you make a copy, drag the squares you make to the right and keep them an equal distance from each other.  If you use the dimensions I did, you should be able to fit 8 squares in your document. (See Figure 6).

* I recommend using the guides in Photoshop to be sure they are an equal distance from one another. If rulers are not enabled, go to View > Rulers. Then drag guidelines from the left (vertical ruler) onto the document and use equal increments.

Figure 6

Once you have all your squares the way you want them and set equal distances from each other, you are ready to make the animation. Go the the top menu bar, and under Window select Animation. This will bring the animation menu below your document. To start you only want the first square visible, so hide all the other squares’ layers by clicking the Eyes to the left of each layer in the layers menu.

Your animation menu may come up in Timeline mode – this is shown as the title of the animation menu at the bottom. If it is called “Animation (Timeline)” then you are in timeline mode and you need to switch to frames mode. This is done by clicking the very small image in the bottom right corner of the animation menu which looks like a gray rectangle with 3 white squares in it. This will change the title to “Animation (Frames)“. Now, all you should see on your document is the first square, all the way to the left because we hid the others.

First, set the Delay to 0.5 seconds, this is done by clicking on the “10 sec.” with the down arrow. Now click the New Frame button (which looks identical to the new layer button but is located in the animation menu, obviously, not the layers menu). This will add a second frame to the animation. What you want to do is add a new frame, and then un-hide the next square in the sequence. So it’s basically: make a new frame and un-hide next square – over and over until you reach the last square in the document. When you are done, you should have 8 frames and 8 squares in the last frame. Lastly, set the looping to “Forever” by clicking where it says “Once” with a down arrow. (See Figure 7).
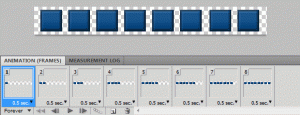
Figure 7

You can preview your animated loading image by zooming back out to 100% on the document, and going to Frame 1 and hit play. It’s still on a transparent background so it doesn’t look as nice as it will on your webpage, but just an idea. Here is our animated loading image:

Animated Loading GIF Image


Here is another, smoother sliding upload bar animated GIF I made:


Now that we have our animated loading GIF image, we need to incorporate this to our website with a form. Let’s say this is our form in HTML:

[codesyntax lang=”html4strict” title=”HTML Form”]
<form method=”post” action=”” enctype=”multipart/form-data”>
<table width=”650″ align=”center” border=”0″ cellpadding=”2″ cellspacing=”0″>
<tr>
<td align=”left” width=”100″><strong>Title:</strong></td>
<td align=”left”><input type=”text” name=”title” size=”25″ maxlength=”60″ /></td>
</tr>
<tr>
<td align=”left”><strong>Image:</strong></td>
<td align=”left”><input type=”file” name=”image” size=”25″ /></td>
</tr>
<tr>
<td align=”left” colspan=”2″><input type=”submit” value=”Submit” name=”submit” onclick=”showUploadDiv()” /></td>
</tr>
</table>
</form>
[/codesyntax]

So right now, this form just submits as normal without any loading image. To change this, we use the “onclick” attribute to the submit button, so that once the submit button is clicked (the form is submitted) we will display the loading image with whatever text we want to go along with it. So first let’s make some CSS styles for the uploading div and the image itself, then some Javascript entries, to the <head> portion of the webpage.

Insert the following in the <head></head> section:

[codesyntax lang=”css” title=”CSS Styles and IDs”]
<style type=”text/css”>
#uploading {
background: #eee;
padding: 3px;
border: 1px dashed #ccc;
width: 300px;
text-align:center;
}
#loading_image {
width:100%;
height:18px;
border:0;
padding: 2px 0;
background: #eee url(./Loading-Animated-GIF.gif) no-repeat top center;
text-align: center;
}
</style>
[/codesyntax]

[codesyntax lang=”javascript” title=”Show Upload Image JavaScript Function”]
<script type=”text/javascript”>
function showUploadDiv(){
var uploadDiv = document.getElementById(‘uploading’);
if(uploadDiv.style.display == ‘none’){
// the div isnt being displayed yet, so lets change the display then write the content
uploadDiv.style.display = ‘block’;
uploadDiv.innerHTML = ‘Please wait while your image is being uploaded…<br/><div id=”loading_image”></div>’;
}
}
</script>
[/codesyntax]

Now, right after our form we need to include a <div> which holds the uploading animated GIF and some text. So let’s put this right after the form:

[codesyntax lang=”html4strict” title=”Uploading DIV”]
<div id=”uploading” style=”display:none”>
</div>
[/codesyntax]

Be sure to change the image source to your images location and file name so it loads properly. Otherwise you will see the alternative text. Now, we have one last change to make. We need to add the onclick function to the form’s submit button. So let’s go back to the form and change the submit button to the following:

[codesyntax lang=”html4strict” title=”Form Submit Button”]
<input type=”submit” value=”Submit” name=”submit” onclick=”showUploadDiv()” />
[/codesyntax]

Now when we click the submit button we will see a nice message letting us know our image is being uploaded and an image representing the upload progress.

Click here to check out the demo!

Enjoy!

Filed under: Tutorials, Web ProgrammingTagged with: , , , , , , , , , , , ,

PHP Upload and Resize Image

Many times when you upload a image somewhere you want to resize it to different dimensions based off of a maximum width or height. Here is a simple script that does this for you, using a HTML form and a PHP script. We start with the PHP script that will run if our $_GET[‘do’] is set to “upload.” Then we include the HTML form that has three inputs (max width, max height, image file).

Use the Upload and Resize Demo Here!

Download This Script!

Here is the PHP for our function – generate_resized_image() – which will take the given image file, create a new file on our server, and then copy the uploaded image to our local image file with the new width and height:

[codesyntax lang=”php” title=”Upload and Resize PHP Code”]
<?php

// index.php

function generate_resized_image(){

$max_dimension = 800; // Max new width or height, can not exceed this value.
$dir = “./images/”; // Directory to save resized image. (Include a trailing slash – /)

// Collect the post variables.
$postvars = array(
“image”    => trim($_FILES[“image”][“name”]),
“image_tmp”    => $_FILES[“image”][“tmp_name”],
“image_size”    => (int)$_FILES[“image”][“size”],
“image_max_width”    => (int)$_POST[“image_max_width”],
“image_max_height”   => (int)$_POST[“image_max_height”]
);

// Array of valid extensions.
$valid_exts = array(“jpg”,”jpeg”,”gif”,”png”);

// Select the extension from the file.
$ext = end(explode(“.”,strtolower(trim($_FILES[“image”][“name”]))));

// Check not larger than 175kb.
if($postvars[“image_size”] <= 179200){

// Check is valid extension.
if(in_array($ext,$valid_exts)){

if($ext == “jpg” || $ext == “jpeg”){
$image = imagecreatefromjpeg($postvars[“image_tmp”]);
}
else if($ext == “gif”){
$image = imagecreatefromgif($postvars[“image_tmp”]);
}
else if($ext == “png”){
$image = imagecreatefrompng($postvars[“image_tmp”]);
}
// Grab the width and height of the image.
list($width,$height) = getimagesize($postvars[“image_tmp”]);

// If the max width input is greater than max height we base the new image off of that, otherwise we
// use the max height input.
// We get the other dimension by multiplying the quotient of the new width or height divided by
// the old width or height.

if($postvars[“image_max_width”] > $postvars[“image_max_height”]){

if($postvars[“image_max_width”] > $max_dimension){
$newwidth = $max_dimension;
} else {
$newwidth = $postvars[“image_max_width”];
}
$newheight = ($newwidth / $width) * $height;

} else {

if($postvars[“image_max_height”] > $max_dimension){
$newheight = $max_dimension;
} else {
$newheight = $postvars[“image_max_height”];
}
$newwidth = ($newheight / $height) * $width;
}

// Create temporary image file.
$tmp = imagecreatetruecolor($newwidth,$newheight);

// Copy the image to one with the new width and height.
imagecopyresampled($tmp,$image,0,0,0,0,$newwidth,$newheight,$width,$height);

// Create random 4 digit number for filename.
$rand = rand(1000,9999);
$filename = $dir.$rand.$postvars[“image”];
// Create image file with 100% quality.
imagejpeg($tmp,$filename,100);
return “<strong>Image Preview:</strong><br/>
<img src=\””.$filename.”\” border=\”0\” title=\”Resized  Image Preview\” style=\”padding: 4px 0px 4px 0px;background-color:#e0e0e0\” /><br/>
Resized image successfully generated. <a href=\””.$filename.”\” target=\”_blank\” name=\”Download your resized image now!\”>Click here to download your image.</a>”;

imagedestroy($image);
imagedestroy($tmp);
} else {
return “File size too large. Max allowed file size is 175kb.”;
}
} else {
return “Invalid file type. You must upload an image file. (jpg, jpeg, gif, png).”;
}
}

?>
[/codesyntax]

This function you can define in your header PHP files along with other functions or where ever you would like, so long as it is defined before the call of the function itself.

Here is the HTML for our form to submit the image file and the new dimensions:

[codesyntax lang=”html4strict” title=”HTML Form”]
<form action=”./index.php?do=upload” method=”post” enctype=”multipart/form-data”>
<table width=”100%” align=”center” border=”0″ cellpadding=”2″ cellspacing=”0″>
<tr>
<td align=”left” width=”100″>
New Width:</td>
<td align=”left”><input name=”image_max_width” style=”width: 120px” type=”text” maxlength=”4″ /> px.</td>
</tr>
<tr><td colspan=”2″><strong>OR</strong></td></tr>
<tr>
<td align=”left”>
New Height:</td>
<td align=”left”><input type=”text” name=”image_max_height” style=”width: 120px” maxlength=”4″ /> px.</td>
</tr>
<tr>
<td align=”left”>
Image:</td>

<td align=”left”><input type=”file” name=”image” size=”40″ /></td></tr>
<tr>
<td align=”left” colspan=”2″>
<ol style=”margin:0;padding:3px 0px 3px 15px”>
<li>Max file size: 175 KB.</li>
<li>Allowed extensions: jpg, jpeg, gif, png.</li>
<li>Max Dimension: <em>800</em>px.</li>
</ol>
</tr>
<tr>
<td align=”left” colspan=”2″>
<input type=”submit” name=”submit” value=”Submit!” style=”font: 10pt verdana” />
</td>
</tr>
</table>
</form>
[/codesyntax]

This will create a form that looks like this:

Max Width: px.
Max Height: px.
Image:
  1. Max file size: 175 KB
  2. Allowed extensions: jpg, jpeg, gif, png.
  3. Max Dimension: 800px.


Okay, so now we have our PHP function defined, included and our HTML contains this form submitting the image file and its new dimensions. All we need now is a short code of PHP to check our GET values, particularly do for the value upload. This tells us the form was submitted and we can start checking it for values, and creating our re-sized image.

Here is the PHP which will appear below the HTML form to show our re-sized image once the form is submitted:

<?php

if(isset($_GET['do']) && $_GET['do'] == "upload")
{

$upload_and_resize = generate_resized_image();
echo '<div id="upload">'. $upload_and_resize. '</div>';

}

?>

Filed under: Featured, PHP, Scripts, Tutorials, Web ProgrammingTagged with: , , , , , ,

PHP Create Thumbnail Images

Here we are going to observe how to use PHP to generate thumbnails for us. A thumbnail is a smaller size and usually smaller quality of an image shown as preview or link to the original image. Thumbnails can be very useful for faster loading times and quicker display of images on your web pages and a few other reasons. This script will allow us to use a directory on our server and convert all image files in it to a new thumbnail, with dimensions we want, and save it on a new thumbnails directory.

We do this using some PHP functions. First we have to open the directory that we specify as the directory to the images we want to convert to thumbnails. We use the function opendir().

The next part:

[code lang=”php”]
while (false !== ($fname = readdir($dir))) {
[/code]

This loops through the directory until it reaches the end of the files stored in the directory.

Then we make sure it is an image file type by checking its extension:

[code lang=”php”]
$valid_extensions = array(“jpg”,”gif”,”png”,”jpeg”);
if(in_array(strtolower($info[‘extension’]),$valid_extensions)){
[/code]

We use the function imagecreatefromjpeg() to make an image out of the file with the image extension. With this we grab the image’s width and height to calculate the new height of the thumbnail based off of the $thumbWidth specified in the beginning of the function (200).

We then use the function imagecreatetruecolor() to make a temporary image for the new thumbnail. With it we transfer it to a new image file in our thumbnails directory with the following code:

[code lang=”php”]
$genThumb = imagejpeg($tempImage,$pathToThumbs . rand(100,999) . $fname);
[/code]

The rand(100,900) make a random 3 digit number in front of the file name. Remove it if you wish.

Here is our function:

[code lang=”php”]

function generateThumbs(){
$pathToScreens = “../screenshots/”; // Directory to your images you want converted to thumbnails.
$pathToThumbs = “../screenshots/thumbs/”; // Directory to your thumbnails.
$thumbWidth = 200; // Width of the thumbnails generated.

$dir = opendir($pathToScreens) or die(“Could not open directory”);
$counter = 0;

while(($fname = readdir($dir)) !== false){
if($fname != “.” && $fname != “..”){
// Remove folders.
$valid_extensions = array(“jpg”,”jpeg”); // Only jpeg images allowed.
$info = pathinfo($pathToScreens . $fname);
if(in_array(strtolower($info[“extension”]),$valid_extensions)){
// Make sure the file is an image file by checking its extension to the array of image extensions.
$img = imagecreatefromjpeg($pathToScreens . $fname); // Select the file as an image from the directory.
$width = imagesx($img);
$height = imagesy($img);
// Collect its width and height.

$newHeight = floor($height * ($thumbWidth / $width)); // Calculate new height for thumbnail.

$tempImage = imagecreatetruecolor($thumbWidth,$newHeight); // Create a temporary image of the thumbnail.
// Copy and resize old image into new image.
imagecopyresized($tempImage,$img, 0, 0, 0, 0, $thumbWidth,$newHeight,$width,$height);

$genThumb = imagejpeg($tempImage,$pathToThumbs . rand(100,999) . $fname);
// Create the thumbnail with the new width and height in the thumbnails directory.
// I added a rand 3 digit number in front of the file name to avoid overwrite.
$counter++; // Increment.
}
}
}
if($counter > 0){
return $counter . ” thumbnails generated from the directory \””.$pathToScreens.”\”.”;
} else {
return “No image files could be processed.”;
}
closedir($dir); // Close the directory.
}

?>
[/code]

Then we can just call it like so:

[code lang=”php”]
echo generateThumbs();
[/code]

Filed under: Scripts, TutorialsTagged with: , ,

PHP Image Verification in Forms

One of the most common ways to stop bots and spammers from generating spam in people’s websites is using some form of image verification. This can be done very easily with just PHP and Sessions. Using image verification acts as a human detector, to make sure the viewer of that page is not a bot of some kind. Bots can cause damage to your server by overloading it with spammed content and flooding your boards with unwanted links and text.

Let’s say we have a form that submits a few fields and possibly a file:

[code lang=”html”]

Field 1:
Field 2:
File:

[/code]

Now, this form will submit three variables: field1, field2, and the file.

This form does not have any image verification added in. So any bot could simply process this page over and over to flood the server with crap. 🙁 So we are going to add a simple image verification to the form. To do this we make image.php:

[code lang=”php”]

[/code]

Now we must add the field to our form:

[code lang=”html”]
Verification: &amp;nbsp;

[/code]

Notice I used the class “imgverification.” We must add this to our <head> tags of the page:

[code lang=”html”]

[/code]

We must also make sure we include our session_start() on all pages we use session variables on. So on our form page, the image page, and submit page.

Now when the form is submitted to submit.php we check the submitted input for $_POST[“verification”] to $_SESSION[“md5_image_verification”].

[code lang=”php”]

[/code]

function simple_image($width,$height){
$image = imagecreate($width,$height);

$alphanum = “ABCDEFGHIJKLMNOPQRSTUVWXYZ0123456789”;
$rand = strtoupper(substr(str_shuffle($alphanum),0,6));
$_SESSION[‘simp_image_verification’] = $rand;
$_SESSION[‘md5_simp_image_verification’] = md5($rand);

$bgColor = imagecolorallocate($image, 231,231,231);
$textColor = imagecolorallocate($image, 0,0,0);
$textSize = imagefontheight(1);
imagestring ($image, 5, 8, 2, $_SESSION[‘simp_image_verification’], $textColor);
header(“Expires: Mon, 26 Jul 1997 05:00:00 GMT”);
header(“Last-Modified: ” . gmdate(“D, d M Y H:i:s”) . ” GMT”);
header(“Cache-Control: no-store, no-cache, must-revalidate”);
header(“Cache-Control: post-check=0, pre-check=0”, false);
header(“Pragma: no-cache”);
header(‘Content-type: image/jpeg’);
imagejpeg($image);
imagedestroy($image);
return true;
}

Filed under: TutorialsTagged with: , , ,