PHP Search a Mysql Database

Nearly every website has some kind of search feature that allows you to quickly find the specific things you are looking for. This can be done a number of ways depending on the language and desired features, but I am going to show you how to search a Mysql database using PHP and a simple HTML form. The form is going to submit two variables – “q” and “submit.” The “submit” variable will tell PHP to initiate the search, and “q” will be the defined search terms that it searches the database for.

First, we need the HTML form. We do this with the “form” tags and “input” tags as the keywords and search button.

[code lang=”html”]


[/code]

This form is sending the two variables to the page “search.php.” This is where we will search our mysql database for rows that match the terms. First we will clean the search terms using trim() and addslashes() which will remove any whitespace and add backslashes “\” before any quotation marks, etc. so it isn’t a threat to our mysql database.

Visit my post on Mysql Database Connect to see how to connect to the database.

[codesyntax lang=”php” title=”search.php Source Code”]
<?php

// search.php
if(isset($_POST[“submit”])){
// Form was submitted, collect the search terms.
$search = trim(addslashes($_POST[“q”]));
if($search){
// We got the search terms, now lets search the database.
// Connect to database here.
$sql = mysql_query(“SELECT * FROM table1 WHERE column1 LIKE ‘%$search%'”);
$count = mysql_num_rows($sql);
// This will search column1 in table1 for a match of the search terms. The parentheses before and after the terms allow the search terms to be a part of other text.
if($count > 0){
// Matches were found!
echo “<p>Search: \”<em>”.$search.”</em>\” – “.$count.” Results Found.</p>”;
echo “<table width=\”100%\” align=\”center\” border=\”1\” cellpadding=\”3\” cellspacing=\”0\”>”;
echo “<tr><th align=\”left\”><strong>Search Results</strong></th></tr>”;
while($row = mysql_fetch_array($sql)){
echo “<tr><td align=\”left\”>”.$row[“column1″].”</td></tr>”;
}
echo “</table>”;
}
} else {
echo “Please enter search terms.”;
}
} else {
// Form wasn’t submitted, redirect to index.php.
header(“Location: index.php”);
}
[/codesyntax]

You can personalize the mysql query however you like of course. Edit the values “table1” and “column1” to match the table you are searching in your database and the columns you want to match the search terms to. You can even match them against multiple columns like so:

[code lang=”php”]
$sql = mysql_query(“SELECT * FROM table1 WHERE column1 LIKE ‘%$search%’ OR column2 LIKE ‘%$search%'”);
[/code]

This will try to match the search terms to column1 or column2. This will make your search range larger, thus bringing more results to your viewers. Of course when displaying your results in the table above it would be smart to include things like: date/time it was submitted, who it was submitted by, category, etc. You can do this by including other columns when you echo the data into the table, like so:

[code lang=”php”]
while($row = mysql_fetch_array($sql)){
echo “

“.$row[“column1″].” “.$row[“column2″].” “.$row[“column3″].”

“;
}
[/code]

So let’s say you wanted to display posts in a table from users, when it was posted, the last reply, etc. You would have it displayed as so:

Title Last Reply Posted By Time Posted
HTML Linking Stylesheets May 1st, 2010 bgallz April 16th, 2010
Another Post May 1st, 2010 bgallz April 16th, 2010
Filed under: MySQL, PHP, TutorialsTagged with: , , ,

Battlefield Games, Downloads, Videos, and more!

If you are interested in playing Battlefield 3, Bad Company 2, 2142, BF 2, Vietnam; any or all – then BFGamerz.com is your ultimate Battlefield resource. On every Battlefield game you can find free downloads, reviews, videos, forums, and soon a Battlefield League! Registration is quick and free, join today and browse the forums and find clans worldwide or get a super quick direct download FREE for any game any time.

Currently I am working on the new theme and setup in Drupal. This is taking some time and will be a while before it is ready on the new system. However you can still visit the old site here.

BFGamerz.com has tons of free content for the Battlefield games (ALWAYS growing):

  • Downloads
  • Screenshots
  • Maps
  • Reviews
  • League
  • so much more…

I made this website starting back in about June of 2008. I’ve just been slowly piecing it together to reach its entirety. The league still needs to be finished, however it has a great resource for Battlefield games. Anyone who would like to be a leader of this website and submit downloads, screen shots, videos, maps, reviews, or anything on the site please send me an email at brian@bgallz.org. I am working on getting a Bad Company 2 server currently for the website to reach some publicity in game as well as on some advertisements. Right now I need some help gathering all of the data.

But if you like to play the Battlefield games, please sign up and make some posts.

Click here to visit BFGamerz.com – Battlefield Games, Talk, and more…

Filed under: Web ProgrammingTagged with: , , , , , , , ,

PHP Timestamps time()

One of the most common ways to capture the current time in PHP scripting is by using the time() function. This returns the current timestamp which is the number of seconds after a certain date and time in the past. You can use this when entering a mysql query to note the current time of whatever action you are capturing.

We must be connected to a Mysql database in order to submit the value(s) to the database. You can see how to connect to a mysql database here.

For example, lets say we want to capture the current time of when a form is submitted:

[code lang=”php”]
timestamp where the Username field matches a specified value. We will use the date() function to echo the timestamp into a date format. We will use the m/d/Y format:

  • d – Represents the day of the month (01 to 31)
  • m – Represents a month (01 to 12)
  • Y – Represents a year (in four digits)

View a complete list of the PHP date() format list here!

Like so:

[code lang=”php”]
0){
$row = mysql_fetch_assoc($sql);
echo “You joined on: “.date(“m/d/Y”,$row[‘time’]).”.”;
} else {
echo “User has not joined!”;
}
?>
[/code]

This will output the code as such:

You joined on: 05/31/2010.

Filed under: PHP, Tutorials, Web ProgrammingTagged with: , ,

PHP Create Thumbnail Images

Here we are going to observe how to use PHP to generate thumbnails for us. A thumbnail is a smaller size and usually smaller quality of an image shown as preview or link to the original image. Thumbnails can be very useful for faster loading times and quicker display of images on your web pages and a few other reasons. This script will allow us to use a directory on our server and convert all image files in it to a new thumbnail, with dimensions we want, and save it on a new thumbnails directory.

We do this using some PHP functions. First we have to open the directory that we specify as the directory to the images we want to convert to thumbnails. We use the function opendir().

The next part:

[code lang=”php”]
while (false !== ($fname = readdir($dir))) {
[/code]

This loops through the directory until it reaches the end of the files stored in the directory.

Then we make sure it is an image file type by checking its extension:

[code lang=”php”]
$valid_extensions = array(“jpg”,”gif”,”png”,”jpeg”);
if(in_array(strtolower($info[‘extension’]),$valid_extensions)){
[/code]

We use the function imagecreatefromjpeg() to make an image out of the file with the image extension. With this we grab the image’s width and height to calculate the new height of the thumbnail based off of the $thumbWidth specified in the beginning of the function (200).

We then use the function imagecreatetruecolor() to make a temporary image for the new thumbnail. With it we transfer it to a new image file in our thumbnails directory with the following code:

[code lang=”php”]
$genThumb = imagejpeg($tempImage,$pathToThumbs . rand(100,999) . $fname);
[/code]

The rand(100,900) make a random 3 digit number in front of the file name. Remove it if you wish.

Here is our function:

[code lang=”php”]

function generateThumbs(){
$pathToScreens = “../screenshots/”; // Directory to your images you want converted to thumbnails.
$pathToThumbs = “../screenshots/thumbs/”; // Directory to your thumbnails.
$thumbWidth = 200; // Width of the thumbnails generated.

$dir = opendir($pathToScreens) or die(“Could not open directory”);
$counter = 0;

while(($fname = readdir($dir)) !== false){
if($fname != “.” && $fname != “..”){
// Remove folders.
$valid_extensions = array(“jpg”,”jpeg”); // Only jpeg images allowed.
$info = pathinfo($pathToScreens . $fname);
if(in_array(strtolower($info[“extension”]),$valid_extensions)){
// Make sure the file is an image file by checking its extension to the array of image extensions.
$img = imagecreatefromjpeg($pathToScreens . $fname); // Select the file as an image from the directory.
$width = imagesx($img);
$height = imagesy($img);
// Collect its width and height.

$newHeight = floor($height * ($thumbWidth / $width)); // Calculate new height for thumbnail.

$tempImage = imagecreatetruecolor($thumbWidth,$newHeight); // Create a temporary image of the thumbnail.
// Copy and resize old image into new image.
imagecopyresized($tempImage,$img, 0, 0, 0, 0, $thumbWidth,$newHeight,$width,$height);

$genThumb = imagejpeg($tempImage,$pathToThumbs . rand(100,999) . $fname);
// Create the thumbnail with the new width and height in the thumbnails directory.
// I added a rand 3 digit number in front of the file name to avoid overwrite.
$counter++; // Increment.
}
}
}
if($counter > 0){
return $counter . ” thumbnails generated from the directory \””.$pathToScreens.”\”.”;
} else {
return “No image files could be processed.”;
}
closedir($dir); // Close the directory.
}

?>
[/code]

Then we can just call it like so:

[code lang=”php”]
echo generateThumbs();
[/code]

Filed under: Scripts, TutorialsTagged with: , ,

HTML Linking Stylesheets

There are several ways to incorporate styles to elements in your HTML and apply them throughout the document. In this we will go over three ways to include styles, and three ways to apply the styles to different elements.

Linking External Stylesheets

You can link an external stylesheet to your HTML document through the <link> tag.

[code lang=”html”] [/code]

You would place this in the <head> tag of your document. External stylesheets are to consist of only defined classes and styles, no other tags included. Here would be a basic layout of style.css:

[code lang=”css”]
.class1 {
color:#fff;
font: 11px tahoma;
}

.class2 {
color: #000;
font: 11px arial;
}

#class3 {
color: #ccc;
font: 11px verdana;
}
[/code]

Embedding Styles

You can embed styles into the <head> of a HTML document without creating an external stylesheet. Here is an example of styles embedded:

[code lang=”html”]


HTML Document

Text.


[/code]

These styles would be defined just as in an external stylesheet and should not include any other tags inside the <style> tags.

Importing a Stylesheet

In CSS there is an import statement you can use to import a stylesheet to the document. This the CSS @import statement. Here is an example:

[code lang=”html”]


HTML Document

Text.


[/code]

You can still define other styles in these <style> tags under the @import statement just as in the previous example. This will basically include the defined path to a CSS stylesheet to the document just as using the external linking example.

Now we will go over how to apply these styles to elements.

Class Attribute

In your HTML document you can apply styles using the class attribute to almost any element. Styles that are applied with the class attribute are defined with a period before their name. In the previous examples of defining styles you may see a period (.) before the titles. Ex: .class1; .class2. Here is how to apply them:

[code lang=”html”]

White text in Tahoma.
Black text in Arial.

[/code]

ID Attribute

Styles can also be defined and applied by the ID attribute. To define a style using this attribute you would add a number symbol (#) in front of the title. In the previous examples you see that “class3” is defined with one like #class3. This works the same way was the class attribute except now we apply it with the ID attribute in the element. Here is how to apply them:

[code lang=”html”]

Grey text in Verdana.

[/code]

In-Line Styling

Without the use of any defined styles in a stylesheet or embedded styles you can apply styles to elements with in-line styling. This is done using the style attribute in an element. Here is how to apply them:

[code lang=”html”]

White text in Tahoma.
Black text in Arial.
Grey text in Verdana.

[/code]

Styles can also be defined within each other. So you can define a class under the <p> tag that can only be defined to paragraphs. Like so:

[code lang=”css”]
p .small {
font-size: 11px;
}
[/code]

Now we can apply the small class to paragraphs in the document like so:

[code lang=”html”]

Regular text.

Small text.

[/code]

Filed under: TutorialsTagged with: , ,

HTML body tag

The body tag in a HTML document defines the documents body. This includes the majority of the displayed content on the page, such as hyperlinks, images, etc.

Here is a basic HTML document with the body tag:

[code lang=”html”]


HTML Document


Body content.


[/code]

The body tag is supported by all major web browsers.

Body tag standard attributes:

Attribute Value Information
class classname Specified class name to an element.
dir rtl

ltr

Specified text direction to an element.
id id Specified id name to an element.
lang language_code Specified language to an element.
style style Specified style definition to an element.
Filed under: HTMLTagged with: ,

Javascript Snowing Effect Script

Here is a nice feature to add to your web pages during the holiday season. Falling snowflakes are very simple and yet a great eye catcher to new visitors to your website.

Here is the snowflake gif I made for this:

Falling Snowflake

Now, to make  the effect of the snowflake falling on the webpage we will just use javascript. You want to place this code in the <head> tags of your webpage and it will give you the pretty effect that it is snowing! You can do this with other seasons as well like autumn, you would want to use a leaf of some kind. Here is the code:

[code lang=”javascript”]

[/code]

Enjoy!

Filed under: Scripts, TutorialsTagged with: , ,

PHP Switch Function

The function switch() in PHP is used to execute different codes based on a variable’s value. This is used in place of the IF/ELSE IF statements. A default value is optional and, if specified, is used when no other option is matched. You must include a break; after each case or the following cases will all return true.

[code lang=”php”]

[/code]

You can use this with forms and such to determine an action based on a submitted value as well! Here is an example using the switch() function in a form:

[code lang=”html”]

Select your gender:

[/code]

Now on our PHP side of the script (submit.php) we will use the switch() function to evaluate the value.

[code lang=”php”]

[/code]

Filed under: PHP, Web ProgrammingTagged with: , ,

Simple File Hosting Script

I’ve made an easy to use file hosting script that is free for download.

It has some nice features such as:

  • Allowed file extensions.
  • File size limit.
  • Generated file names.
  • BBcode, IMG code, Url, etc.
  • Terms of Conditions

Generated file names on the server are created using the functions rand() and the md5() hash generator. Here is the code:

[code lang=”php”]

[/code]

The script also uses javascript to check for the Terms and Conditions checkbox being checked to make the submit button enabled.

I will be updating this script with more features, but this is meant to be a simple file hosting script. I will later include a download file page.

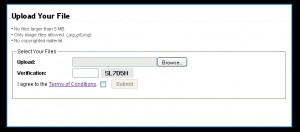
Here is what the upload form looks like:

filehostingscript

Check out the demo here!

Click here to download the script!

Filed under: ScriptsTagged with: , ,

PHP Users Online with Mysql

Using PHP and Mysql you can keep track of the users online your website and display it on your page.

First thing ,we need a table in our Mysql database for the users online. So let’s make a table in our database.

[code lang=”sql”]
mysql_query(“CREATE TABLE online(
id INT(11) NOT NULL AUTO_INCREMENT,
PRIMARY KEY(id),
ip_address VARCHAR(25) NOT NULL,
timestamp VARCHAR(25) NOT NULL)”) or die(mysql_error());
[/code]

Now that we have the table, we need to update the users online on every page. That way it is most accurate and up to date with who is currently online. We will set a time offset so that we include all users online within the past 5 minutes.

[code lang=”php”]
0){
mysql_query(“UPDATE online SET timestamp = ‘”.time().”‘ WHERE ip_address = ‘$ip’) or die(mysql_error());
} else {
mysql_query(“INSERT INTO online (ip_address,timestamp) VALUES (‘$ip’,'”.time().”‘)”) or die(mysql_error());
}
$delete = mysql_query(“DELETE FROM online WHERE timestamp < '$time_offset'") or die(mysql_error()); ?>
[/code]

Now every time someone goes on a page with this code, mysql will check to see if the user is in the system, and if so update their current timestamp, otherwise create a row for them in the table. It will also erase any rows with old timestamps. This will keep the table clean and updated.

Now we count the users online and show it on the page.

[code lang=”php”]
‘$time_offset'”);
$online = mysql_num_rows($sql);

return ‘There are ‘.$online.’ user(s) currently online. ‘;
}
?>
[/code]

Filed under: TutorialsTagged with: , ,