Category: Tutorials

Installing Your New Internal Hard Drive

So you just bought a hard drive and want to start filling that sucker with some files or whatever you want to put on it… Whether you don’t know how to install it into your computer’s case or just on the BIOS you have come to the right place. Here I am going to show you step by step how to install the new piece of hardware into your case as well as how to be sure it is populated properly on your PC.

Hard Drive (Hardware) Installation

Step 1) Open your computer’s case.

Your case should support at least 2 hard drives if not more. The hard drive bays are located (usually) below the bays for the CD/DVD drives. Most modern cases have locking mechanisms for the drives as you can see in Figure 1 next the the numbers for each bay.
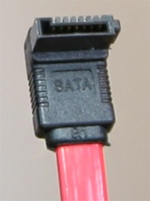
7-Pin SATA Cable
Figure 2 (7-Pin SATA Cable)

Now if this is your first hard drive you are installing you are going to want to choose a bay that works well with your power supply connection’s cord length. So don’t choose the bottom bay with a cord that runs to hard drives as well as CD/DVD drives because you probably will have trouble reaching them up at the top of your case. The amount of space and cord length which you are given is always important to consider when installing ANY new hardware in your system.

In Figure 1 below you can see I labeled the following important items:

a) SATA Cables – Also called “Serial ATA” cables as seen in Figure 2, these connect from your motherboard to CD/DVD/Bluray Drives and SATA hard drive disks.
b) CD/DVD Drives – Usually located on top of the hard drive bays and are larger in size.
c) Hard Drive Bays – This is where you are installing your new hard drive. You will most likely need to remove a locking mechanism from the bay before you can insert a new drive. Be sure to pick an easily accessible bay with adequate cord length to the mother board and PSU.

Figure 3 (4-Pin Molex to SATA)

d) Molex Cables – These are usually white or clear 4-pin connectors that have 4 male outputs to connect to devices, see Figure 3. Most modern power supplies will have these molex connectors attached with adapters to connect to SATA devices like the hard drive. See Figure 3 for the connector to your new hard drive.

Not all hard drives come with SATA cables to connect to the motherboard. Make sure you have one before hand or that it comes with one!
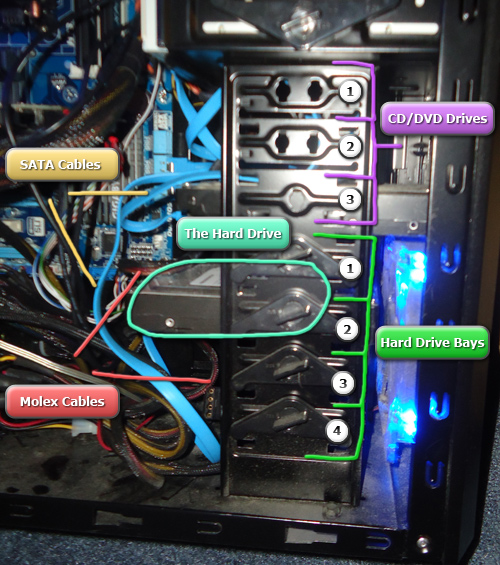
Computer Hardware Layout
Figure 1 (Computer Hardware Layout)

Step 2) Place hard drive in case.

Once you know where you are installing the hard drive slide it into the bay and be sure to use the locks on the side of the bays that come with the case. This will keep the hard drive from sliding back and forth.

Plug in the SATA cable shown in the Figure 2 in to your motherboard and then into the back end of the hard drive. Then plug in the power cable to your hard drive and be sure it is connected properly to the power supply.

Tuck away any loose cables to be sure they are as far away from any fans as possible.

Once you have your hard drive installed in the case it should resemble something like Figure 5.

Figure 5 (Hard Drive in Case)

 Step 3) Install the device’s drivers.

Great! You have the hard part over with. Now that the drive is securely installed in the case we can close the case back up, power on, and start uploading.

When you boot up your computer after the hard drive is installed you should automatically get a notification from Windows detecting a new device. This will install the device’s drivers onto Windows. If Windows doesn’t tell you it has found a new device, go to:

Start > Right-click Computer > Properties > Click Device Manager

Right click on “Disk drives” and go to “Scan for hardware changes.” This should find your newly connected hard drive and run driver install/update.

If this fails to detect the hard drive, you may need to recheck your installation in the case. Make sure all cables are plugged in securely, or try another SATA port on the motherboard.

 Step 4) Add drive to Disk Management.

Last thing before you can start utilizing your hard drive. Before the hard drive is recognized as a partition part of your computer’s disk management you must do the following:

Start > Right-click Computer > Manage

On the left go to Storage > Disk Management and in the main window you should see your new drive in the list of volumes. Right click on the drive and go to “Format…” From here it will format the drive for your operating system and you can name it, etc. It will then populate the drive’s details, and whalla!

Enjoy using your new hard drive!
Filed under: Articles, Featured, TutorialsTagged with: , , , , , , , , , , ,

How to Make an Animated Loading GIF

When you have a form to submit some kind of data to your website it is very helpful to have a loading image that is displayed once the user submits the form.

This let’s the user know that the form was submitted and the upload is in progress, rather than just relying on looking up at the address bar and seeing the refresh button spinning. This also helps prevent people from clicking the submit button again, causing problems with the upload, ending in the user being frustrated and leaving.

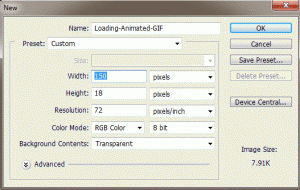
First, let’s open Adobe Photoshop and open a new document dimensions 150px by 18px. (See Figure 1).

Figure 1

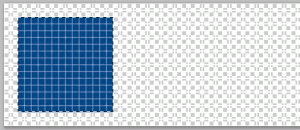
Then let’s select the Rectangular Marquee Tool in the tools panel, and at the top under Style select “Fixed Size” and enter the dimensions – Width: 14px Height: 14px. Then make a New Layer, and then click on the palette and position the square marquee to the left and centered (as seen in Figure 2). You may need to zoom in in order to position it exactly 2 pixels away from the edges so it is centered.

Figure 2

Then fill this selected square with your desired themed color, I chose a blue color (#044686), using the Paint Bucket Tool. (Also seen in Figure 2).

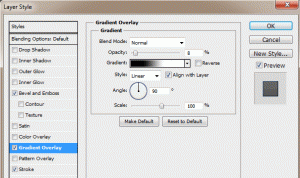
I like to apply a nice gradient to the square, as well as a little bevel and a clean border. First open the Layer Blending Options – do this by right clicking on the layer you placed the square on, and selecting “Blending Options…” or simply by double clicking the layer – and then go to Gradient Overlay. Then apply a slight gradient, I just keep it on Normal blending mode, and just lower the opacity to like 8%. (See Figure 3).

Figure 3

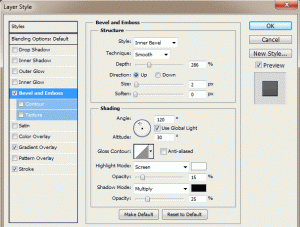
Then go to the Bevel and Emboss in the Layer Blending Options, and apply a slight bevel. This is accomplished by raising the Depth of the bevel and lowering the Opacity. I like the bevel to be small so I keep the size at 2px. Then I lower the opacity of the white to 15% and the black to 25%. (See Figure 4).

Figure 4

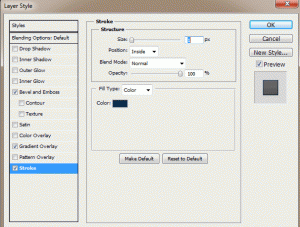
Now your square should have a nice gradient and bevel. To make it stand out from the background even more, add a nice clean border. Keep it at 1px width and either black or a darkened version of the color you used for the square. For example, my square is blue so I just used a dark blue (#0a2b4b). Do this by going to the Stroke menu in the Layer Blending Options. Enter the following for the properties: Size: 1px, Position: Inside, Opacity: 100%, and then choose your color. (See Figure 5).

Figure 5

Now your square has a Gradient, Bevel, and a nice Border. Now you can duplicate your square layer – select the layer and press (Ctrl+J) to make copies. After you make a copy, drag the squares you make to the right and keep them an equal distance from each other.  If you use the dimensions I did, you should be able to fit 8 squares in your document. (See Figure 6).

* I recommend using the guides in Photoshop to be sure they are an equal distance from one another. If rulers are not enabled, go to View > Rulers. Then drag guidelines from the left (vertical ruler) onto the document and use equal increments.

Figure 6

Once you have all your squares the way you want them and set equal distances from each other, you are ready to make the animation. Go the the top menu bar, and under Window select Animation. This will bring the animation menu below your document. To start you only want the first square visible, so hide all the other squares’ layers by clicking the Eyes to the left of each layer in the layers menu.

Your animation menu may come up in Timeline mode – this is shown as the title of the animation menu at the bottom. If it is called “Animation (Timeline)” then you are in timeline mode and you need to switch to frames mode. This is done by clicking the very small image in the bottom right corner of the animation menu which looks like a gray rectangle with 3 white squares in it. This will change the title to “Animation (Frames)“. Now, all you should see on your document is the first square, all the way to the left because we hid the others.

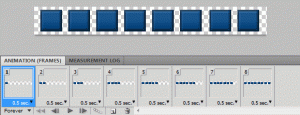
First, set the Delay to 0.5 seconds, this is done by clicking on the “10 sec.” with the down arrow. Now click the New Frame button (which looks identical to the new layer button but is located in the animation menu, obviously, not the layers menu). This will add a second frame to the animation. What you want to do is add a new frame, and then un-hide the next square in the sequence. So it’s basically: make a new frame and un-hide next square – over and over until you reach the last square in the document. When you are done, you should have 8 frames and 8 squares in the last frame. Lastly, set the looping to “Forever” by clicking where it says “Once” with a down arrow. (See Figure 7).

Figure 7

You can preview your animated loading image by zooming back out to 100% on the document, and going to Frame 1 and hit play. It’s still on a transparent background so it doesn’t look as nice as it will on your webpage, but just an idea. Here is our animated loading image:

Animated Loading GIF Image


Here is another, smoother sliding upload bar animated GIF I made:


Now that we have our animated loading GIF image, we need to incorporate this to our website with a form. Let’s say this is our form in HTML:

[codesyntax lang=”html4strict” title=”HTML Form”]
<form method=”post” action=”” enctype=”multipart/form-data”>
<table width=”650″ align=”center” border=”0″ cellpadding=”2″ cellspacing=”0″>
<tr>
<td align=”left” width=”100″><strong>Title:</strong></td>
<td align=”left”><input type=”text” name=”title” size=”25″ maxlength=”60″ /></td>
</tr>
<tr>
<td align=”left”><strong>Image:</strong></td>
<td align=”left”><input type=”file” name=”image” size=”25″ /></td>
</tr>
<tr>
<td align=”left” colspan=”2″><input type=”submit” value=”Submit” name=”submit” onclick=”showUploadDiv()” /></td>
</tr>
</table>
</form>
[/codesyntax]

So right now, this form just submits as normal without any loading image. To change this, we use the “onclick” attribute to the submit button, so that once the submit button is clicked (the form is submitted) we will display the loading image with whatever text we want to go along with it. So first let’s make some CSS styles for the uploading div and the image itself, then some Javascript entries, to the <head> portion of the webpage.

Insert the following in the <head></head> section:

[codesyntax lang=”css” title=”CSS Styles and IDs”]
<style type=”text/css”>
#uploading {
background: #eee;
padding: 3px;
border: 1px dashed #ccc;
width: 300px;
text-align:center;
}
#loading_image {
width:100%;
height:18px;
border:0;
padding: 2px 0;
background: #eee url(./Loading-Animated-GIF.gif) no-repeat top center;
text-align: center;
}
</style>
[/codesyntax]

[codesyntax lang=”javascript” title=”Show Upload Image JavaScript Function”]
<script type=”text/javascript”>
function showUploadDiv(){
var uploadDiv = document.getElementById(‘uploading’);
if(uploadDiv.style.display == ‘none’){
// the div isnt being displayed yet, so lets change the display then write the content
uploadDiv.style.display = ‘block’;
uploadDiv.innerHTML = ‘Please wait while your image is being uploaded…<br/><div id=”loading_image”></div>’;
}
}
</script>
[/codesyntax]

Now, right after our form we need to include a <div> which holds the uploading animated GIF and some text. So let’s put this right after the form:

[codesyntax lang=”html4strict” title=”Uploading DIV”]
<div id=”uploading” style=”display:none”>
</div>
[/codesyntax]

Be sure to change the image source to your images location and file name so it loads properly. Otherwise you will see the alternative text. Now, we have one last change to make. We need to add the onclick function to the form’s submit button. So let’s go back to the form and change the submit button to the following:

[codesyntax lang=”html4strict” title=”Form Submit Button”]
<input type=”submit” value=”Submit” name=”submit” onclick=”showUploadDiv()” />
[/codesyntax]

Now when we click the submit button we will see a nice message letting us know our image is being uploaded and an image representing the upload progress.

Click here to check out the demo!

Enjoy!

Filed under: Tutorials, Web ProgrammingTagged with: , , , , , , , , , , , ,

Building a Battlefield 3 PC

How to Build a Battlefield 3 PC
Build Your Battlefield 3 PC Cheap and Right!

Battlefield 3 will hit the shelves October 25th, 2011 for the PC, Xbox 360, and Playstation 3. If you are a PC gamer you know you are going to want a powerful machine to experience this much anticipated release. Battlefield 3 introduces the Frostbite 2.0 engine which is based on the 1.5 engine seen in Bad Company 2, so the system requirements will be similar.

Minimum System Requirements:

OS: Windows Vista or Windows 7
Processor: Core 2 Duo @ 2.0GHz
RAM: 2GB
Graphic card: DirectX 10 or 11 compatible Nvidia or AMD ATI card.
Graphics card memory: 512 MB
Hard drive: 15 GB for disc version or 10 GB for digital version

Recommended System Requirements:

OS: Windows 7 64-bit
Processor: Quad-core Intel or AMD CPU
RAM: 4GB
Graphics card: DirectX 11 Nvidia or AMD ATI card, GeForce GTX 460, Radeon Radeon HD 6850
Graphics card memory: 1 GB
Hard drive: 15 GB for disc version or 10 GB for digital version

My Battlefield 3 Gaming Machine

CPU / Processor:
AMD Phenom II X6 1090T Black Edition Thuban 3.2GHz
http://www.newegg.com/Product/Produc…82E16819103849

Motherboard:
GIGABYTE GA-990XA-UD3 AM3+ AMD 990X
http://www.newegg.com/Product/Produc…82E16813128510

Video Card:
SAPPHIRE 100315L Radeon HD 6850 1GB 256-bit GDDR5
http://www.newegg.com/Product/Produc…82E16814102908

with 8GB 1333 DDR3 memory and my current power supply / case which will fit the new components well.

Take the build found here in this article:
http://pc.mmgn.com/Articles/Building-A-PC-For-Battlefield-3

This build budget is $1000.

With the 3 components I have above I am at $445 with a promotional code (HARDOCPX817E) on the processor. This promotion ends TODAY – 8/23/11.

If I added on a Power Supply, HDD, CPU cooler, Case, DVD Drive, and memory:

OCZ ModXStream Pro 700W$59.99 (After rebate) + Free Shipping
Western Digital WD5000AAKS 500GB$49.99 + Free Shipping
ZALMAN CNPS10X Performa 120mm$40.24
– Free Shipping
Rosewill CHALLENGER Black Gaming ATX Mid Tower Computer Case – $49.99 + $9.99 Shipping
Sony Optiarc CD/DVD Burner Drive$19.99 + Free Shipping
G.SKILL Ripjaws Series 8GB (2 x 4GB)$49.99 + Free Shipping

Total: $749 (Plus Tax)
Saved: $250!

Now whether you are looking to put together a new computer all together or just upgrade some components, this may be helpful to you.

1. Establish your price range – Sounds simple, but careful – you may find yourself stretching your boundaries reaching for some luxurious hardware.

2. Look for the deals – Always look for specials online for websites like Newegg.com and TigerDirect.com.

Promotional codes and coupons can be found online  as well from places like RetailMeNot.com or Google. It pays to be patient as well for some upcoming deals for PC components. Check combo deals as well online for Motherboards/CPU’s or GPU/CPU’s.

3. Check compatibility –  It is very important when picking out computer parts to make sure they are compatible with everything else you are getting or with what you are keeping in your system.

With Processors (CPU’s) you want to make sure your motherboard and CPU are both either Intel or AMD. For example my processor is “AMD Phenom II X6 1090T Black Edition” and my motherboard is “GIGABYTE GA-990XA-UD3 AM3+ AMD 990X.” Both are AMD. You also want to make sure that the motherboard accepts the CPU socket type of your processor. My CPU socket type is “Socket AM3” and if you look under details on my motherboard it says “CPU Socket Type: AM3+.” Your power supply must also have the power inputs that match your motherboard’s CPU power input. My motherboard has a 8 pin spot for the CPU and my power supply has that input.

You also want to make sure your motherboard is compatible with both the video card and memory you have. Most motherboards have multiple “PCI Express 2.0 x16” inputs. You will need at least one for your video card and more than one if you plan on having other components that will use these inputs (sound card, 2nd video card, etc.) The video card must also have the same “Chipset Manufacturer” as the motherboard/CPU brand (Intel or AMD). You should also check if features that are available from your video card are possible through your motherboard, such as SLI and CrossfireX. If you are getting a video card for any games (Battlefield 3) make sure it is DirectX11 under 3D API DirectX.

Most memory online and in stores now is DDR3. If you are upgrading your motherboard you will need to make sure the memory you will have is a compatible speed and type.  If you look at “Memory Standard” under details for my motherboard it says “DDR3 2000(O.C.)/1866/1600/1333/1066.” So it is DDR3 and runs at those speeds – 2000 is “Over Clocked.” My memory is 8GB DDR3 1600MHz so it is compatible.

Here is my motherboard layout:

Enjoy building your new PC! Post your builds here or at BFGamerz!

Filed under: Featured, Gaming, TutorialsTagged with: , , , , , , , , , , , ,

Javascript & PHP Star Rating Script

I’ve searched around the interwebs for an ajax star rater and I came across a few different possibilities, all of which looked very good. The top result from google was Nick Stakenburg’s “Starbox” for “ajax star rater”. I also found Masuga Web Design’s Ajax Star Rater and a script from MySandbox to be popular results. However I couldn’t really seem to find a PHP / Mysql script that used Javascript for the rater effects. So I decided to make one based off of a script I found:

Reign Water Design’s 5 Star Rating System

This was a very nice easy to use Javascript 5 star rating script. All I had to do was make some tweaks to my preference and add on some PHP/Mysql code to submit the rating.

See the demo or download this script.

To view the PHP source code, images, and everything together you must download this script.

Javascript

Insert the following in the <head> tags of your page:
[codesyntax lang=”html4strict” title=”Javascript Source Code”]
<script type=”text/javascript”>
function insertParam(key, value)
{
key = escape(key); value = escape(value);

var kvp = document.location.search.substr(1).split(“&”);

var i=kvp.length; var x; while(i–)
{
x = kvp[i].split(“=”);

if (x[0]==key)
{
x[1] = value;
kvp[i] = x.join(“=”);
break;
}
}

if(i<0) {kvp[kvp.length] = [key,value].join(“=”);}

//this will reload the page, it’s likely better to store this until finished
document.location.search = kvp.join(“&”);
}
function alterDisplay(id){
var dropdown = document.getElementById(id);
if(dropdown.style.display == “none”){
dropdown.style.display = “”;
} else {
dropdown.style.display = “none”;
}
}
</script>
<script type=”text/javascript” language=”javascript” src=”./scripts/ratingsys.js”></script>
[/codesyntax]

CSS

You will need to include this in the <head> tags as well either in <style> tags or by <link>:
[codesyntax lang=”css” title=”CSS Styles”]
#rateMe #rate_overlay {
position:absolute;
display:block;
float:left;
margin:0;
padding:0;
height:30px;
width:auto;
background:#eee url(./images/star_overlay.gif) repeat-x;
z-index:2;
cursor:default;
}
#rateStatus{width:100px; height:20px;margin:4px 0 0 5px;font: 12px “Trebuchet MS”, Arial, Helvetica, sans-serif; font-weight: bold}
#rateMe{width:152px; height:50px; padding:1px; margin:0px; vertical-align:top; z-index:auto; border: 1px solid #ccc; }
#rateMe li{float:left;list-style:none;}
#rateMe li a:hover,
#rateMe .on{background:url(./images/star_on.gif) no-repeat;}
#rateMe a{float:left;background:url(./images/star_off.gif) no-repeat;width:30px; height:30px;cursor:pointer;}
#rateMe a:hover{background:url(./images/star_on.gif) no-repeat;}
#rateMe a.grey,#rateMe a.grey:hover{background:url(./images/star_off.gif) no-repeat; cursor:default;}
#rateVotes{display:block; margin-left:65px; font: 11px “Trebuchet MS”, Arial, Helvetica, sans-serif; color:#4a4a4a;}
#ratingSaved{display:none;}
.saved{color:red; }
.grey

.rate_on_button {

}
.rate_on_button a { float:left;padding:10px;margin:0 5px;border:2px solid #666; background-color:#fff; color: #000; font-size: 2em; text-align:center; display:block; color: #000; text-decoration: none; }
.rate_on_button a:hover { color: #fff; text-decoration: none; background-color: #333; }
[/codesyntax]

Basically I took the script that Water’s made and changed a few things to the css styles, added an overlay for the current rating, and wrote a php script to insert rates and determine the current rating, etc. I also added the Javascript functions insertParam() and alterDisplay(). You do not need to use this function insertParam() to create the url, you can simply set the <a> tags to something like this:

[codesyntax lang=”html4strict”]
<a href=”./index.php?r=1″ id=”_1″ title=”Terrible” onmouseover=”rating(this)” onmouseout=”off(this)”></a>
[/codesyntax]

The Javascript function alterDisplay() is used to hide and show the overlay <div> that holds the current rating (if there is one). So when you mouse over the rating bar holder it hides the overlay so you can rate.

The PHP script grabs the information from the Mysql table that you specify in the function. You will need to adjust the following values:

  • $var – The column to base your mysql selection off of. Grab all rows where this column equals $id.
  • $table – The table where the ratings are being held.
  • $star_width – Width of the stars, default is 30px.

You will need to be connected to a MYSQL database before calling the rating bar function.

Since the syntax of the function is the following:

[codesyntax lang=”php” title=”Rating Bar Syntax”]
function rating_bar($id);
[/codesyntax]

You will need to supply the identifier ($id) which tells the PHP script which row to grab from the Mysql table.

To display the current rating after it has been rated on – because Javascript alone is not enough – I added an overlay <div> which will hold the current rating. This is done by setting the css style of this overlay div to the following:

[codesyntax lang=”css” title=”Rate Overlay CSS Style”]
#rateMe #rate_overlay {
position:absolute;
display:block;
float:left;
margin:0;
padding:0;
height:30px;
width:auto;
background:#eee url(./images/star_overlay.gif) repeat-x;
z-index:2;
cursor:default;
}
[/codesyntax]

The position: aboslute and z-index: 2 style attributes make the div lay over top of the rateMe div which holds the rater and has a z-index: 1.

Test out this free script with the demo link at the top of the post or download it and use on your own website. Credit where due is always appreciated.

Any questions or problems please feel free to email me at brian@bgallz.org or post here.

Filed under: Featured, Javascript, PHP, Scripts, TutorialsTagged with: , , , , , , ,

Check if Field Exists in Mysql Table

Sometimes it is useful to know if a field exists in a mysql table before running a query using that field name, especially when the field name is coming from some kind of user input.

So to do this we use the function mysql_list_fields to grab the fields out of a table and run through them with a for loop until we find the one we are looking for – using the function mysql_field_name, in which case we return true. If we don’t find it, the function returns false.

[code lang=”php”]

[/code]

And it’s that easy!

Filed under: MySQL, PHP, TutorialsTagged with: , , , ,

WHMCS Cron Jobs in cPanel

Here we will look at how to set up your WHMCS to run scheduled cron jobs through your cPanel. This allows you to let your clients automatically have their websites and hosting, etc. set up without actually manually doing it. It is an automation feature, which coming from your system’s cPanel, is availabile in WHMCS. Basically in cPanel you create a new job under Cron Jobs and set it to your cron.php in WHMCS to run the automation. These scheduled tasks are very useful for several web applications for businesses or even personal use.

So firstly, we need to create a new server in the Servers menu and a product in our Products and Services menu in WHMCS.

Assuming you have your WHMCS installed, go to the admin directory “whmcs/admin/” and login.

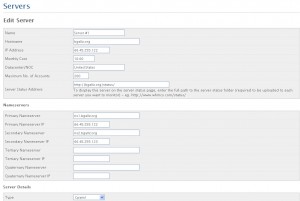
Under Setup go to Servers (if you don’t have a server already made) click Add New Server. You generally have one main server for the WHMCS you are using, but some larger companies and business/groups have multiple servers – VPS, Dedicated, etc. Here you need to fill in the information for your server. Below is an image of what mine looks like:

Server Settings

Depending on the software you are using you will need to select it in “Type” and input your connection username and password. You will then need to create at least one group for the server you just made. These groups are the different types of accounts that will be setup to run off of this server you select.

Then, under Setup go to Products/Services. If you don’t have any groups or products, click the add group/new product links to create a new group and a product inside that group. Set up whatever specific details you want for your new product. If it is hosting of some kind, or just a purchasable service, fill it out to its entirety.

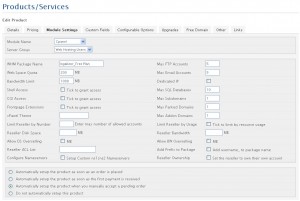
Under the Module Settings tab, you will find the fields and inputs for setting up the cPanel and Cron Job properties. Below is an image of what my Product Module Settings looks like:

Product Module Settings

I use cPanel so that is my Module Name. Then you just select the server group you just made for your server.

Web Host Manager Settings

In your cPanel at the very bottom of the index (homepage) there is a link for your Web Host Manager (WHM). This is the software that cPanel uses for maintaining all of the hosting accounts you have on your server. You must set up your nameservers here that are used in the server you setup in WHMCS. You do this by clicking the “Basic cPanel & WHM Setup” link. You must also add the packages here that are the same titles you used when setting up the products and services in the Module Settings tab under “WHM Package Name.” Your WHMCS will run Cron jobs based off of these values so make sure they are correct.

Finally, we must set the Cron Jobs Settings in cPanel.

On your cPanel index page, towards the bottom there is a link for Cron Jobs.

  1. Enter an email address for support on these accounts affected.
  2. Enter the time interval for this Cron Job to be ran.
  3. The Command is the address to your cron.php file in WHMCS.

My command line is something like so:

[code lang=”html”]php -q /home/mysite/public_html/whmcs/admin/cron.php[/code]

This tells cPanel where to get the cron.php script from so it can run the automated jobs for your WHMCS services. Be sure to go through all the settings for the Product/Service you setup. There are a lot of features you may want on or off depending on what the service is.

And that’s it! Enjoy setting up endless hosting accounts, hands free!

Filed under: Featured, TutorialsTagged with: , , , ,

Avoid Duplicate Content Pages

Many people do not think about the possibility of duplicate content pages on their website, when this is very common and easily avoidable. All it takes is a little HTML in the head tags of the page.

What is a duplicate content page?

Duplicate content is content that is showing up on the Internet by multiple URLs. Another words, a page like aboutus.php might be coming with the same content as aboutus.php?do=send.

This causes some problems with search engines as far as determining which page the engine should use for query matches, page ranking, use of meta tags between the two versions, and just which one to include for their indices.

How do you avoid duplicate content?

Let’s say these are your pages that are coming with the same content:

Original source:
post.php?id=1
.

Duplicate content pages:
post.php?id=1&lang=en
post.php?id=1&do=login

On post.php we can include a <link> tag that will reference to the original source so Search Engines gather the original correct information from the server, rather than trying to decide between the serveral duplicate pages.

Place in the <head> tags of post.php:

[code lang=”php”]
echo ‘‘;
[/code]

This will take the $id and put it into the URL as just post.php?id=$id. So any other URL parameters, such as lang=en, or do=login, will not be read as a duplicate page, but tell search engines to use the content of just post.php?id=$id.

If you do not need to use PHP and you just want the page to load a set content of just post.php then you would use the tag like so:

[code lang=”html”] [/code]

When using this method, you want to be sure that you are consistent throughout your website with your canonical URLs. If your canonical url is like: “http://www.bgallz.org/” then you want to use “www” in all of your URL references and tags for the domain.

Now, if you have pages that you do NOT want included in any search engine queries or crawled by search engine bots, then you want to use a META tag with “noindex, nofollow”.

To block a page from search engine indexes places the following in the <head> tags:

[code lang="html"]

[/code]

Walla!
Filed under: HTML, TutorialsTagged with: , ,

Setting Up Your New Website

Before you do anything, you need to pick a domain name. For example: bgallz.org.

You want your domain to be simple, obvious, effective. Think of what your website is going to be about, think of all possible searches, keywords, and most commonly used phrases or words when talking about your “niche.” A niche is a specific/special idea or description to your site. Like any website can be about cute puppy dogs, but your site is about… “Where to adopt cute puppies!” Try to keep the domain name short as possible. Something like “adoptapup.org.”

You can register one at any of the following domain registars:

  • Namecheap.com
  • Godaddy.com
  • Networksolutions.com

There are plenty of others, these are just some I know of, however I recommend using Namecheap. Select the domain you want (that’s available) and register it with a registrar. This takes some time to get configured and defined on the registrar’s side.

After you have decided on domain name, you need to get space to put the site on. This is where web hosting comes in to play. When searching  for hosting you want to consider your needs, ask yourself – what do I need? Think about how much disk space you will need, bandwidth, required server applications and languages, etc. You want to find the best price that meets your requirements. Also, know the difference between web hosting and VPS (virtual private servers). VPS is needed for things like managing your own small web hosting business, running certain server-side programs, etc.

Web hosting is not something to just pick any cheap possible option for. Your website is going to be hosted on the place you order from, so make sure it is reliable, dependable, stable, and yeah – a good price. At bgallz.org you can get 250 GB disk space and 10 TB bandwidth for just $3.99/mo. Web hosting is usually set up very quickly, and once you have your host paid for and cleared you can put your domain on it! You do this by either transferring your recently bought domain to the web host, OR by changing the nameservers to point to your new web host.

You can change the nameservers on your domain at the registrar you just registered at. In your account somewhere under each domain you have there, you should find a link to change domain nameservers or domain name setup.

Here is a screenshot off Namecheap where I have mine:

Then you can enter your nameservers that are provided from your new web host. They are usually like ns1.webhostingsite.com and ns2.webhostingsite.com. These tell the registrar where to load your website’s files from.

Here is an image:

Now that your domain is setup with your new nameservers, you are ready to load your site’s files onto your new host.

Don’t have any files or web design? Check out my web design packages. This is where the programming comes in to play. I recommend using Dreamweaver or something of similar power to program your web code into a beautiful working website. Please contact me for all your web programming needs! My email: support@bgallz.org.

With the purchase of your web hosting you should receive login details for your FTP and cPanel (or whatever system they are using).

I like to use Filezilla as my FTP program, download it here.

Here is my FTP screen once logged in:

Once you are connected to your FTP you can upload all you want. Well based on whatever your limitations are as far as disk space. Usually you connect to ftp.yourdomain.com with the username and password your host provides you with. You want to upload in the /public_html/ directory, this is the main directory for your website.

So when people access your website, such as http://yourdomain.com/images/image1.gif – this would be uploaded to:

/public_html/images/

Your done! Once your files are uploaded and your domain settles into its new nameservers, everything should be accessible and ready to go. Enjoy.

Filed under: Tutorials

HTML Div Float Property

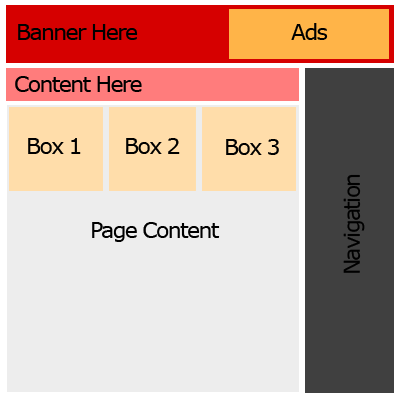
Div Float LayoutUsing the HTML tag – <div> and the float style property, you can make designs for your websites. Well, you can make layouts for where design could be. This is a good structural tool in laying out where content will be on your web pages, images, blurbs, etc.

Let’s say we want a page to look like this:

First I’m going to set up the CSS styles we will set our <div>’s to in the HTML to give this page the right look as far as padding, margins, borders, etc. Once we have all the styles defined we will call them to the DIV tags in our HTML like so: <div class=”CLASSNAME“>. Using the right float’s in the right order will place our DIVs in the right places to make this layout.

This will go in our <head> tags of the HTML page:

[code lang=”css”]
html, body, center {
padding: 0px;
margin: 0px;
height: 100%;
}
.header {
padding: 8px;
vertical-align: middle;
height: 80px;
background: #d60000;
}
.banner {
float: left;
border: 0;
vertical-align: middle;
width: 500px;
height: 60px;
}
.ads {
padding: 10px 0px;
float: right;
width: 300px;
height: 60px;
vertical-align: middle;
background: #ffb448;
}
.wrapper { /* Main page holder. */
padding: 10px;
width: 875px;
background: #fff;
height: 100%;
}
.page {
padding: 10px 0px;
width: 630px;
float: left;
height: 100%;
}
.top {
padding: 5px;
height: 40px;
background: #ff7c7c;
margin:0;
}
#boxes {
padding: 5px 0px;
}
.box {
width: 197px;
height: 197px;
padding: 3px;
margin: 3px;
background: #ffddaa;
float: right;
}
.rightside {
float: right;
text-align: center;
height: 100%;
padding: 10px 0px;
}
.nav {
padding: 5px;
background: #ccc;
width: 200px;
height: 100%;
min-height: 600px;
}
.content {
margin: 20px 0px;
width: 600px;
text-align: left;
}
[/code]

Now we have to write the HTML to use these styles appropriately.

Here is our <body> HTML:

[code lang=”html”]


Ads Here
Content Here
Box 3
Box 2
Box 1

Content Here, lots and lots of content here! Content Here, lots and lots of content here! Content Here, lots and lots of content here! Content Here, lots and lots of content here! Content Here, lots and lots of content here! Content Here, lots and lots of content here! Content Here, lots and lots of content here! Content Here, lots and lots of content here!Content Here, lots and lots of content here!

Content Here, lots and lots of content here!Content Here, lots and lots of content here!Content Here, lots and lots of content here!Content Here, lots and lots of content here!Content Here, lots and lots of content here!

[/code]

Take a look at the HTML in action here!

If you notice in the HTML the box’s are placed in descending order inside the “boxes” div ID. Since the box class is set to to the right:

[code lang=”css”]
.box {
float: right;
}
[/code]

We put the boxes in descending order so that the HTML will read down the page and float the first one to the right, then the next, then the last. So it floats BOX3, then BOX2, then BOX1.

Using the float style property of DIV tags is really useful in making layouts because it does not require any real guidelines to follow as far as where it is on the page. This sounds a little wordy but basically with a combination of float, and position style attributes you can make your DIV’s go where ever you want.

Filed under: HTML, Tutorials, Web Programming, XHTMLTagged with: , , , , , , ,

PHP Pagination with Mysql

So you have a Mysql table you want to pull data from, but you don’t want to flood the page with everything in the table right! So you need some pagination to seperate all the content in the table into easy to open pages.

So let’s say this is your mysql query:

[code lang=”php”]
$sql = mysql_query(“SELECT * FROM table1”) or die(mysql_error());
[/code]

So this will grab everything from table1.

If we have a lot of rows in this table this is going to return all of them, so we need to make a pagination for all the rows returned. This requires modifying the query and adding some variables. I like to have the PER_PAGE,OFFSET, and PAGE_NUM variables defined so you can use them globally in every class and function, however you may not want the same values throughout so declare them as you wish.

Here is the header PHP for definitions:

[code lang=”php”]
// === START Pagination definitions === //
$pgNperPage=15;
$pgNpageNum=1;
if(isset($_GET[“p”])){
$pgNpageNum=(int)$_GET[“p”];
}
$pgNoffset = ($pgNpageNum – 1) * $pgNperPage;
// definitions
define(“SITE_URL”,”http://mysite.com/”,true);
define(“PER_PAGE”,$pgNperPage,true);
define(“OFFSET”,$pgNoffset,true);
define(“PAGE_NUM”,$pgNpageNum,true);
// === END Pagination definitions === //
[/code]

So we have to modify the query we use in $sql to include a limit with the offset and per page values used. I have made a pagination function which will do everything for me. We’ll pass the query along with some parameters through this function to output the new query and the pagination HTML.

Here is the function syntax:

[code lang=”php”]
pagination($query,$pageNum,$perpage,$sortable,$cat=””,$sort=””,$headers=””,$pageL=””);
[/code]

Function Paremeters:

  • $query – The original query to use for the Mysql. i.e. “SELECT * FROM table1”. (No ORDER BY or LIMIT).
  • $pageNum – Current page number.
  • $perpage – Per page integer value.
  • $sortable – Array of sortable fields in mysql table to order the results by.
  • $cat – What is being paginated. i.e. (Users, videos, comments, etc.) [Optional]
  • $sort – Field in Mysql table to sort it by. Default in the function definition is “timestamp” – usually used for date. [Optional]
  • $headers – Additional URL headers besides the sort and page number. i.e. “&g=bf-2142” (Start with & not ?) [Optional]
  • $pageL – Pagination letter. Useful if you have multiple paginations on one page. i.e. “cp”. (Default is p.) [Optional]

Here is the pagination function definition:

[code lang=”php”]
function pagination($query,$pageNum,$perpage,$sortable,$cat=””,$sort=””,$headers=””,$pageL=””){
$pagination = array();
$paginationDetails = “”;
$adjacents = 3;
if(!$perpage){
$perpage = 15; // default
}
if($cat){
$cat = ” “.$cat.””;
}
$pageNum = (int)$pageNum;
if(!$pageNum){
$pageNum=1;
}
if(!$pageL){
$pageL=”p”;
}
$pgNoffset = ($pageNum – 1) * $perpage;

if(isset($_GET[‘dsc’]) && $_GET[‘dsc’] != “”){
$dsc = “DESC”;
$urldsc = “&dsc=1”;
} else {
$dsc = “”;
$urldsc = “”;
}
if(is_array($sortable)){
if(in_array($sort,$sortable)){
$sort = trim($sort);
} else {
$sort = “”;
}
}
if($sort){
$order_by = “ORDER BY “.$sort.” “.$dsc.””;
} else {
$order_by = “”;
}
$limit = “LIMIT “.$pgNoffset.”,”.$perpage.””;
$queryNew = $query.’ ‘.$order_by.’ ‘.$limit;
$pagination[] = $queryNew;
if(strpos($_SERVER[“REQUEST_URI”],”?”)){
$pos = strpos($_SERVER[“REQUEST_URI”],”?”);
} else {
$pos = strlen($_SERVER[“REQUEST_URI”]);
}
$pageURL = substr($_SERVER[“REQUEST_URI”],0,$pos);

$pageURL .= “?sort=”.$sort.””;
$pageURL .= “&dsc=”.$dsc.””;
$pageURL .= $headers;

$sql = mysql_query($queryNew) or die(mysql_error());
$count = mysql_num_rows($sql);
if($count > 0){
$totalQuery = mysql_query($query) or die(mysql_error());
$totalCount = mysql_num_rows($totalQuery);
$total = ceil($totalCount / $perpage);
$pm1 = $total – 1;
$paginationDetails .= ‘

Displaying ‘.$count.’ of ‘.$totalCount.$cat.’.

‘;
if($pageNum > 1){
// previous button
$paginationDetails .= ‘

‘;
}
// conditionals for breaking up the pages
if($total < 7 + ($adjacents*2)){ // not enought to break up for($page=1;$page<=$total;$page++){ if($page == $pageNum){ $paginationDetails .= '

‘;
} else {
$paginationDetails .= ‘

‘;
}
}
}
else if($total > 5 + ($adjacents*2)){
// enought to hide some
if($pageNum < 1 + ($adjacents*2)){ // hide later pages for($page=1;$page<5+($adjacents*2);$page++){ if($page == $pageNum){ $paginationDetails .= '

‘;
} else {
$paginationDetails .= ‘

‘;
}
}
$paginationDetails .= ‘

‘;
$paginationDetails .= ‘

‘;
$paginationDetails .= ‘

‘;
}
else if($total – ($adjacents*2) > $pageNum && $pageNum > ($adjacents * 2)){
// in middle, hide little front and back
$paginationDetails .= ‘

‘;
$paginationDetails .= ‘

‘;
$paginationDetails .= ‘

‘;
for($page=($pageNum – $adjacents);$page<=($pageNum + $adjacents);$page++){ if($page == $pageNum){ $paginationDetails .= '

‘;
} else {
$paginationDetails .= ‘

‘;
}
}
$paginationDetails .= ‘

‘;
$paginationDetails .= ‘

‘;
$paginationDetails .= ‘

‘;
}
else {
// close to end, hide early pages
$paginationDetails .= ‘

‘;
$paginationDetails .= ‘

‘;
$paginationDetails .= ‘

‘;
for($page=$total – (3 +($adjacents*2));$page<=$total;$page++){ if($page == $pageNum){ $paginationDetails .= '

‘;
} else {
$paginationDetails .= ‘

‘;
}
}
}
}

if($pageNum < $total){ $paginationDetails .= '

‘;
}
$paginationDetails .= ‘

Page ‘.$pageNum.’ of ‘.$total.’ ‹ Prev ‘.$page.’ ‘.$page.’ ‘.$page.’ ‘.$page.’ ‘.$pm1.’ ‘.$total.’ 1 2 ‘.$page.’ ‘.$page.’ ‘.$pm1.’ ‘.$total.’ 1 2 ‘.$page.’ ‘.$page.’ Next ›

‘;
$pagination[] = $paginationDetails;
}
return $pagination;
}
[/code]

Now we just need to include the HTML and CSS classes for the pagination so viewers can navigate through the pages returned from this query.

Pagination CSS:

[code lang=”css”]
.pagination,.pagination div {
background-color: #eee;
font: 11px tahoma;
border: 1px solid #ccc;
text-align: left;
}
.a_td {
color: #343434;
background-color: #fff;
font-size: 11px;
font-family: tahoma;
}
.a_page {
color: #343434;
background-color: #fff;
font-size: 11px;
font-family: tahoma;
padding:0px;
}
.a_page:hover {
background-color: #eee;
}
.a_page a {
display:block;
padding:2px;
color: #333;
text-decoration: none;
}
.page_selected {
background-color: #333;
color: #fff;
font-weight: bold;
font-size: 11px;
font-family: tahoma;
}
.page_selected a {
color: #000;
}
[/code]

Now we have the function included on our page along with the necessary CSS styles. Now we can call the function and echo the contents of the returned array. The function pagination returns an array like so: pagination = [newMysqlQuery, paginationHTML].

So let’s say this was our function for downloads:

[code lang=”php”]
function downloads($g){
$g=mysql_real_escape_string($g); // Game
$validSorts = array(“title”,”catType”,”dl_count”,”timestamp”); // Sorts
if(isset($_GET[‘sort’]) && in_array($_GET[‘sort’],$validSorts)){
$sort = mysql_real_escape_string($_GET[‘sort’]);
} else {
$sort = ‘timestamp’; // default sort used.
}
if(isset($_GET[‘dsc’])){
$desc = “DESC”;
} else {
$desc = “”;
}
if(isset($_GET[‘p’])){
$page = (int)$_GET[‘p’];
} else {
$page = 1;
}
$query = “SELECT * FROM downloads WHERE gameCat = ‘$g'”;
$pagination = pagination($query,$page,15,$validSorts,”downloads”,$sort,”&g=”.$g.””); // Call the function.
$sql = mysql_query($pagination[0]) or die(mysql_error()); // $pagination[0] = new query.
$count = mysql_num_rows($sql);
}
[/code]

Now we have called the pagination function with some variables for displaying our downloads. Along with printing the pagination HTML you could display the rows with the new Mysql query that the function returns.

See how to display Mysql Rows here!

For this example we will simply echo the pagination HTML:

[code lang=”php”]
echo $pagination[1];
[/code]

Check this function out LIVE here:

http://bfgamerz.com/members.php

Filed under: MySQL, PHP, Tutorials, Web ProgrammingTagged with: , , , ,