Category: Featured

WHMCS Cron Jobs in cPanel

Here we will look at how to set up your WHMCS to run scheduled cron jobs through your cPanel. This allows you to let your clients automatically have their websites and hosting, etc. set up without actually manually doing it. It is an automation feature, which coming from your system’s cPanel, is availabile in WHMCS. Basically in cPanel you create a new job under Cron Jobs and set it to your cron.php in WHMCS to run the automation. These scheduled tasks are very useful for several web applications for businesses or even personal use.

So firstly, we need to create a new server in the Servers menu and a product in our Products and Services menu in WHMCS.

Assuming you have your WHMCS installed, go to the admin directory “whmcs/admin/” and login.

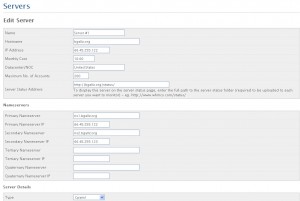
Under Setup go to Servers (if you don’t have a server already made) click Add New Server. You generally have one main server for the WHMCS you are using, but some larger companies and business/groups have multiple servers – VPS, Dedicated, etc. Here you need to fill in the information for your server. Below is an image of what mine looks like:

Server Settings

Depending on the software you are using you will need to select it in “Type” and input your connection username and password. You will then need to create at least one group for the server you just made. These groups are the different types of accounts that will be setup to run off of this server you select.

Then, under Setup go to Products/Services. If you don’t have any groups or products, click the add group/new product links to create a new group and a product inside that group. Set up whatever specific details you want for your new product. If it is hosting of some kind, or just a purchasable service, fill it out to its entirety.

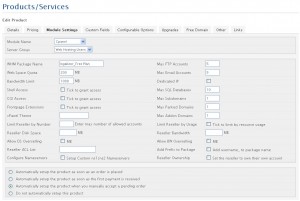
Under the Module Settings tab, you will find the fields and inputs for setting up the cPanel and Cron Job properties. Below is an image of what my Product Module Settings looks like:

Product Module Settings

I use cPanel so that is my Module Name. Then you just select the server group you just made for your server.

Web Host Manager Settings

In your cPanel at the very bottom of the index (homepage) there is a link for your Web Host Manager (WHM). This is the software that cPanel uses for maintaining all of the hosting accounts you have on your server. You must set up your nameservers here that are used in the server you setup in WHMCS. You do this by clicking the “Basic cPanel & WHM Setup” link. You must also add the packages here that are the same titles you used when setting up the products and services in the Module Settings tab under “WHM Package Name.” Your WHMCS will run Cron jobs based off of these values so make sure they are correct.

Finally, we must set the Cron Jobs Settings in cPanel.

On your cPanel index page, towards the bottom there is a link for Cron Jobs.

  1. Enter an email address for support on these accounts affected.
  2. Enter the time interval for this Cron Job to be ran.
  3. The Command is the address to your cron.php file in WHMCS.

My command line is something like so:

[code lang=”html”]php -q /home/mysite/public_html/whmcs/admin/cron.php[/code]

This tells cPanel where to get the cron.php script from so it can run the automated jobs for your WHMCS services. Be sure to go through all the settings for the Product/Service you setup. There are a lot of features you may want on or off depending on what the service is.

And that’s it! Enjoy setting up endless hosting accounts, hands free!
Filed under: Featured, TutorialsTagged with: , , , ,

PHP Upload and Resize Image

Many times when you upload a image somewhere you want to resize it to different dimensions based off of a maximum width or height. Here is a simple script that does this for you, using a HTML form and a PHP script. We start with the PHP script that will run if our $_GET[‘do’] is set to “upload.” Then we include the HTML form that has three inputs (max width, max height, image file).

Use the Upload and Resize Demo Here!

Download This Script!

Here is the PHP for our function – generate_resized_image() – which will take the given image file, create a new file on our server, and then copy the uploaded image to our local image file with the new width and height:

[codesyntax lang=”php” title=”Upload and Resize PHP Code”]
<?php

// index.php

function generate_resized_image(){

$max_dimension = 800; // Max new width or height, can not exceed this value.
$dir = “./images/”; // Directory to save resized image. (Include a trailing slash – /)

// Collect the post variables.
$postvars = array(
“image”    => trim($_FILES[“image”][“name”]),
“image_tmp”    => $_FILES[“image”][“tmp_name”],
“image_size”    => (int)$_FILES[“image”][“size”],
“image_max_width”    => (int)$_POST[“image_max_width”],
“image_max_height”   => (int)$_POST[“image_max_height”]
);

// Array of valid extensions.
$valid_exts = array(“jpg”,”jpeg”,”gif”,”png”);

// Select the extension from the file.
$ext = end(explode(“.”,strtolower(trim($_FILES[“image”][“name”]))));

// Check not larger than 175kb.
if($postvars[“image_size”] <= 179200){

// Check is valid extension.
if(in_array($ext,$valid_exts)){

if($ext == “jpg” || $ext == “jpeg”){
$image = imagecreatefromjpeg($postvars[“image_tmp”]);
}
else if($ext == “gif”){
$image = imagecreatefromgif($postvars[“image_tmp”]);
}
else if($ext == “png”){
$image = imagecreatefrompng($postvars[“image_tmp”]);
}
// Grab the width and height of the image.
list($width,$height) = getimagesize($postvars[“image_tmp”]);

// If the max width input is greater than max height we base the new image off of that, otherwise we
// use the max height input.
// We get the other dimension by multiplying the quotient of the new width or height divided by
// the old width or height.

if($postvars[“image_max_width”] > $postvars[“image_max_height”]){

if($postvars[“image_max_width”] > $max_dimension){
$newwidth = $max_dimension;
} else {
$newwidth = $postvars[“image_max_width”];
}
$newheight = ($newwidth / $width) * $height;

} else {

if($postvars[“image_max_height”] > $max_dimension){
$newheight = $max_dimension;
} else {
$newheight = $postvars[“image_max_height”];
}
$newwidth = ($newheight / $height) * $width;
}

// Create temporary image file.
$tmp = imagecreatetruecolor($newwidth,$newheight);

// Copy the image to one with the new width and height.
imagecopyresampled($tmp,$image,0,0,0,0,$newwidth,$newheight,$width,$height);

// Create random 4 digit number for filename.
$rand = rand(1000,9999);
$filename = $dir.$rand.$postvars[“image”];
// Create image file with 100% quality.
imagejpeg($tmp,$filename,100);
return “<strong>Image Preview:</strong><br/>
<img src=\””.$filename.”\” border=\”0\” title=\”Resized  Image Preview\” style=\”padding: 4px 0px 4px 0px;background-color:#e0e0e0\” /><br/>
Resized image successfully generated. <a href=\””.$filename.”\” target=\”_blank\” name=\”Download your resized image now!\”>Click here to download your image.</a>”;

imagedestroy($image);
imagedestroy($tmp);
} else {
return “File size too large. Max allowed file size is 175kb.”;
}
} else {
return “Invalid file type. You must upload an image file. (jpg, jpeg, gif, png).”;
}
}

?>
[/codesyntax]

This function you can define in your header PHP files along with other functions or where ever you would like, so long as it is defined before the call of the function itself.

Here is the HTML for our form to submit the image file and the new dimensions:

[codesyntax lang=”html4strict” title=”HTML Form”]
<form action=”./index.php?do=upload” method=”post” enctype=”multipart/form-data”>
<table width=”100%” align=”center” border=”0″ cellpadding=”2″ cellspacing=”0″>
<tr>
<td align=”left” width=”100″>
New Width:</td>
<td align=”left”><input name=”image_max_width” style=”width: 120px” type=”text” maxlength=”4″ /> px.</td>
</tr>
<tr><td colspan=”2″><strong>OR</strong></td></tr>
<tr>
<td align=”left”>
New Height:</td>
<td align=”left”><input type=”text” name=”image_max_height” style=”width: 120px” maxlength=”4″ /> px.</td>
</tr>
<tr>
<td align=”left”>
Image:</td>

<td align=”left”><input type=”file” name=”image” size=”40″ /></td></tr>
<tr>
<td align=”left” colspan=”2″>
<ol style=”margin:0;padding:3px 0px 3px 15px”>
<li>Max file size: 175 KB.</li>
<li>Allowed extensions: jpg, jpeg, gif, png.</li>
<li>Max Dimension: <em>800</em>px.</li>
</ol>
</tr>
<tr>
<td align=”left” colspan=”2″>
<input type=”submit” name=”submit” value=”Submit!” style=”font: 10pt verdana” />
</td>
</tr>
</table>
</form>
[/codesyntax]

This will create a form that looks like this:

Max Width: px.
Max Height: px.
Image:
  1. Max file size: 175 KB
  2. Allowed extensions: jpg, jpeg, gif, png.
  3. Max Dimension: 800px.


Okay, so now we have our PHP function defined, included and our HTML contains this form submitting the image file and its new dimensions. All we need now is a short code of PHP to check our GET values, particularly do for the value upload. This tells us the form was submitted and we can start checking it for values, and creating our re-sized image.

Here is the PHP which will appear below the HTML form to show our re-sized image once the form is submitted:

<?php

if(isset($_GET['do']) && $_GET['do'] == "upload")
{

$upload_and_resize = generate_resized_image();
echo '<div id="upload">'. $upload_and_resize. '</div>';

}

?>

Filed under: Featured, PHP, Scripts, Tutorials, Web ProgrammingTagged with: , , , , , ,