Author: Brian

PHP Display Mysql Rows with Column Limit

This little script is very useful for having a set width of a table and displaying several rows organized in that table.

It is easy to just display a table full of rows for all the data in a mysql table. Something like this:

[code lang=”php”]
0){
echo “

“;
echo “

“;
while($row = mysql_fetch_array($sql)){
echo “

“;
}
echo “

“.$row[“col1″].”

“;
}
?>
[/code]

This will grab all content of the mysql table and put the data from column 1 as a table column in this table.

Let’s say we have some images we want to display. The table is 500 pixels wide. So if your images are no larger than 100 pixels, you would want to display 5 columns per row in your table. This will give it good organization and flow in your webpage.

[code lang=”php”]
0){
echo “

“;
echo “

“;
for($i=0;$i<=mysql_num_rows($sql);$i=$i+1){ while($row = mysql_fetch_array($sql)){ $i++; if($i%5==0){ // use the operator to find the remainder of $i / 5 (%) // if the remainder is 0; it is a multiple of 5, so make a new row. echo " “;
} else {
echo “

“;
}

}
}
echo “

“;
}
?>
[/code]

The two codes will appear like so:

Before Column Limit:

Image 1 Image 2 Image 3 Image 4 Image 5 Image 6 Image 7 Image 8 Image 9 Image 10

After Column Limit:

Image 1 Image 2 Image 3 Image 4 Image 5
Image 6 Image 7 Image 8 Image 9 Image 10
Filed under: TutorialsTagged with: , , ,

PHP Validate Email Address

When a user submits their email address in a form, you want to be sure it is a real email address. We will use the function preg_match() to see if it matches our regex for emails.

[code lang=”php”]

[/code]

You can submit the email to this function using something like this:

[code lang=”php”]

[/code]

It is that simple! 🙂 Enjoy.

Filed under: Web ProgrammingTagged with: , ,

PHP Get File Size of Remote File

Previously in a post I made for uploading a file from URL we wanted to include a file size check to make sure the file wasn’t too big before we upload it. Here I’ll show you how to get the remote file’s size and other information before doing other functions with it.

We’ll do this through a simple form. By default a form will encode all characters and convert spaces to “+” so we will leave the enctype undefined.

Then we just need the text input named “url” which I gave a default value “Enter URL Here…” and the Javascript-related attribute – onfocus. So when you focus on the text input it will change from the default value to blank.

Finally of course, we include the submit input named “submit” with the value “Submit.” We will use this value to check that the  form was submitted.

[codesyntax lang=”html4strict” title=”HTML Form”]
<form action=”getinfo.php” method=”post”>
<input type=”text” name=”url” size=”40″ value=”Enter URL Here…” onfocus=”if(this.value == ‘Enter URL Here…’) this.value = ”;” /> <input type=”submit” name=”submit” value=”Submit” />
</form>
[/codesyntax]

This HTML form will submit the entered url to getinfo.php.

We are going to the function fopen() to get the information we need from the remote file. There is one thing to be aware of using fopen() to retrieve this data. You need to be sure the fopen wrappers is enabled in your php.ini. This can not be changed using ini_set().

We are going to create a variable “contents” and add each line of the file to it as we read it. Then we will use the function mb_strlen() to get the file size of the variable. Normally we would use strlen(), however that will only read one character as one byte. That doesn’t really give you the most accurate reading if you have special characters in the file which are more than one byte.

By default the function fgets() reads each line of a file 1024 bytes at a time. The function runs until either the specified length is reached (1024 bytes) or to the end of the file. It is more resource efficient to specify a read length:

“Until PHP 4.3.0, omitting it would assume 1024 as the line length. If the majority of the lines in the file are all larger than 8KB, it is more resource efficient for your script to specify the maximum line length.”php.net

getinfo.php

[codesyntax lang=”php” title=”getinfo.php Source Code”]
<?php
// getinfo.php

if($_POST[“submit”]){
// Form is submitted.

// Check the fopen wrapper settings in php.ini
if (ini_get(“allow_url_fopen”) == 1) {

// Open the file.
$file = fopen(trim($_POST[“url”]), “r”);

if($file){
// We got the file.

$contents = “”;
while($line = fgets($file,1024)){
// Write each line to the string contents a kilobyte at a time.
$contents .= $line;
}

$filesize = mb_strlen($contents,”8bit”);
$kb = $filesize / 1024; // Returns the file size in kilobytes
echo “<strong>File Size</strong>:  “.$filesize.” bytes or “.$kb.” kilobytes.”;

} else {

echo “Remote file not found.”;

}

} else {

echo “Fopen wrappers not enabled.”;

}

}

?>
[/codesyntax]

The page will display the file size in bytes and kilobytes, as so:
File Size: 1024 bytes or 1 kilobytes.

Filed under: PHP, Tutorials, Web ProgrammingTagged with: , , ,

.htaccess Remove “www” from URL

Here is a quick and easy code you can use in your .htaccess file, located in the root directory of your website, to remove any world-wide web letters from your url. This will remove “www” from all your website’s pages as well as search engines, etc.

[code lang=”apache”]
RewriteEngine On
RewriteCond %{HTTP_HOST} ^www.mywebsite.com$ [NC]
RewriteRule ^(.*)$ http://mywebsite.com/$1 [R=301,L]
[/code]

And vice-versa you can add “www” to your website’s url with the following .htaccess code:

[code lang=”apache”]
RewriteEngine on
Options FollowSymlinks
Rewritecond %{HTTP_HOST} ^mywebsite.com [NC]
Rewriterule ^(.*)$ http://www.mywebsite.com/$1 [R=301,NC]
[/code]

All I did here was switch the places of the url of with “www” and the url without “www” in the code.

Just replace “mywebsite.com” with your website’s domain name.

Filed under: Web ProgrammingTagged with:

Making a Background Pattern

Here is how to make a very basic background pattern to use on your webpage. We’ll be using Photoshop to make this.

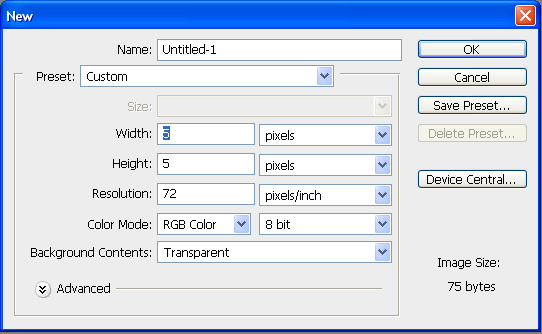
First, open up a new document, with dimensions 5 pixels by 5 pixels.

Create new document.

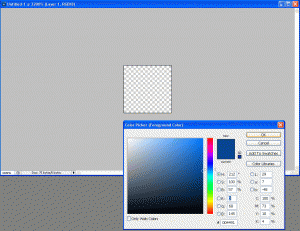
Then pick a good solid background color, something not too dark that will match the colors of your website. I went with a medium blue color (#004491).

Background color.
Background color.

Now we choose a darker color to make the pattern on top of the blue background color. You can make any pattern you want. I’m gunna show you two different patterns. One will be just a dotted pattern and the other will be diagonal line. Here are the two patterns:

Dotted Pattern
Dotted Pattern
Diagonal Line Pattern

I used the dark blue color (#001c3b) for the pattern. Just take the pencil tool:

Pencil Tool
Pencil Tool

and click on the center of the 5×5 canvas to make the dot pattern. For the diagonal pattern just click along a diagonal line with the pencil tool. Then just save the image as a gif file “background.gif.”

Now we can insert it into our webpage as the background:

[code lang=”html”]

[/code]

Click here to see examples of these background patterns.

Filed under: TutorialsTagged with: , ,

Mysql Rows from a Table

If you have a mysql database you can connect to, you can create tables, rows, columns, and do many other mysql functions through PHP. Let’s say we have a mysql database named “my_database”. We will connect to it using the php function “mysql_connect()” and draw information from the tables.

Config.php:
[code lang=”php”]

[/code]

This is usually placed in a config.php file and is included or required on other pages that execute mysql queries.

Now let’s move on to our query file. Let’s say we have a table named “table1.” We will insert the config file to have the connection to the database, and then select columns from the table1.

[code lang=”php”]
0){
// we have some!

// this is used to grab all rows in the table.
while($row = mysql_fetch_array($sql)){
echo ‘Col1: ‘.$row[‘col1′].’
‘;
echo ‘Col2: ‘.$row[‘col2′].’
‘;
echo ‘Col3: ‘.$row[‘col3′].’

‘;
}
} else {
// nothing found.
echo ‘No rows found.’;
}

?>
[/code]

Now, this will return simple HTML of each row with col1: (its value), col2: (its value), etc. We can get fancy and use a table to organize our information better. Here is an example:

[code lang=”php”]
if($count > 0){
// we have some, make the table!
echo ‘

‘;
echo ‘

‘;

// this is used to grab all rows in the table.
while($row = mysql_fetch_array($sql)){
echo ‘

‘;
echo ‘

‘;
echo ‘

‘;
echo ‘

‘;
echo ‘

‘;
}
} else {
// nothing found.
echo ‘No rows found.’;
}
[/code]

This will display something like this:

Col1 Col2 Col3
‘.$row[‘col1′].’ ‘.$row[‘col2′].’ ‘.$row[‘col3′].’
Col1 Col2 Col3
Row1: value1 Row1: value2 Row1: value3
Row2: value1 Row2: value2 Row2: value3
Row3: value1 Row3: value2 Row3: value3
Filed under: Web ProgrammingTagged with: , ,

PHP Image Verification in Forms

One of the most common ways to stop bots and spammers from generating spam in people’s websites is using some form of image verification. This can be done very easily with just PHP and Sessions. Using image verification acts as a human detector, to make sure the viewer of that page is not a bot of some kind. Bots can cause damage to your server by overloading it with spammed content and flooding your boards with unwanted links and text.

Let’s say we have a form that submits a few fields and possibly a file:

[code lang=”html”]

Field 1:
Field 2:
File:

[/code]

Now, this form will submit three variables: field1, field2, and the file.

This form does not have any image verification added in. So any bot could simply process this page over and over to flood the server with crap. 🙁 So we are going to add a simple image verification to the form. To do this we make image.php:

[code lang=”php”]

[/code]

Now we must add the field to our form:

[code lang=”html”]
Verification: &amp;nbsp;

[/code]

Notice I used the class “imgverification.” We must add this to our <head> tags of the page:

[code lang=”html”]

[/code]

We must also make sure we include our session_start() on all pages we use session variables on. So on our form page, the image page, and submit page.

Now when the form is submitted to submit.php we check the submitted input for $_POST[“verification”] to $_SESSION[“md5_image_verification”].

[code lang=”php”]

[/code]

function simple_image($width,$height){
$image = imagecreate($width,$height);

$alphanum = “ABCDEFGHIJKLMNOPQRSTUVWXYZ0123456789”;
$rand = strtoupper(substr(str_shuffle($alphanum),0,6));
$_SESSION[‘simp_image_verification’] = $rand;
$_SESSION[‘md5_simp_image_verification’] = md5($rand);

$bgColor = imagecolorallocate($image, 231,231,231);
$textColor = imagecolorallocate($image, 0,0,0);
$textSize = imagefontheight(1);
imagestring ($image, 5, 8, 2, $_SESSION[‘simp_image_verification’], $textColor);
header(“Expires: Mon, 26 Jul 1997 05:00:00 GMT”);
header(“Last-Modified: ” . gmdate(“D, d M Y H:i:s”) . ” GMT”);
header(“Cache-Control: no-store, no-cache, must-revalidate”);
header(“Cache-Control: post-check=0, pre-check=0”, false);
header(“Pragma: no-cache”);
header(‘Content-type: image/jpeg’);
imagejpeg($image);
imagedestroy($image);
return true;
}

Filed under: TutorialsTagged with: , , ,

Javascript innerHTML

Using Javascript, you can change the content of a certain tag just through basic javascript browser functions. This can be useful for navigation systems, content on a page to display, etc.

Here is an example:

[code lang=”html”]

[/code]

This is a basic javascript function to set the innerHTML of one id to the innerHTML of another. Now lets make the html in the body of the page.

[code lang=”html”]

Click here to change the content!

Content #1.

[/code]

When you click the link the content will change to #2.

Here is a good example for using navigation bars:

[code lang=”html”]

Link 1 | Link 2 | Link 3

Navigation details displayed here…

[/code]

You can view a live working version of these here!

Filed under: Web Programming

PHP Upload file from URL

Let’s say you have a form on a page with the input for URL to a file so you can upload it to your server. You can do this using PHP functions.

Here is an example of a form to upload:

[code lang=”html”]

Enter URL:

[/code]

Now on upload.php we need to have PHP run an upload of the file based on the entered URL. Here is how it will look.

The form above submitted two variables, the url text, and the submit button (value “submit”). So when we start the PHP code, we check it was submitted with the submit button.

We trim the url submitted through the form using the function trim() for the url to be accessed then create a filename using the function basename(). We then check that the url exists after having these functions applied to it. This is what we are going to submit to upload.

$file = Opening the url submitted with read-only permissions. This is defined with the “rb.”

[code lang=”php”]
$file = fopen($url,”rb”);
[/code]

Once we have opened the file we create a random number. This is going to be added to the file’s name when we upload it so that no two files have the same name. This is done very simply with the function rand(). Simply set the minimum and maximum for random numbers.

$newfile = Open the new file we are creating on our server. This actually creates the file on the server in the folder $directory with the random number ($rand) and the file’s name ($filename). This is done with writing permissions so that we can write the data from the url file to this one.

[code lang=”php”]
$rand = rand(1000,9999); // random number 4 digits long
$filename = $rand . basename($url); // places random number in front of the url’s base name
$newfile = fopen($directory . $filename, “wb”);
[/code]

If this new file can be created, we start writing the data to the file. To do this we use the function feof(). So if the new file exists now, while we haven’t reached the end of the url file, we write this content to the one on our server. This sounds a little confusing but it is quite easy.

Code:

[code lang=”php”]
if($newfile){
while(!feof($file)){

// Write the url file to the directory.
fwrite($newfile,fread($file,1024 * 8),1024 * 8);
}

}
[/code]

This script basically says write the data of the url file up until we reach 8kb, to the new file we created on the server. You can adjust the maximum size in kb by changing the “8” to whatever you wish. Once it reaches the end of the file, it will stop writing.

Now let’s say we want to check for filetypes. No one wants people uploading unsafe filetypes to their server. This is a serious problem if you do not check the filetypes being uploaded. So once we establish that the file exists through the URL we are going to check its extension to match ones we allow.

$valid_exts = An array of the valid extensions we allow the user to upload. (i.e. image files).

[code lang=”php”]
$valid_exts = array(“jpg”,”jpeg”,”gif”,”png”);
[/code]

$ext = We find the extension of the file by using the function explode(). This function splits the url into an array based on a seperator, in this case the seperator is a period “.” to find the trailing extension. We then set this to all lowercase because that is what our valid extensions are in. Also, we use the end() function to this array because it is possible the url has more than one period in it. We want to make sure we get JUST the extension on the end.

[code lang=”php”]
$ext = end(explode(“.”,strtolower(basename($url))));
[/code]

Here is the complete code:

Upload.php

[codesyntax lang=”php” title=”upload.php PHP Source Code”]<?php
// UPLOAD.PHP
if($_POST[“submit”]){
$url = trim($_POST[“url”]);
if($url){
$file = fopen($url,”rb”);
if($file){
$directory = “./downloads/”; // Directory to upload files to.
$valid_exts = array(“jpg”,”jpeg”,”gif”,”png”); // default image only extensions
$ext = end(explode(“.”,strtolower(basename($url))));
if(in_array($ext,$valid_exts)){
$rand = rand(1000,9999);
$filename = $rand . basename($url);
$newfile = fopen($directory . $filename, “wb”); // creating new file on local server
if($newfile){
while(!feof($file)){
// Write the url file to the directory.
fwrite($newfile,fread($file,1024 * 8),1024 * 8); // write the file to the new directory at a rate of 8kb/sec. until we reach the end.
}
echo ‘File uploaded successfully! You can access the file here:’.”\n”;
echo ”.$directory.$filename.”;
} else { echo ‘Could not establish new file (‘.$directory.$filename.’) on local server. Be sure to CHMOD your directory to 777.’; }
} else { echo ‘Invalid file type. Please try another file.’; }
} else { echo ‘Could not locate the file: ‘.$url.”; }
} else { echo ‘Invalid URL entered. Please try again.’; }
}
?>

[/codesyntax]

When the form is submitted, PHP uploads the file to the directory – $directory – which is set to “./downloads/” by default. The function !feof() reads as – before reaching the end of a file. So while it hasn’t reached the end, write to $directory. Once the function returns false (when we have reached the end of the file) it will stop. The path to the file is given as “$directory.$filename.”

I have made a script for uploading multiple files from a URL or your computer’s HDD viewable here:

https://bgallz.dev/1345/php-upload-multiple-files-url/

Enjoy!
Filed under: PHP, Tutorials, Web ProgrammingTagged with: , , , , ,