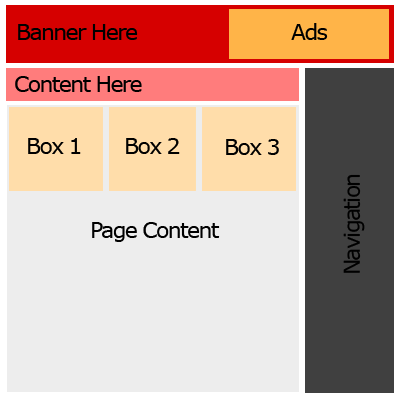
 Using the HTML tag – <div> and the float style property, you can make designs for your websites. Well, you can make layouts for where design could be. This is a good structural tool in laying out where content will be on your web pages, images, blurbs, etc.
Let’s say we want a page to look like this:
First I’m going to set up the CSS styles we will set our <div>’s to in the HTML to give this page the right look as far as padding, margins, borders, etc. Once we have all the styles defined we will call them to the DIV tags in our HTML like so: <div class=”CLASSNAME“>. Using the right float’s in the right order will place our DIVs in the right places to make this layout.
This will go in our <head> tags of the HTML page:
[code lang=”css”]
html, body, center {
padding: 0px;
margin: 0px;
height: 100%;
}
.header {
padding: 8px;
vertical-align: middle;
height: 80px;
background: #d60000;
}
.banner {
float: left;
border: 0;
vertical-align: middle;
width: 500px;
height: 60px;
}
.ads {
padding: 10px 0px;
float: right;
width: 300px;
height: 60px;
vertical-align: middle;
background: #ffb448;
}
.wrapper { /* Main page holder. */
padding: 10px;
width: 875px;
background: #fff;
height: 100%;
}
.page {
padding: 10px 0px;
width: 630px;
float: left;
height: 100%;
}
.top {
padding: 5px;
height: 40px;
background: #ff7c7c;
margin:0;
}
#boxes {
padding: 5px 0px;
}
.box {
width: 197px;
height: 197px;
padding: 3px;
margin: 3px;
background: #ffddaa;
float: right;
}
.rightside {
float: right;
text-align: center;
height: 100%;
padding: 10px 0px;
}
.nav {
padding: 5px;
background: #ccc;
width: 200px;
height: 100%;
min-height: 600px;
}
.content {
margin: 20px 0px;
width: 600px;
text-align: left;
}
[/code]
Now we have to write the HTML to use these styles appropriately.
Here is our <body> HTML:
[code lang=”html”]
Content Here, lots and lots of content here! Content Here, lots and lots of content here! Content Here, lots and lots of content here! Content Here, lots and lots of content here! Content Here, lots and lots of content here! Content Here, lots and lots of content here! Content Here, lots and lots of content here! Content Here, lots and lots of content here!Content Here, lots and lots of content here!
Content Here, lots and lots of content here!Content Here, lots and lots of content here!Content Here, lots and lots of content here!Content Here, lots and lots of content here!Content Here, lots and lots of content here!
[/code]
Take a look at the HTML in action here!
If you notice in the HTML the box’s are placed in descending order inside the “boxes” div ID. Since the box class is set to to the right:
[code lang=”css”]
.box {
float: right;
}
[/code]
We put the boxes in descending order so that the HTML will read down the page and float the first one to the right, then the next, then the last. So it floats BOX3, then BOX2, then BOX1.
Using the float style property of DIV tags is really useful in making layouts because it does not require any real guidelines to follow as far as where it is on the page. This sounds a little wordy but basically with a combination of float, and position style attributes you can make your DIV’s go where ever you want.