Category: HTML

Avoid Duplicate Content Pages

Many people do not think about the possibility of duplicate content pages on their website, when this is very common and easily avoidable. All it takes is a little HTML in the head tags of the page.

What is a duplicate content page?

Duplicate content is content that is showing up on the Internet by multiple URLs. Another words, a page like aboutus.php might be coming with the same content as aboutus.php?do=send.

This causes some problems with search engines as far as determining which page the engine should use for query matches, page ranking, use of meta tags between the two versions, and just which one to include for their indices.

How do you avoid duplicate content?

Let’s say these are your pages that are coming with the same content:

Original source:
post.php?id=1
.

Duplicate content pages:
post.php?id=1&lang=en
post.php?id=1&do=login

On post.php we can include a <link> tag that will reference to the original source so Search Engines gather the original correct information from the server, rather than trying to decide between the serveral duplicate pages.

Place in the <head> tags of post.php:

[code lang=”php”]
echo ‘‘;
[/code]

This will take the $id and put it into the URL as just post.php?id=$id. So any other URL parameters, such as lang=en, or do=login, will not be read as a duplicate page, but tell search engines to use the content of just post.php?id=$id.

If you do not need to use PHP and you just want the page to load a set content of just post.php then you would use the tag like so:

[code lang=”html”] [/code]

When using this method, you want to be sure that you are consistent throughout your website with your canonical URLs. If your canonical url is like: “http://www.bgallz.org/” then you want to use “www” in all of your URL references and tags for the domain.

Now, if you have pages that you do NOT want included in any search engine queries or crawled by search engine bots, then you want to use a META tag with “noindex, nofollow”.

To block a page from search engine indexes places the following in the <head> tags:

[code lang="html"]

[/code]

Walla!
Filed under: HTML, TutorialsTagged with: , ,

HTML Div Float Property

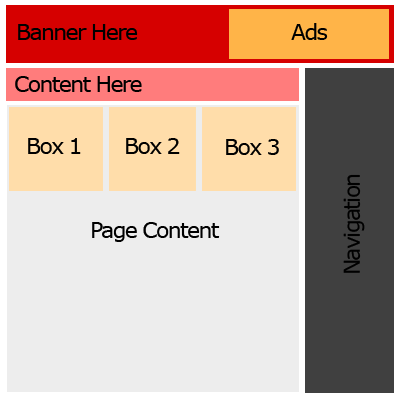
Div Float LayoutUsing the HTML tag – <div> and the float style property, you can make designs for your websites. Well, you can make layouts for where design could be. This is a good structural tool in laying out where content will be on your web pages, images, blurbs, etc.

Let’s say we want a page to look like this:

First I’m going to set up the CSS styles we will set our <div>’s to in the HTML to give this page the right look as far as padding, margins, borders, etc. Once we have all the styles defined we will call them to the DIV tags in our HTML like so: <div class=”CLASSNAME“>. Using the right float’s in the right order will place our DIVs in the right places to make this layout.

This will go in our <head> tags of the HTML page:

[code lang=”css”]
html, body, center {
padding: 0px;
margin: 0px;
height: 100%;
}
.header {
padding: 8px;
vertical-align: middle;
height: 80px;
background: #d60000;
}
.banner {
float: left;
border: 0;
vertical-align: middle;
width: 500px;
height: 60px;
}
.ads {
padding: 10px 0px;
float: right;
width: 300px;
height: 60px;
vertical-align: middle;
background: #ffb448;
}
.wrapper { /* Main page holder. */
padding: 10px;
width: 875px;
background: #fff;
height: 100%;
}
.page {
padding: 10px 0px;
width: 630px;
float: left;
height: 100%;
}
.top {
padding: 5px;
height: 40px;
background: #ff7c7c;
margin:0;
}
#boxes {
padding: 5px 0px;
}
.box {
width: 197px;
height: 197px;
padding: 3px;
margin: 3px;
background: #ffddaa;
float: right;
}
.rightside {
float: right;
text-align: center;
height: 100%;
padding: 10px 0px;
}
.nav {
padding: 5px;
background: #ccc;
width: 200px;
height: 100%;
min-height: 600px;
}
.content {
margin: 20px 0px;
width: 600px;
text-align: left;
}
[/code]

Now we have to write the HTML to use these styles appropriately.

Here is our <body> HTML:

[code lang=”html”]


Ads Here
Content Here
Box 3
Box 2
Box 1

Content Here, lots and lots of content here! Content Here, lots and lots of content here! Content Here, lots and lots of content here! Content Here, lots and lots of content here! Content Here, lots and lots of content here! Content Here, lots and lots of content here! Content Here, lots and lots of content here! Content Here, lots and lots of content here!Content Here, lots and lots of content here!

Content Here, lots and lots of content here!Content Here, lots and lots of content here!Content Here, lots and lots of content here!Content Here, lots and lots of content here!Content Here, lots and lots of content here!

[/code]

Take a look at the HTML in action here!

If you notice in the HTML the box’s are placed in descending order inside the “boxes” div ID. Since the box class is set to to the right:

[code lang=”css”]
.box {
float: right;
}
[/code]

We put the boxes in descending order so that the HTML will read down the page and float the first one to the right, then the next, then the last. So it floats BOX3, then BOX2, then BOX1.

Using the float style property of DIV tags is really useful in making layouts because it does not require any real guidelines to follow as far as where it is on the page. This sounds a little wordy but basically with a combination of float, and position style attributes you can make your DIV’s go where ever you want.

Filed under: HTML, Tutorials, Web Programming, XHTMLTagged with: , , , , , , ,

HTML body tag

The body tag in a HTML document defines the documents body. This includes the majority of the displayed content on the page, such as hyperlinks, images, etc.

Here is a basic HTML document with the body tag:

[code lang=”html”]


HTML Document


Body content.


[/code]

The body tag is supported by all major web browsers.

Body tag standard attributes:

Attribute Value Information
class classname Specified class name to an element.
dir rtl

ltr

Specified text direction to an element.
id id Specified id name to an element.
lang language_code Specified language to an element.
style style Specified style definition to an element.
Filed under: HTMLTagged with: ,

Using HTML Meta tags

Meta HTML tags can be very helpful for gaining some search engine rank and promoting your website better. However, these simple tags are not going to drive your website immediately to the top of the lists.

Meta tags are basically information located in the head of your webpage(s). This content is not visible to the viewer, however does communicate with the browser.

Some of the most common meta tags include:

  • Description
  • Keywords
  • Character Set
  • Author
  • Robots

Here is an example for meta tags of a website about fast cars:

[code lang=”html”]


[/code]

The robots tag is used to tell whether or not a page should be indexed by search engines. For example, if you don’t want your page to be indexed use the following code:

[code lang=”html”]

Page Not Indexed


[/code]

The meta tags are supported by all major browsers out there. These can help your website with it’s niche and search engine listings.

Filed under: HTMLTagged with: , ,